Tag Archives: Epic

DIY Epic or Make Your Own Epic Necron Army!

Back with another quick blog post here. This time I wanted to share some really cool and easy DIY Epic Necron ideas that some of the members of our group have come up with.

Its true; Epic Armageddon is no longer officially supported by GW. But it’s far from dead. The rules are all still freely available on the internet, and army lists are still actively being developed and playtested by fans. The NetEA Website is your one stop site for rules and army lists ready to play straight from the box. All completely free!

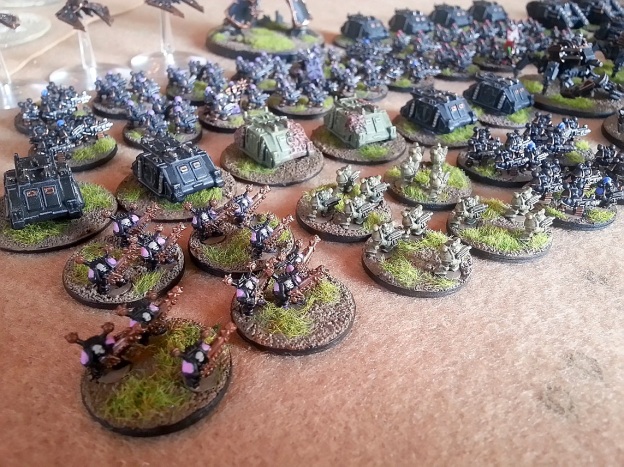
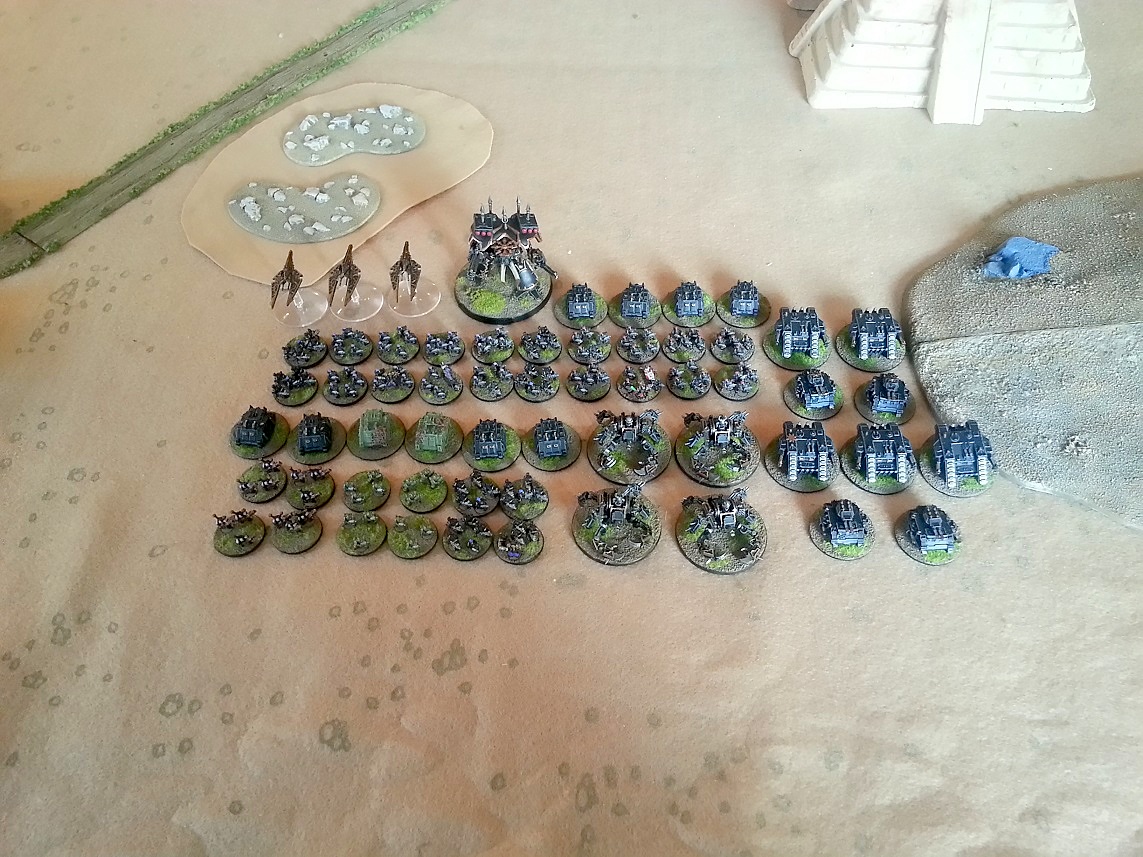
Ok, so you have all the rules you need and every army list you could possibly dream of. Now how do you find an army? You can occasionally find good deals on ebay. Space Marines and Orks are fairly abundant and reasonably priced. Or, you can buy proxies and get creative! GW never actually made Necron models for Epic, so, if you want to play with them, you have to do it yourself. Kind of, anyway. And that’s exactly what some of the guys in our group have done. We happen to have three Necron players in our little group. And with all of the cool kit available for Necron out there, it’s very easy to make an army. Check out their stuff!

DIY Necron 2

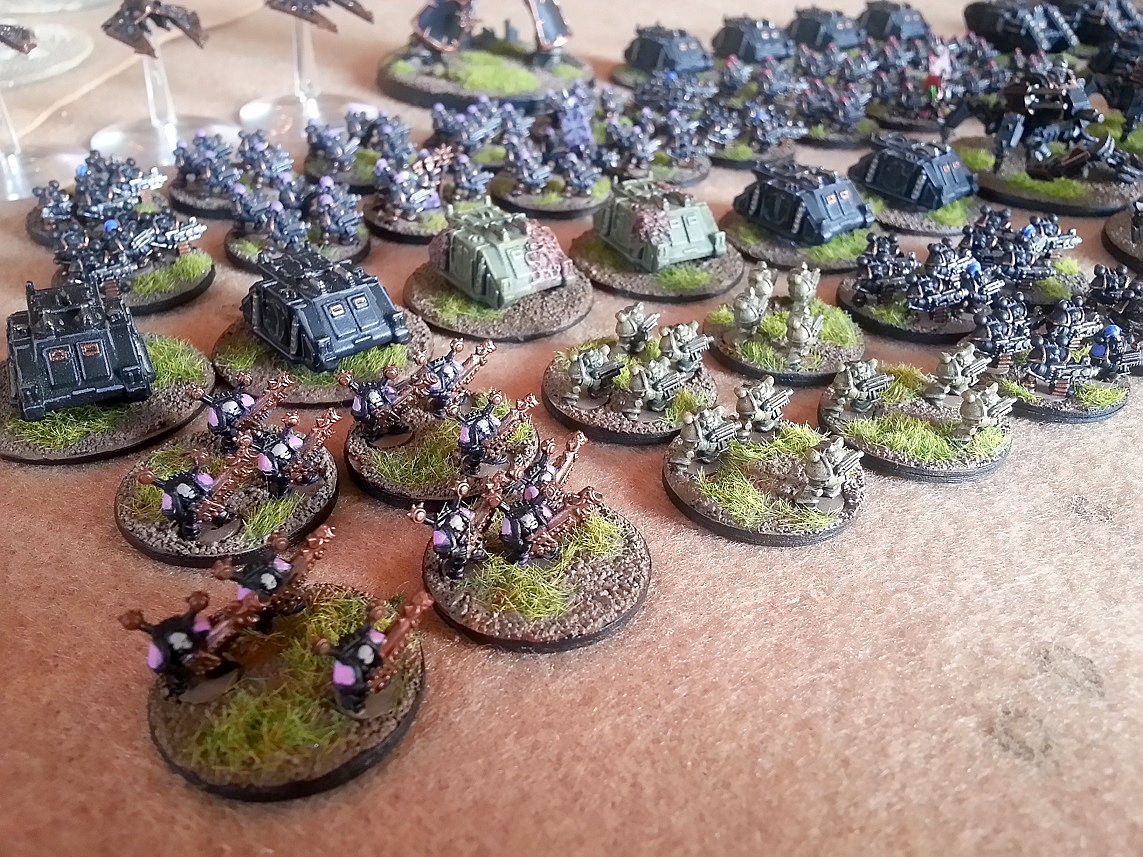
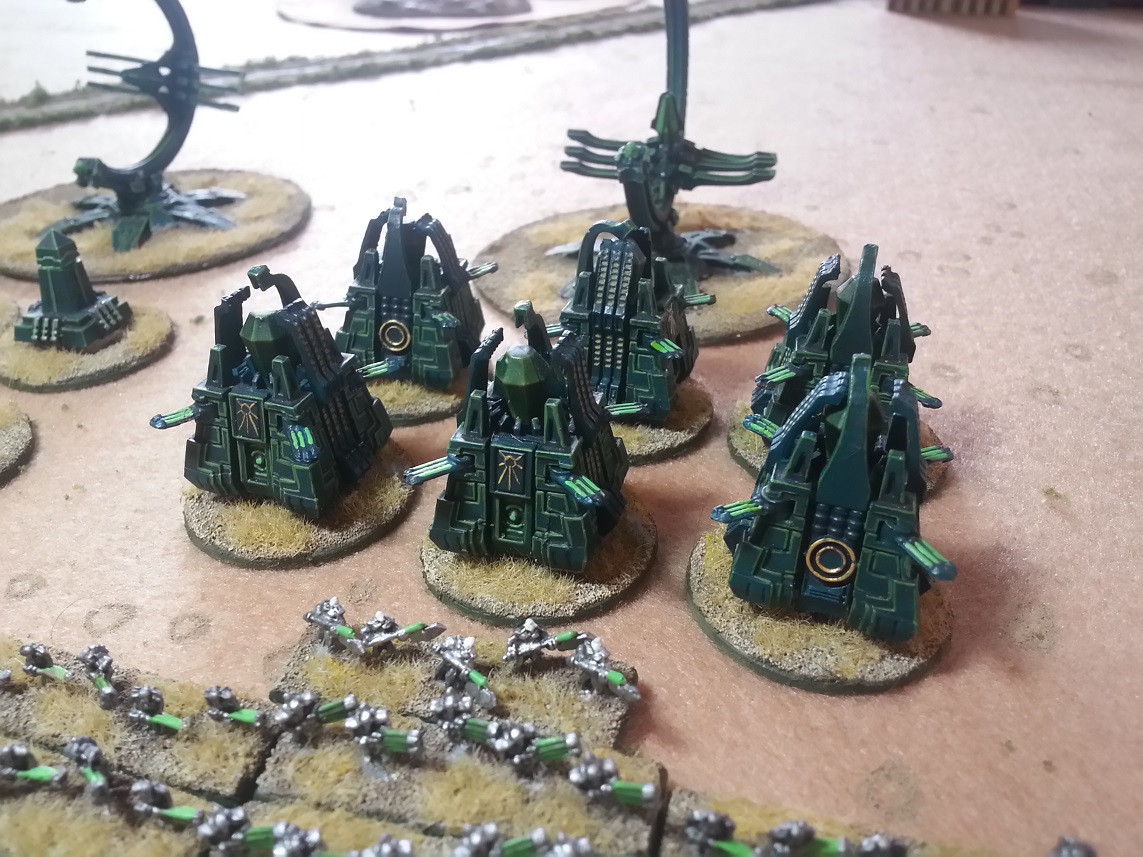
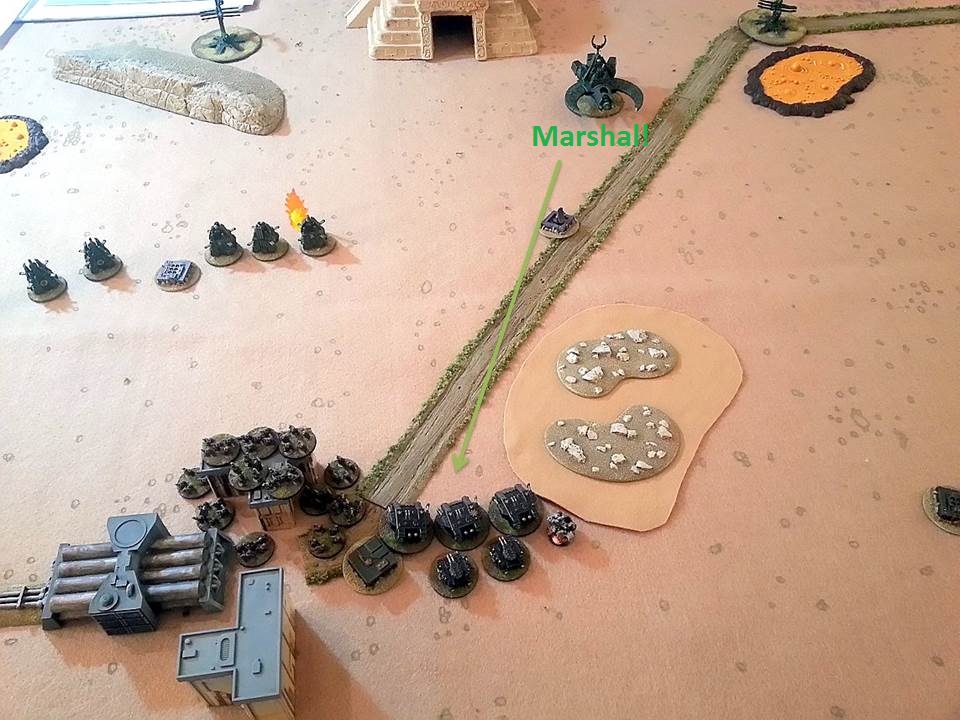
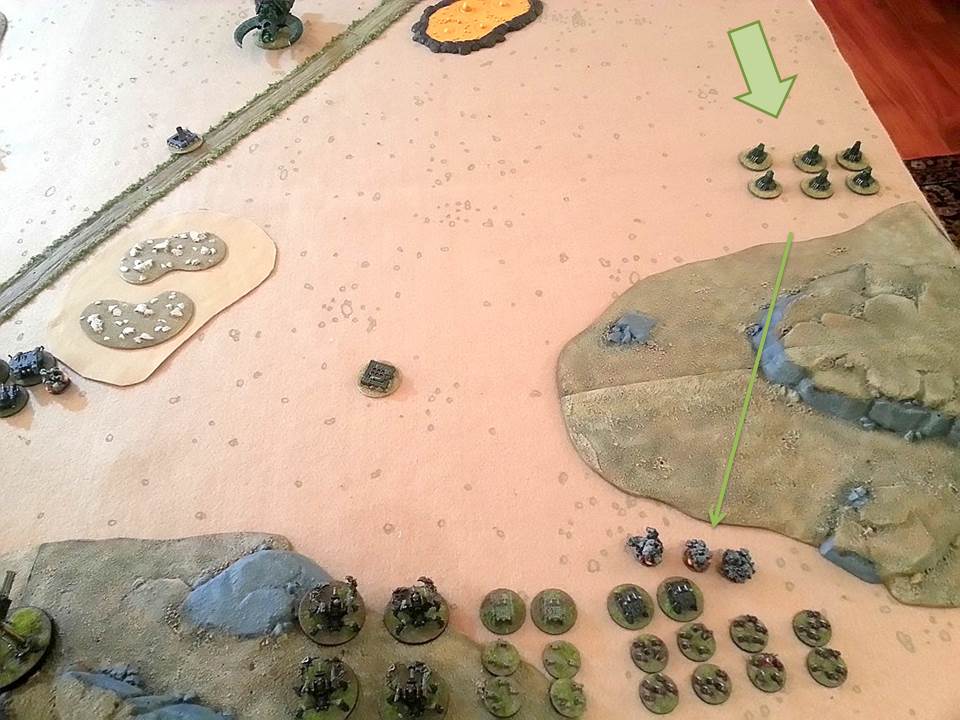
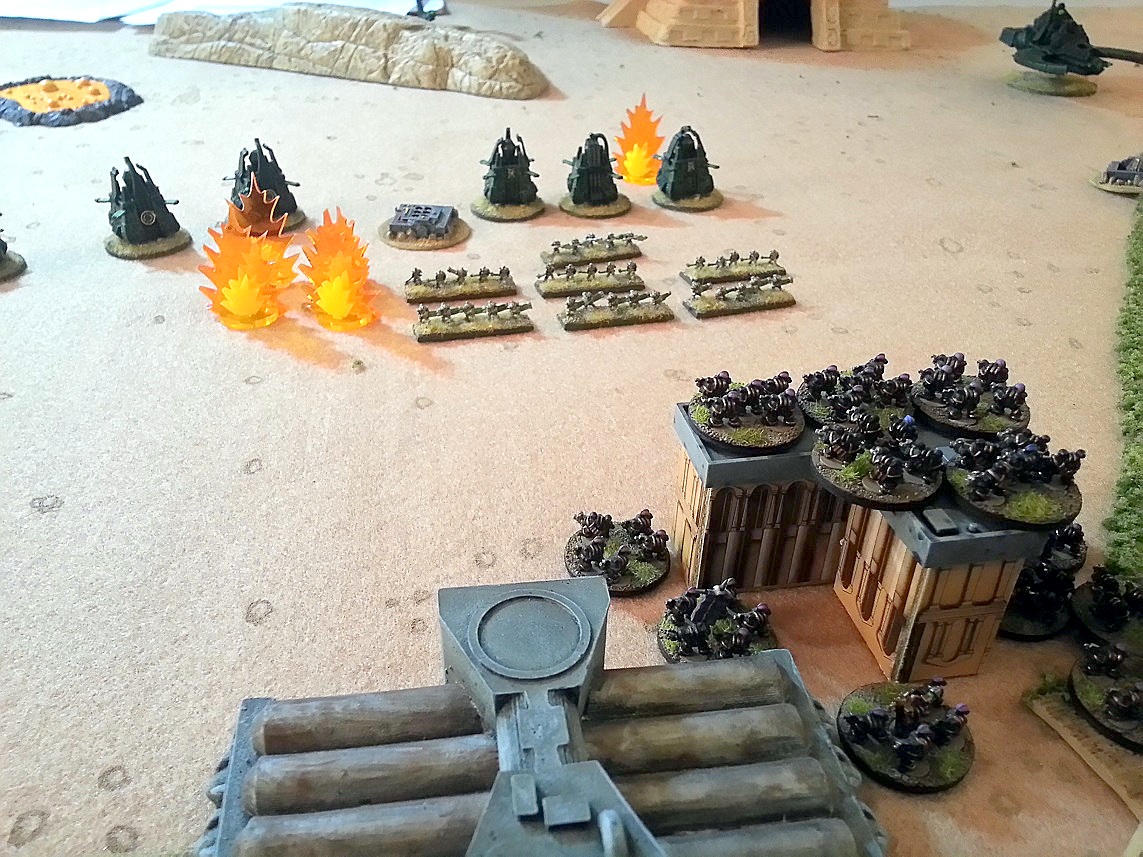
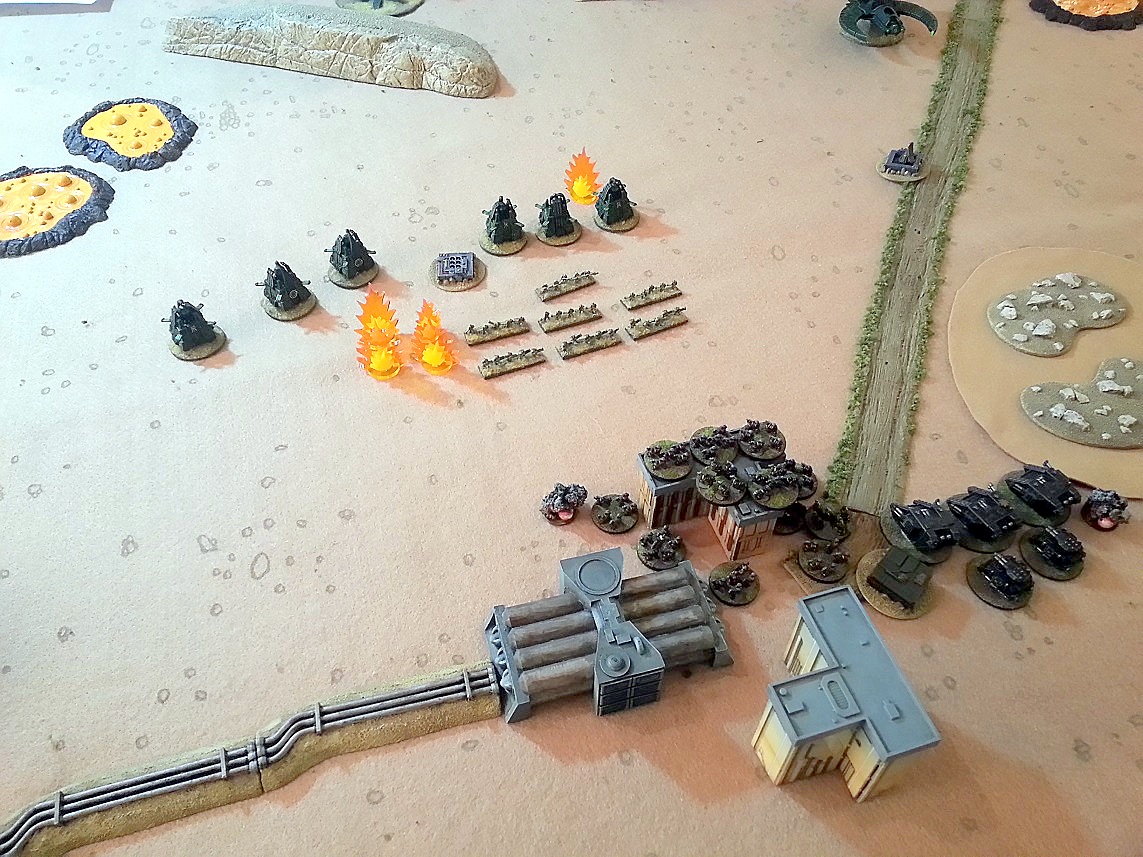
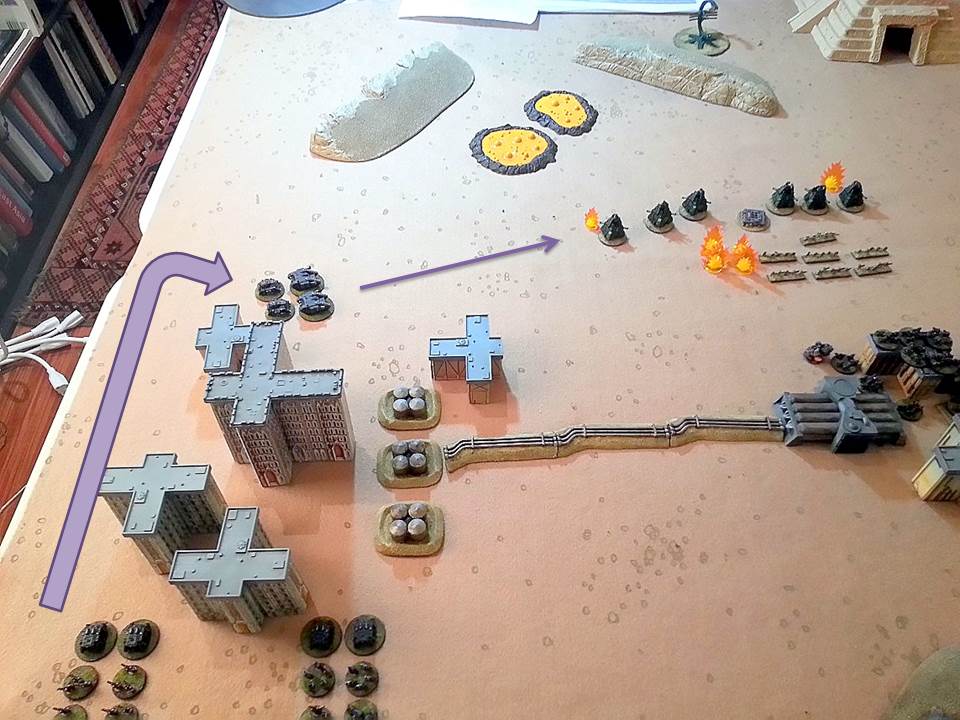
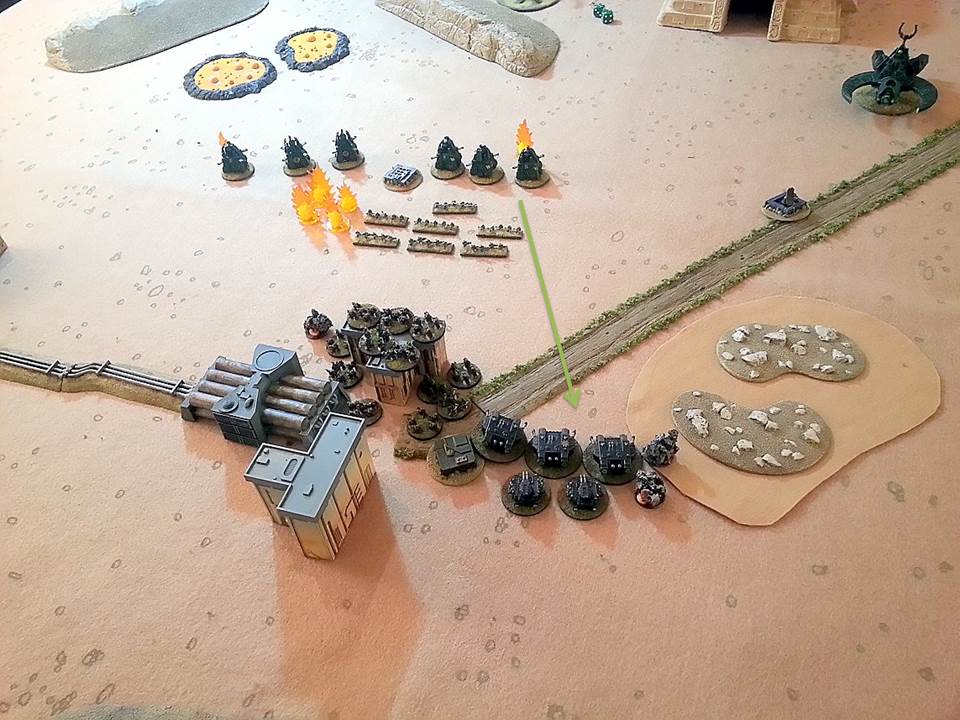
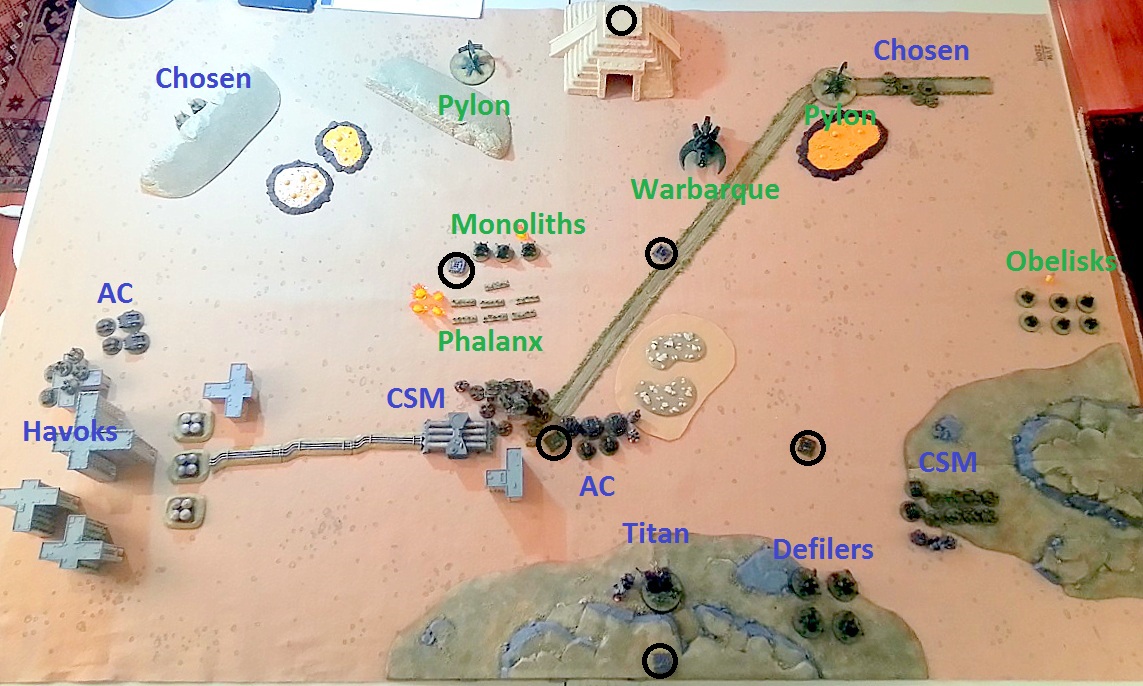
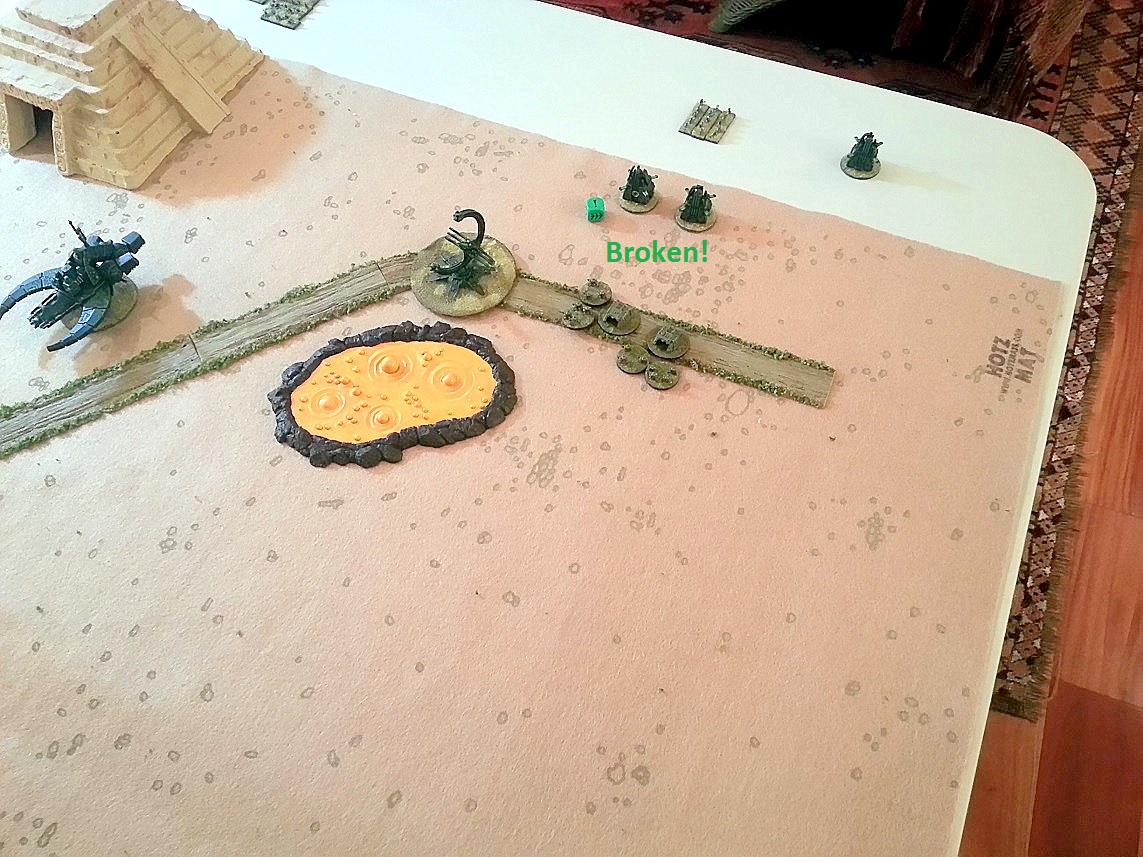
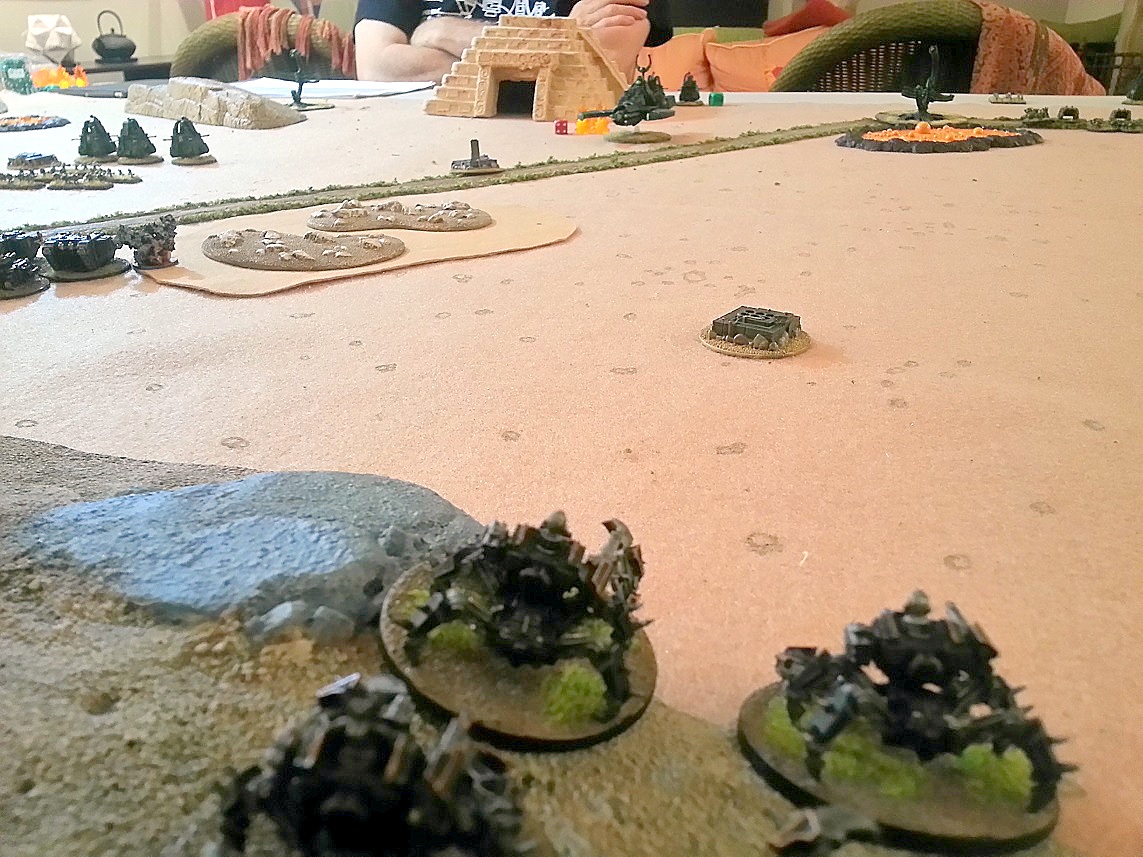
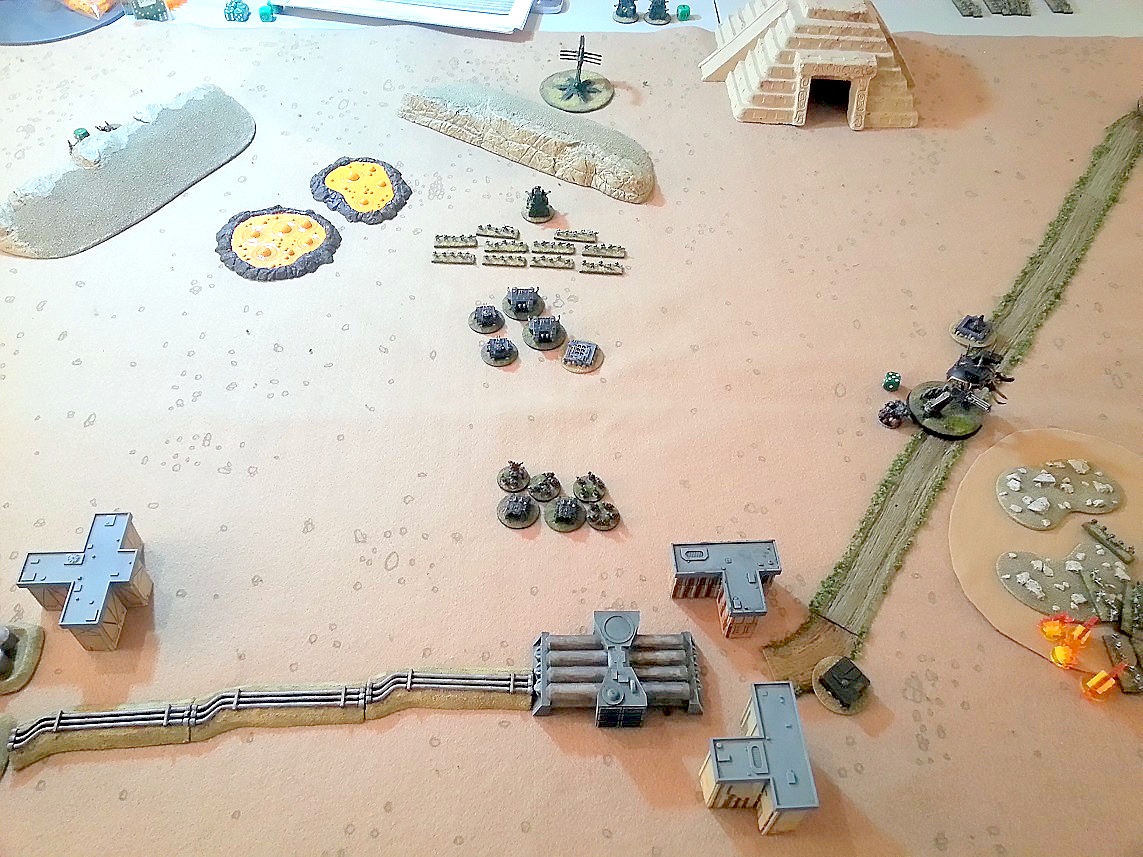
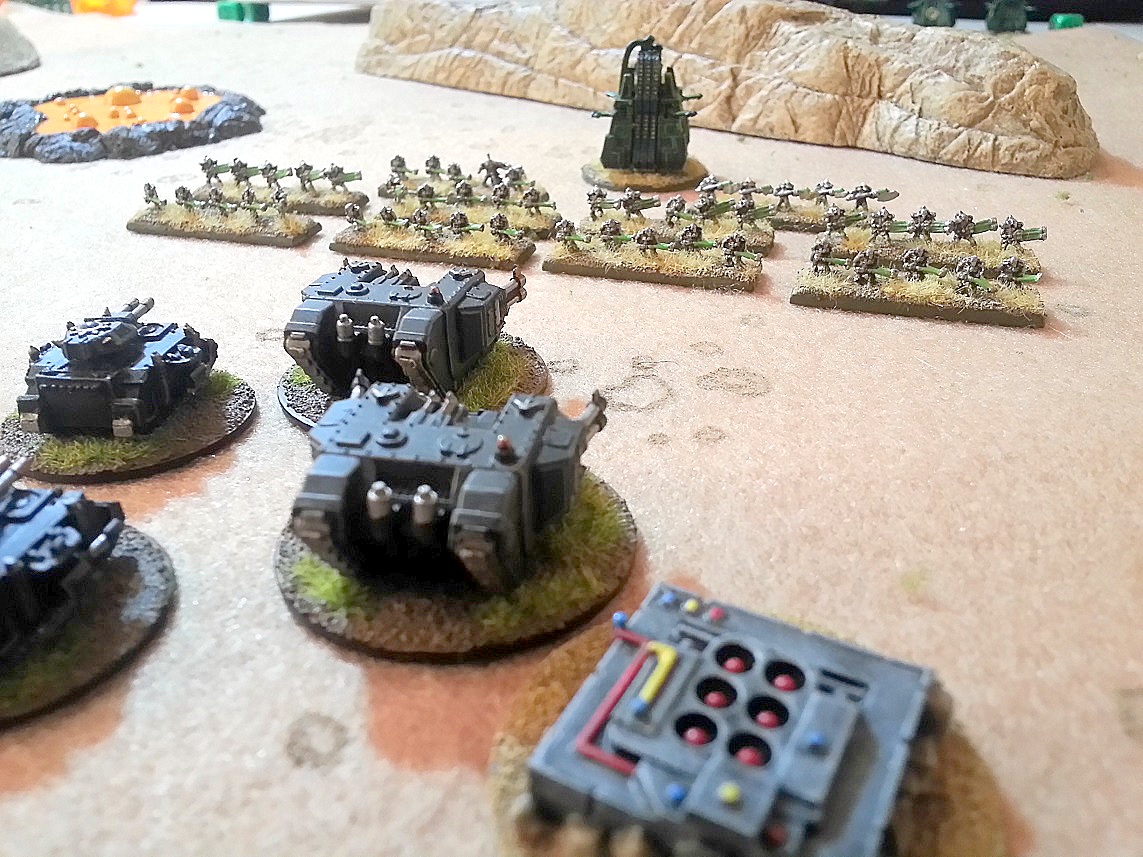
The “warriors” and “immortals” are Edenite Infantry from Steel Crown Miniatures As you can see, they make some pretty nice Necron proxies. While you are on their site, have a look at their other 6mm products as well. The pylons and monoliths that you see in this picture were never produced by GW, and are, unfortunately, no longer produced and very difficult to find these days. However! Where there’s a will, there’s a way. Have a look at what one enterprising member of our group did.

DIY Necron 3

Voila! Monoliths! How cheap and easy is this? And they look great! I might even go as far as to say I prefer them to the “official” models. If you play 40k at all, you may recognize them as Dispersion Shields that the Lychguard carry. Don’t play 40k? Don’t have any buddies who have some of these shields spare? No problem. You might just be able to buy them here or here Of course, a quick search for “Necron bits” or “40k bits” on ebay or google will reveal any number of fine suppliers.

DIY Necron 4

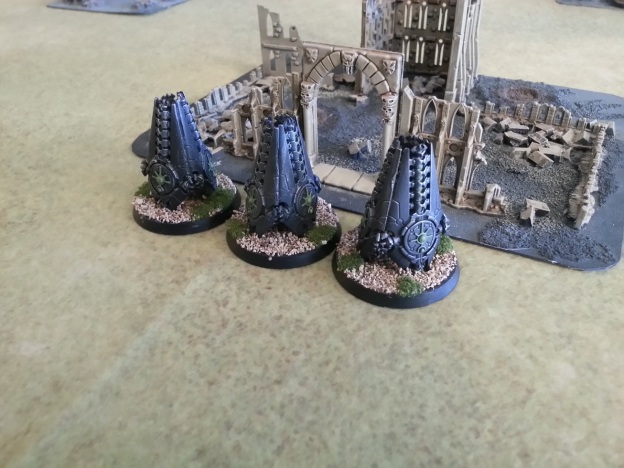
And there you have your Pylon! I think he said this was made from a 40k Necron Deathmark rifle and uhh… I don’t know. I don’t play 40k anymore! But dig around on those bits sites and I’m sure you will find what you’re looking for.

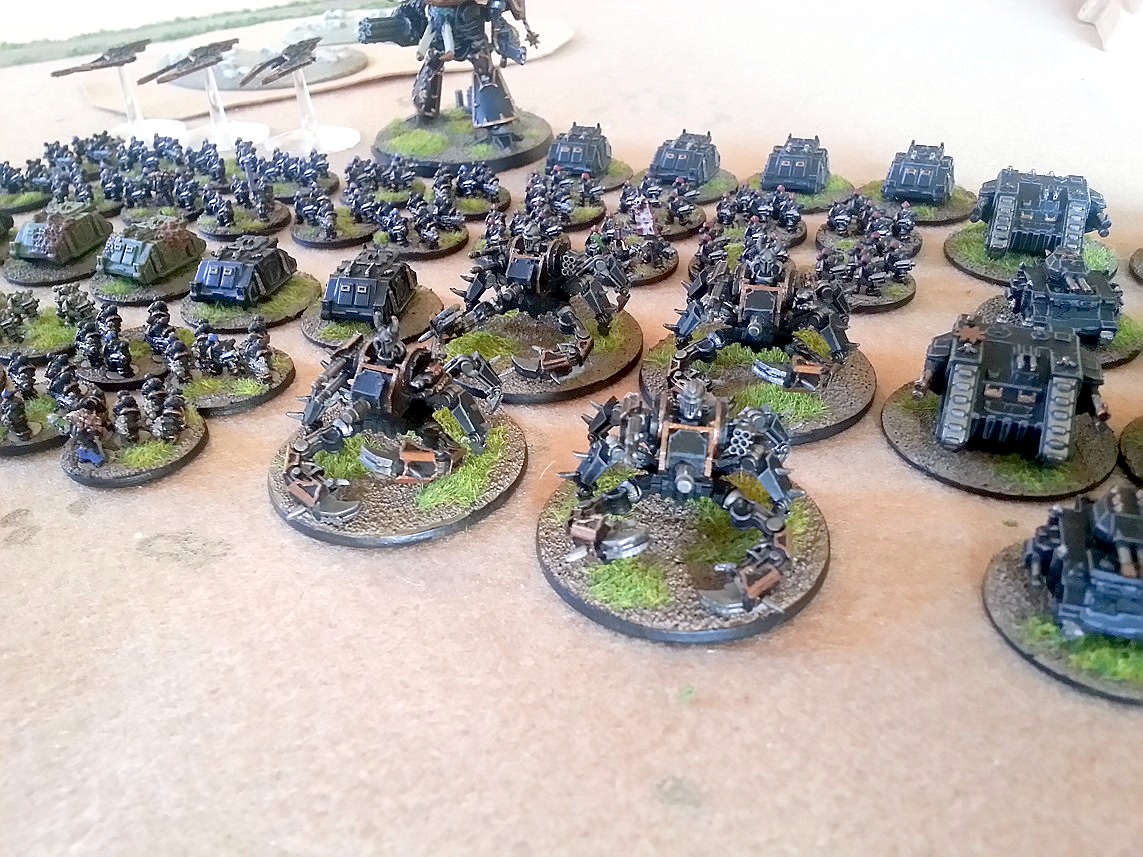
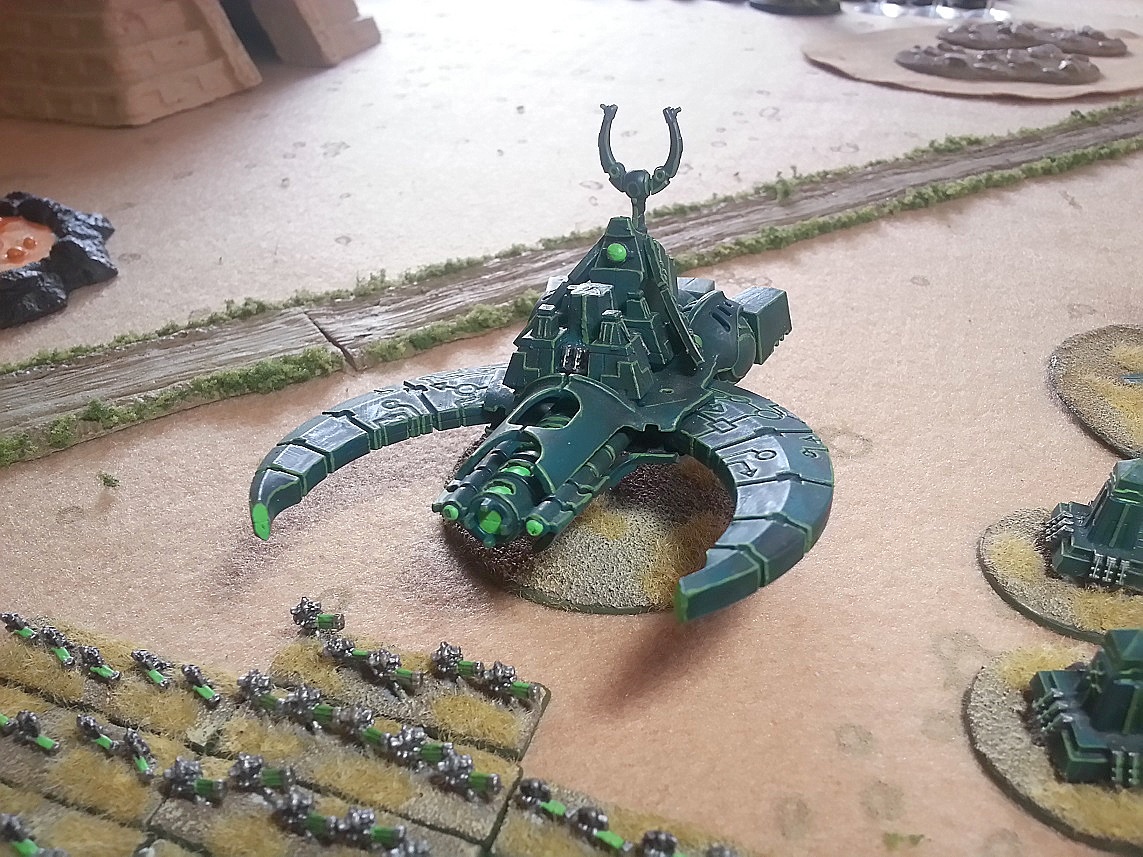
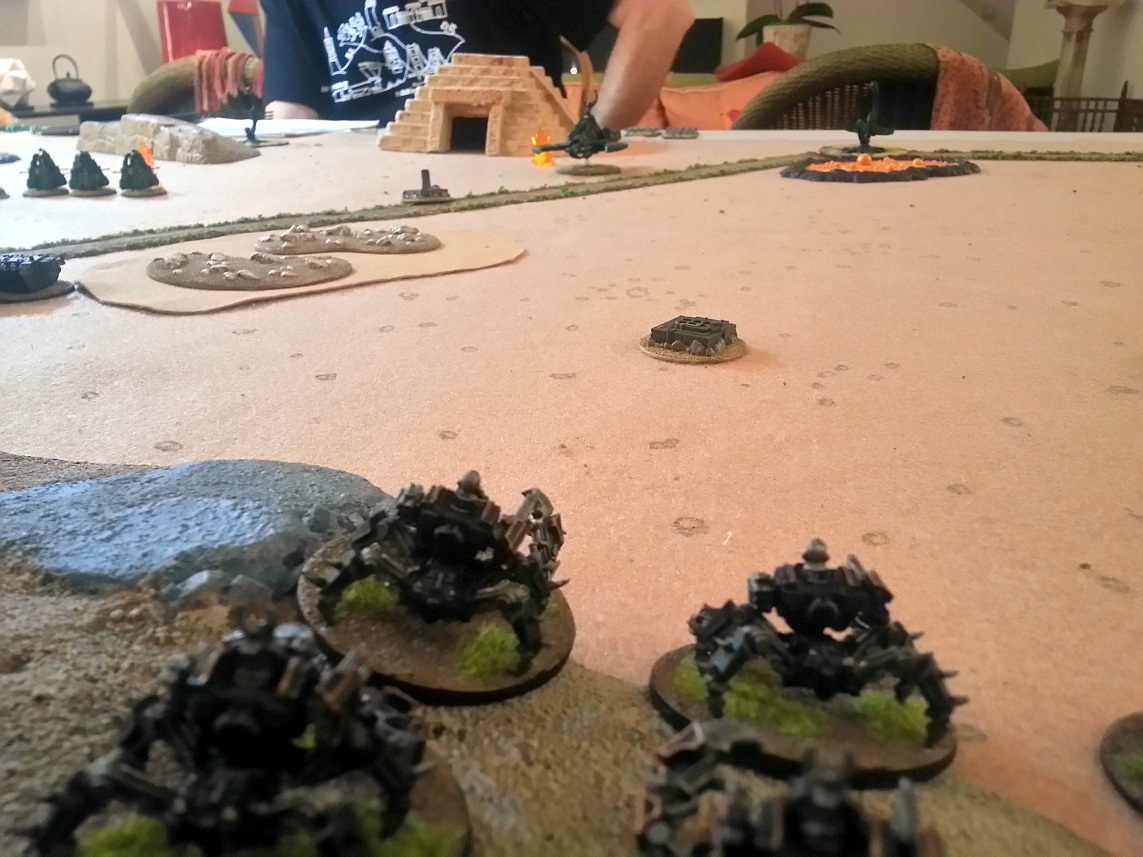
What’s one of the coolest things about playing 40k at this scale? You get to take big ass tanks and flyers and titans and a) not spend a fortune and b) not have them take up the whole table! The Necron in Epic get to take some pretty cool toys. One of them is a baddie called a Warbarque. Think of it as a creepy, floating Warhound titan. That shoots… death rays. And stuff. To my knowledge, no model was ever produced for this, bootleg or otherwise, so you are free to let your imagination run wild.

DIY Necron 5

This is what one person came up with. I believe it is entirely made up of bits from the 40k Necron range.

Or you can go for a ready made option. Another lovely model from Steel Crown

DIY Necron 6

This is the Khazari Droid Controller. Or the Heavy Metal Grimdark Version is also available (now with MOAR SKULLS!!).

Need a Ghost Arc? Well, there might be some trolls who live under a bridge in eastern Europe out beyond the reach of Grandma Wendy who might be willing to sell you a “Necropolis Ghost Ship” (UPDATE: Some little GW fanboy who thinks he’s the IP Police narced to GW, and it is now no longer available – get a life, would you?)

Ghost Arc

Oh! What about a Nightbringer? That can be arranged as well!

DIY Necron 8

There he is in the middle of the ruins looking all dark and brooding. This is a Cairn Wraith from the Warhammer Fantasy Vampire Counts line.

Again, with all the cool kit that is available from the 40k range and elsewhere, your imagination is the limit. Want to make a Tesseract Vault? You can do that! Take a look at this (very) WIP model from the workdesk of one of our guys –

DIY Necron 7

Bend some wire into shape and paint it bright green to make it look like crackling energy and / or put a little glowy dude in the center there and you have something pretty cool. For more inspiration, I bet a quick dig through the Warhammer Fantasy Tomb Kings range would yield all kinds of fun bits that you can use.

There you have it. I’ve provided you with all the ideas, rules, and links to make it happen! And when these links go dead, well, at least you know what terms to search for. This means that YOU NO LONGER HAVE AN EXCUSE! You must build an Epic army. You know you want to! You’re here, aren’t you? A man doesn’t walk on the lot unless he wants to buy! 🙂

Oh, and the price? Our guys spent between $150 – $200 for an entire army. The one with the really nice green paint job and the rare items spent $300 – but it was already painted and had the rare items. Necron not your thing? Check out the links to other proxy models on the right. Now you really have no excuse!

If you find this article useful, please do let me know in the comments. Also, if you have an Epic army that you’ve done a lot of DIY work on, let me know! I’d love to feature it or link to it.

A Day of Epic Gaming and a 16,000 Point Mega Battle!

The Los Angeles Epic crew had a fun day of nerding out playing Epic today.  We also had our league championship match.  Biel-Tan Eldar defeated Adeptus Mechanicus PDF to take the crown.  Three tables of gaming and tons of fun, featuring a 2 vs 2 mega battle with 8,000 points per side.  Ghazkull’s Horde vs. Iron Warriors and Black Legion!

The forces face off!  Note the Ork commander’s shirt 🙂Epic4a

A swirling vortex of violence!  That’s a lot of Orks!
Epic6a

Chaos sets up an armored wall of death to repel the Ork onslaught
Epic9a

Both sides are battered, but the Orks are taking the worst of it
Epic10a

Chaos armor surveys the battlefield
Epic11a

The Orks are routed!  Chaos repels the Ork invasion
Epic13a

Check out this super cool Ork objective
Epic1a

And on another table… Tyranids take the city by storm!
Epic2a

Showcase Battle Report – Black Legion vs. Necron

“And it is called the Celestial Orrery?”

“Yes, my Lord” replied Ashkharaofth, Grand Sorcerer of Tzeentch, Seer of Ways.  “It is an ancient artifact, older than Mankind itself.  Within the web of living metal and hologram may be found every star in the galaxy.  By merely snuffing out one of the lights with your fingers, you cause its physical counterpart to go Supernova, engulfing nearby worlds in fiery oblivion”

Abaddon considered for a moment.  “Such wondrous technology is wasted in the hands of the Necron.  It shall be mine.  Where do we find this artifact?”

“Its location is shrouded in mystery to even me, my Lord.  Ancient rumors, whispers, and hearsay are all that I hear when I conduct the sacred divination rituals.  However… Tzeentch has blessed me with a vision.  I see a nearby mining planet… the ancient dead awakened from their slumber… whispers… voices… yes…  long forgotten gods… massacre… bloodshed…” Ashkharaofth appeared lost in reverie.

“It is here, my Lord”, he said, pointing to and highlighting a planet in the holographic map of the galaxy before him.  “The whispers tell me that the information we seek may be found here, on the mining world of Arjuna IX”

“You mean to tell me that the Orrery is located on this insignificant mining colony?”, Abaddon inquired, incredulous.

“No, my Lord.  My visions indicate that this is an awakening Tomb World.  Perhaps we may find clues as to its location by—”

“FIND IT!!” Abaddon roared, wind blasting from the sheer force of his voice, his eyes glowing red with impatient rage.  “I care little for your riddles and less for your presence!  Get out of my sight and do not return until you have found it!”

“My Lord”, the Sorcerer bowed deeply and scurried out of Abaddon’s chamber.

An expeditionary force lands on the Imperial mining colony.

The Armies

Black Legion
RETINUE [425]
8 Chaos Space Marines, (Chaos Undivided), Chaos Lord, 4 Havocs

RETINUE [365]
8 Chaos Space Marines, (Chaos Undivided), 4 Rhino, Chaos Warlord (Supreme Commander)

ARMOURED COMPANY [325]
(Chaos Undivided), 2 Chaos Predator, 3 Chaos Land Raider

ARMOURED COMPANY [250]
(Chaos Undivided), 2 Chaos Predator, 2 Chaos Land Raider

HAVOC RETINUE [225]
4 Havoc units, (Chaos Undivided), Chaos Lord, 2 Rhinos

RAVAGER TITAN [650]
(Chaos Undivided)

DEFILER ASSAULT PACK [275]
4 Defilers, (Chaos Undivided)

CHOSEN [145]
4 Chaos Space Marine Scouts, (Chaos Undivided), 2 Rhino

CHOSEN [145]
4 Chaos Space Marine Scouts, (Chaos Undivided), 2 Rhino

HELL BLADES [200]
3 Hell Blade Fighters, (Chaos Undivided)

BR001

BR002

BR003

BR004

Necron
INFANTRY PHALANX [505]
Necron Lord, 6 Warriors, 2 Tomb Spyders, Pariahs, 3 Immortals

INFANTRY PHALANX [405]
Necron Lord, 6 Warriors, Pariahs, 3 Immortals

INFANTRY PHALANX [405]
Necron Lord, 6 Warriors, 3 Immortals, Pariahs

MONOLITH PHALANX [275]
3 Monoliths

MONOLITH PHALANX [275]
3 Monoliths

PYLON [200]

PYLON [200]

ARMORED PHALANX [300]
6 Obelisks

TOMB COMPLEX [75]

WARBARQUE [350]
Supreme Commander

BR005

BR007

BR008

BR006

After dropping on planet and massacring the miners, the Chaos forces march steadily toward the menacing ziggurat, wary of the unknown enemy…BR009

They don’t need to wait long.  Strange glowing structures appear out of thin air before them, shimmering into existing as if a mirage
BR010

Quickly the battle is joined.  A Black Legion armored company advances and fires on the strange monoliths, but the laser blasts are simply absorbed by the alien metalBR011

The Necron Pylon crackles to life, and searing beam of light flickers toward the titan, dropping one of its shieldsBR012

It is followed an instant later by another blinding beam, which drops one more shield
BR013

The Defilers open fire on the Warbarque with their long range battle cannons.  But, again, the shells are merely absorbed by the strange alien metalBR014

The alien craft appears to spit the shells out of its hull.  All damage is repaired as it fires upon the Black Legion Armored Company, but causes no damage
BR015

The eerie Monoliths float listlessly forward, and beams of light pour forth, destroying two RhinosBR016

The Chosen of Nurgle march forward fearlessly, looking to assault the Pylon or to harass the Necron flanks
BR017

Metallic undead infantry come pouring forth from glowing portals located in the center of the MonolithsBR018

The garrisoned Chaos Space Marines unleash a hail of overwatch autocannon fire, cutting down three standsBR019

The Necron fire back, but only cause some suppressionBR020

A Black Legion Armored Company sallies forth and fires on the Monoliths, but, again, the strange metal seems impervious to their lascannon fireBR021

Monoliths fire beams at the Land Raiders, but their thick hulls hold true
BR022

CSM Havoks occupy a building and let loose with their autocannons.  The shells find their mark, and one of the Monoliths shatters!  Finally!  The Monolith formation is broken
BR023

The Necron have no more activations for this turn.  A CSM Retinue advances along the right flank and fires on the Obelisks, but cause no damage
BR024

The Slaanesh Chosen march along the left flank and take cover behind a large sand dune
BR025


The Titan marshals, clearing blast markers and regenerating shields.  The Hellblades, wary of the Necron Pylons, go on combat air patrol for the time being
BR025b


End of Turn 1BR026


The Monolith formation that sustained damage in the last turn disappears from the battlefield and reappears in an entirely different location!
BR027

The Chaos Space Marines, with their superior tactical abilities (Strategy Rating 4), go first. The Chosen fire on the formation and immediately break it.
BR028

The Black Legion retains the initiative.  Defilers fire battle cannon shells at the Warbarque, finally managing to damage it
BR029

In a cunning move, a Necron Monolith formation disgorges a phalanx of Warriors, Immortals and Pariahs into the flank of an Armored Company and CSM Retinue
BR030

An intermingled assault ensues!
BR031

The Necron are victorious.  The Armored Company and Retinue break and flee!
BR032

The titan advances and unloads on a Necron phalanx, breaking it
BR033

The Obelisks float unnaturally and unleash dizzying colored lights on the Chosen, killing and breaking the formation.  The Necron retain and a Pylon fires at the titan, but only drops one shield
BR034

A Black Legion Armored Formation advances and fires on the Warbarque, failing to penetrate its hull but confusing its systems enough to break itBR035

The other Necron Pylon fires at the titan, but the Necron technology is having a hard time getting past the shields.
BR036

The Slaanesh Chosen go on overwatch, choosing to take cover and threaten the Necron flankBR037

The Necron are out of activations.  A CSM Retinue sustains fire on a Monolith formation, destroying two and breaking the formation
BR038

Havoks advance and fire on the broken Necron Phalanx, destroying it utterly
BR039

The End of Turn 2
BR040

The Warbarque teleports back onto the battlefield, but the Armored Company is waiting for it.  Their lascannons find their mark and destroy the Warmachine
BR041

The Black Legion retain the initiative.  The titan lumbers forward and opens fire on a Necron phalanx, but destroys only one stand
BR042

The Monolith floats over the dune and unloads its deadly cargoBR043

The Necron phalanx assaults the Armored Company
BR044

Their gauss weapons shred the hulls of the Chaos tanks
BR045

The CSM Retinue shifts slightly to capture a nearby objective and fires at the Obelisks, again doing no damage
BR046

Black Legion retains the initiative.  The broken CSM Retinue rallied in the recovery phase.  It now pushes forward and fires on a phalanx, killing two stands and occupying an objective.
BR047

A Pylon sends a crackling bolt of pure energy at the titan but misses
BR048

The Defilers fire their battle cannons at the Obelisks and manage to destroy one
BR049

The Necron phalanx marshals and moves to contest a Black Legion Defend the Flag objective.  Its position in the Black Legion half of the battlefield also denies them the They Shall Not Pass objective.  Will they hold on?
BR050

If the Chaos Marines can shift the other Phalanx from this position, they can capture the Take and Hold objective.  Slaanesh Choosen circle around and set up a crossfire, but don’t do enough damage to break the formation
BR051

The Obelisks float over to protect the Necron tomb, and fire on and break the Nurgle Chosen
BR052

The Havoks sustained fire on the Phalanx, hoping to capture Defend the Flag and They Shall Not Pass objectives.  But the Necron hold on just one blast marker away from being broken!
BR053

The Hellblades, which stayed off the battlefield all game in fear of the Necron Pylons, fly on and fire on the Phalanx, breaking it!
BR054

The Black Legion have captured the Defend the Flag and They Shall Not Pass Objectives.  The Necron, seeing the futility of continuing to fight, disappear from the battlefield
BR055


The Chaos Space Marines advance on the ancient and mysterious ziggurat, not knowing what they might find inside….
BR056

Post Game Thoughts
What a fun game!!

This was my first time using my Black Legion army and it was my opponent’s first time using his Necron army.  This was purely a friendly match, not a league game or anything, so our goal was just to enjoy ourselves.  The Necron have a lot of funky special rules that probably take a while to get the hang of, so he didn’t know what he was doing, especially at the beginning of the game.  We’ll chalk it up to the Necron battle protocols not quite being booted yet – they are freshly awake after millions of years asleep, after all!

But we still had a lot of fun.  The Necron seem very interesting and I think have a great deal of potential for making a crafty and dangerous opponent.  I can’t wait to see what he comes up with as he gets a feel for the army.

I was quite impressed by the Black Legion.  This is pretty much my first time running anything other than loyalist marines, and it was cool playing by the same set of rules as everyone else for once.  The Black Legion feels like a horde army with bad ass armor saves.  Kind of like an elite Imperial Guard.  I was impressed by their resilience on defense and aggression on offense.  Super cool army that I look forward to getting familiar with in the future.

I’ll be continuing to write more showcase battle reports, and we will have a part two of this particular narrative!  Stay tuned!

Epic Fratricide – Blood Angels vs. Space Wolves – An Epic Armageddon Battle Report

This is the first league game to determine the fate of planet Maarkus IV!  Both the Blood Angels and the Space Wolves are laying claim to the glory of bringing the planet back into the Imperial fold, but only one can win.

The Battlefield

Image

The Armies

Image

DEATH COMPANY [300]
Chaplain, 4 Assault Death Company Units

ASSAULT DETACHMENT [300]
6 Assault Units, Chaplain

ASSAULT DETACHMENT [300]
6 Assault Units, Captain

PREDATORS [300]
4 Baal Predator

DEVASTATOR DETACHMENT [350]
4 Devastators, Blood Angels TL Lascannon Razorback, Blood Angels Hunter
Rhinos

DEVASTATOR DETACHMENT [350]
4 Devastators, Blood Angels Hunter, Blood Angels TL Lascannon Razorback
Rhinos

TACTICAL DETACHMENT [475]
6 Tacticals, Supreme Commander, Land Raider, Blood Angels TL Heavy Bolter Razorback
Rhinos

TACTICAL DETACHMENT [275]
6 Tacticals
Rhinos

LAND SPEEDERS [200]
5 Land Speeder

SCOUT DETACHMENT [150]
4 Scouts
Rhinos

(I forgot to include the Land Speeders in the picture)

The Space Wolves

Image

GREAT COMPANY [425]
6 Grey Hunters, Battle Leader, 2 Long Fangs

GREAT COMPANY [575]
6 Grey Hunters, Battle Leader, 2 Long Fangs, 2 Land Raider

LAND SPEEDERS [200]
5 Land Speeder

THUNDERBOLT SQUADRON [175]
2 Thunderbolt Fighter-Bombers

WHIRLWINDS [300]
4 Whirlwinds

REAVER CLASS TITAN [650]

PREDATORS [250]
4 Predator Destructor

STRIKE CRUISER [200]
Space Wolves Strike Cruiser

(Something like this – I am missing a few units, but this was the gist of the list)

Deployment

The Blood Angels set up across the entirety of the board with Baal Predators and Scouts on the left flank, Two Devastator formations, Two Assault Formations, the Death Company, and the Command Tactical Squad in the center, and a Tactical formation and Land Speeders anchoring the right flank.

Image

The Space Wolves set up with their Reaver Titan in the center, Annihilator Predators on their left flank, Land Speeders on the right, and Command Great Company holding down the center.  Another Great Company waits in orbit on the Strike Cruiser, which will arrive Turn 3.

Image

The Armies Face Off

018

Here you can see the two Blood Angel objectives to the right, and the Space Wolf objectives toward the left, represented by pink chips.

The Blood Angels win the initiative roll and elect to move the Scouts into position, setting up a screen across the left flank

020

The Space Wolves double with their Predators, open fire on the Blood Angel Land Speeders and kill one

024

The Land Speeders quickly retaliate, but fail to hit

027

The Space Wolf Titan doubles to the center of the battlefield and opens fire on a Blood Angel Devastator formation

029

The Titans weapons are devastating, destroying two Rhinos, a Hunter, and a stand of Marines

032

The Space Wolves Command Great Company doubles into cover and opens fire on the scouts, killing a Rhino and a stand of men

034

The Blood Angels advance a Devastator formation and open fire on the Space Wolves in the building, but fail to do any damage

035

Space Wolf Land Speeders double into firing position and attack the Blood Angels Devastators, killing a Rhino

039

Baal Predators retaliate, doubling into firing position and killing two Space Wolf Speeders

041

The Blood Angel Command Tactical formation advances into cover and opens fire at the Space Wolves in the building, failing to do damage.  The center of the battlefield is getting very hot.  The Space Wolf whirlwinds open fire (on what, I forgot), but fail to damage.

043

The Space Wolves are out of activations.  Two Assault formations and the Death Company double into assault positions with impunity.  It’s a bold move – the Blood Angels are banking on winning the initiative roll for Turn 2.

048

TURN 2

Foolish mistake.  The roll is a tie, and since the Blood Angels won the roll last turn, the Space Wolves win the roll this turn.  The whirlwind immediately opens fire on the two Assault Formations and the Death Company.  The Great Company in the building retains, declaring an assault on one of the Blood Angel assault formations

052

The assault is furious.  The Space Wolves wipe out five stands of Blood Angels and only lose one in return.  The broken Blood Angel formation was the one containing the Captain.  Blood Angel dreams of calling a combined assault are crushed then and there.

054

The Blood Angels commander is able to think clearly enough to prioritize his moves in spite of thirsting for vengeance, and sends the Land Speeders against the Reaver Titan, damaging some shields.  Devastators advance as well, and drop more shields.

056

All Weapons are hot on the Space Wolf Command formation, but it proves surprisingly resilient.

059

Space Wolf Land Speeders make a daring move behind enemy lines, shooting at a Blood Angel assault formation but failing to hit.

064

Space Wolf Predators declare a Titan supported assault against the Blood Angel Landspeeders and wipe them out.

067

Baal Predators advance and open fire on the Space Wolves Command Company, causing heavy casualties and breaking the formation.  The Space Wolves flee.

070

Thunderbolts fly in to harass Blood Angel Devastators

073

The other Blood Angels Devastator formation doubles over to get within 30cm of the broken Space Wolf formation and also to lay down fire on the Reaver

075

The Reaver retaliates, causing horrendous casualties and breaking the formation.  The Devastators flee.

078

The Death Company marches to get within assault range next turn and to stay within 30cm of the broken Space Wolf formation

081

A six-strong Blood Angel assault formation led by a Chaplain assaults three Space Wolf Landspeeders and lose the assault!  They are broken and flee.
085

The Scouts looking to the skies to see the approaching Space Wolf Strike Cruiser, spread out to restrict the drop zone the best they can.

087

TURN 3

The Blood Angels win the initiative roll.  During the rally phase, the broken Space Wolves command formation fails to rally due to the presence of the Death Company.

The Death Company charges the Space Wolf Whirlwinds, completely wiping them out.  The Blood Angels retain and open fire on the Space Wolf Land Speeders behind their lines, wiping them out and destroying hopes of a last ditch objective grab.

089

The Blood Angels rush the Space Wolves Blitz objective with the Baal Predators

092

Space Wolf Predators fire ineffectively (not pictured), and Blood Angels scouts spread out over their Blitz objective to prevent the drop pod assault.

094

Thunderbolts fly in to finish off the broken Devastator formation, but fail to damage it

098

The Assault formation that lost the assault to the Land Speeders in the previous turn rally during the recovery phase, and double to sit on top of a Space Wolf objective.  The Blood Angels now have Take and Hold, Blitz, and They Shall Not Pass.

099

The Reaver TItan opens fire into the Blood Angel Command formation, doing tremendous damage.

105

The other Blood Angel tactical formation advances to an objective and open fire on the Space Wolf Annihilators, failing to hit.  But the Blood Angels now have Take and Hold, Blitz, Defend the Flag, and They Shall Not Pass.

106

The Space Wolf Strike Cruiser activates, dropping its barrage on the Space Wolf Blitz objective occupied by the Baal Predators.  Unfortunately, the blast does no damage.

107

The Space Wolves rain from the skies in their Drop Pods and assault the Blood Angel Tactical formation, nearly wiping it out.  But it is too little, too late.  The Blood Angels have the Blitz and Take and Hold objectives, and the Space Wolves have no more activations with which to contest.  Blood Angels win 2 – 0.

112

120

Final Thoughts:

This was a bloody and hard fought battle.  Writing this battle report, I realize it may have looked a little one-sided in turn three, but it really felt a lot closer than that.  A couple of different moves, a couple different dice rolls in either direction, and it could have been a Space Wolf victory.  I think the Space Wolf player made a mistake in not sending the Reaver after the Baals on the Blitz in turn 3.  Had the game gone on to turn 4, I am not sure I could have held on.  I really had no answer for the Reaver.

I looked at the Space Wolf list before going into the match, and it occurred to me that there is a lot of rope to hang yourself with in terms of taking big, expensive formations.  I wanted to capitalize on this by keeping my activation count very high.  This worked to my advantage throughout the course of the game.

I considered taking some drop pods and Thunderhawks, but these were big investments that I could put towards more activations, so I made the decision to forgo them.

The Baal Predators performed much better than I anticipated.  I felt that 300 points might be pricey for them, but for the amount of devastation that they lay down at close range, it seems fair.  Don’t get within 15cm of those things.

Super fun game, and thanks to my opponent for putting up a hard fight.