Age of Sigmar – Fantasy 9th Ed in Disguise?

Quick note on this article before you read! I’ve received more hits to this article than any other in the history of my humble little blog. It looks like it’s been cross-posted to a few sites. I’m really happy that people are enjoying it and that it is sparking some conversation. I want to make it clear that I am not trying to sell anyone on this game. I’m not even sure how I feel about it at this point. I happen to own a bunch of Fantasy models that I haven’t used in a while and am trying to approach this Age of Sigmar thing with an open mind. I’m sharing what I find as I go. Nothing more. Thank you for visiting and I hope you enjoy. On with the article!

Now that we have the preamble on Age of Sigmar out of the way, let’s move on to more in-depth thoughts on it. I played my second game last night.

It’s still very early days with this, so I’m not going to start gushing just yet – but I think GW might have just snuck something clever in right under our noses. It’s entirely possible that my gaming partner and I are just dense, but during our second game, we noticed a ton of things about the rules that we played wrong in our first game that add quite a lot of depth to Age of Sigmar.

It’s funny. The rule set is a big departure from the old one. When you’re learning a new game that shares similarities with an old one (and, indeed, is produced by the same company), there is a tendency to make assumptions about rules instead of playing them as they are actually written. Well, we paid close attention to the rules for Age of Sigmar on our second go round, and when you play them as they are actually written and not as you assume them to be based on what you know of GW’s other games, there are some pretty cool little easter eggs in there.

I’ll go down a list of things that we played wrong in our first game, what the new rules actually are, and what it means for the game.

Combat between units does not take place simultaneously.

What we assumed: Each player takes turns choosing a combat to resolve. For example, Player 1 elects to resolve a combat involving his Greatswords vs his opponent’s Chaos Warriors and Khorne Lord. There is no initiative mechanic in AoS, so we assumed that all units involved on both sides resolve attacks simultaneously in any given “combat”. Then the next player chooses which combat he would like to resolve. This seemed like the “makes sense” solution based on what we knew of GW’s other games. This is incorrect.

What the rule actually is:  The player whose turn it is picks a unit to attack with, then the opposing player must attack with a unit, and so on until all eligible units on both sides have attacked once each.

This means exactly what it says. You choose one of your units to attack with. It attacks. Your opponent does not get a chance to respond to this with an attack of his own until you are done. You may kill five of the models from your opponent’s unit with this attack. Those models are dead where they stand. If they did not already attack this combat turn, they will never get to attack. This adds a very tactical dimension to combat. Instead of combats being resolved according to some arbitrary Initiative statistic, you need to make some tough decisions regarding which combats are urgent and which are not.

Let’s say you just charged some Chaos Ogres with a full-strength unit of Empire Knights who get some nice charge bonuses and you want to make sure you get all of their attacks in. On the other hand, you have a combat going on over on the other side of the table involving a unit of three Greatswords against three Chaos Warriors. You have a dilemma. Which do you attack with first? If you attack with the charging Knights first, they will do a great deal of damage before the Ogres have a chance to blunt their charge by killing models. However, if you do that, it’s possible that your opponent will choose to activate his Warriors and kill off your Greatswords before they even have a chance to attack. Which do you do first? Tough decision.

You are not “locked” into combat.

What we assumed: Once your unit has charged or been charged, or once your unit has come within range of an enemy and made an attack, it is then “locked” in combat and may do nothing but fight until the bitter end.

What the rule actually is: This will require slightly more lengthy explanation, but the idea here is that nowhere in the rules does it state that you are not free to move in your own movement phase simply because an enemy is nearby or you are “locked” in combat. In your own movement phase, you are free to move as you please. Here are the rules regarding moving when you are “locked in combat”:

Units starting the movement phase within 3″ of an enemy unit can either remain stationary or retreat. If you choose to retreat, the unit must end its move more than 3″ away from all enemy units. If a unit retreats, then it can’t shoot or charge later that turn (see below).

Disregard whether you were charged in the previous turn and whether or not your unit participated in combat. That is immaterial. What this rule says is that if your unit begins the movement phase within 3″ of an enemy unit, it has two options. 1) Stay where it is. 2) Move as it pleases. If it moves, this is treated as a “retreat”. If it retreats, it may not then shoot or charge in those subsequent phases this player turn. Hello, flee mechanic! We thought you were dead! I see. You just got a facelift. One that makes you look much better, I think.

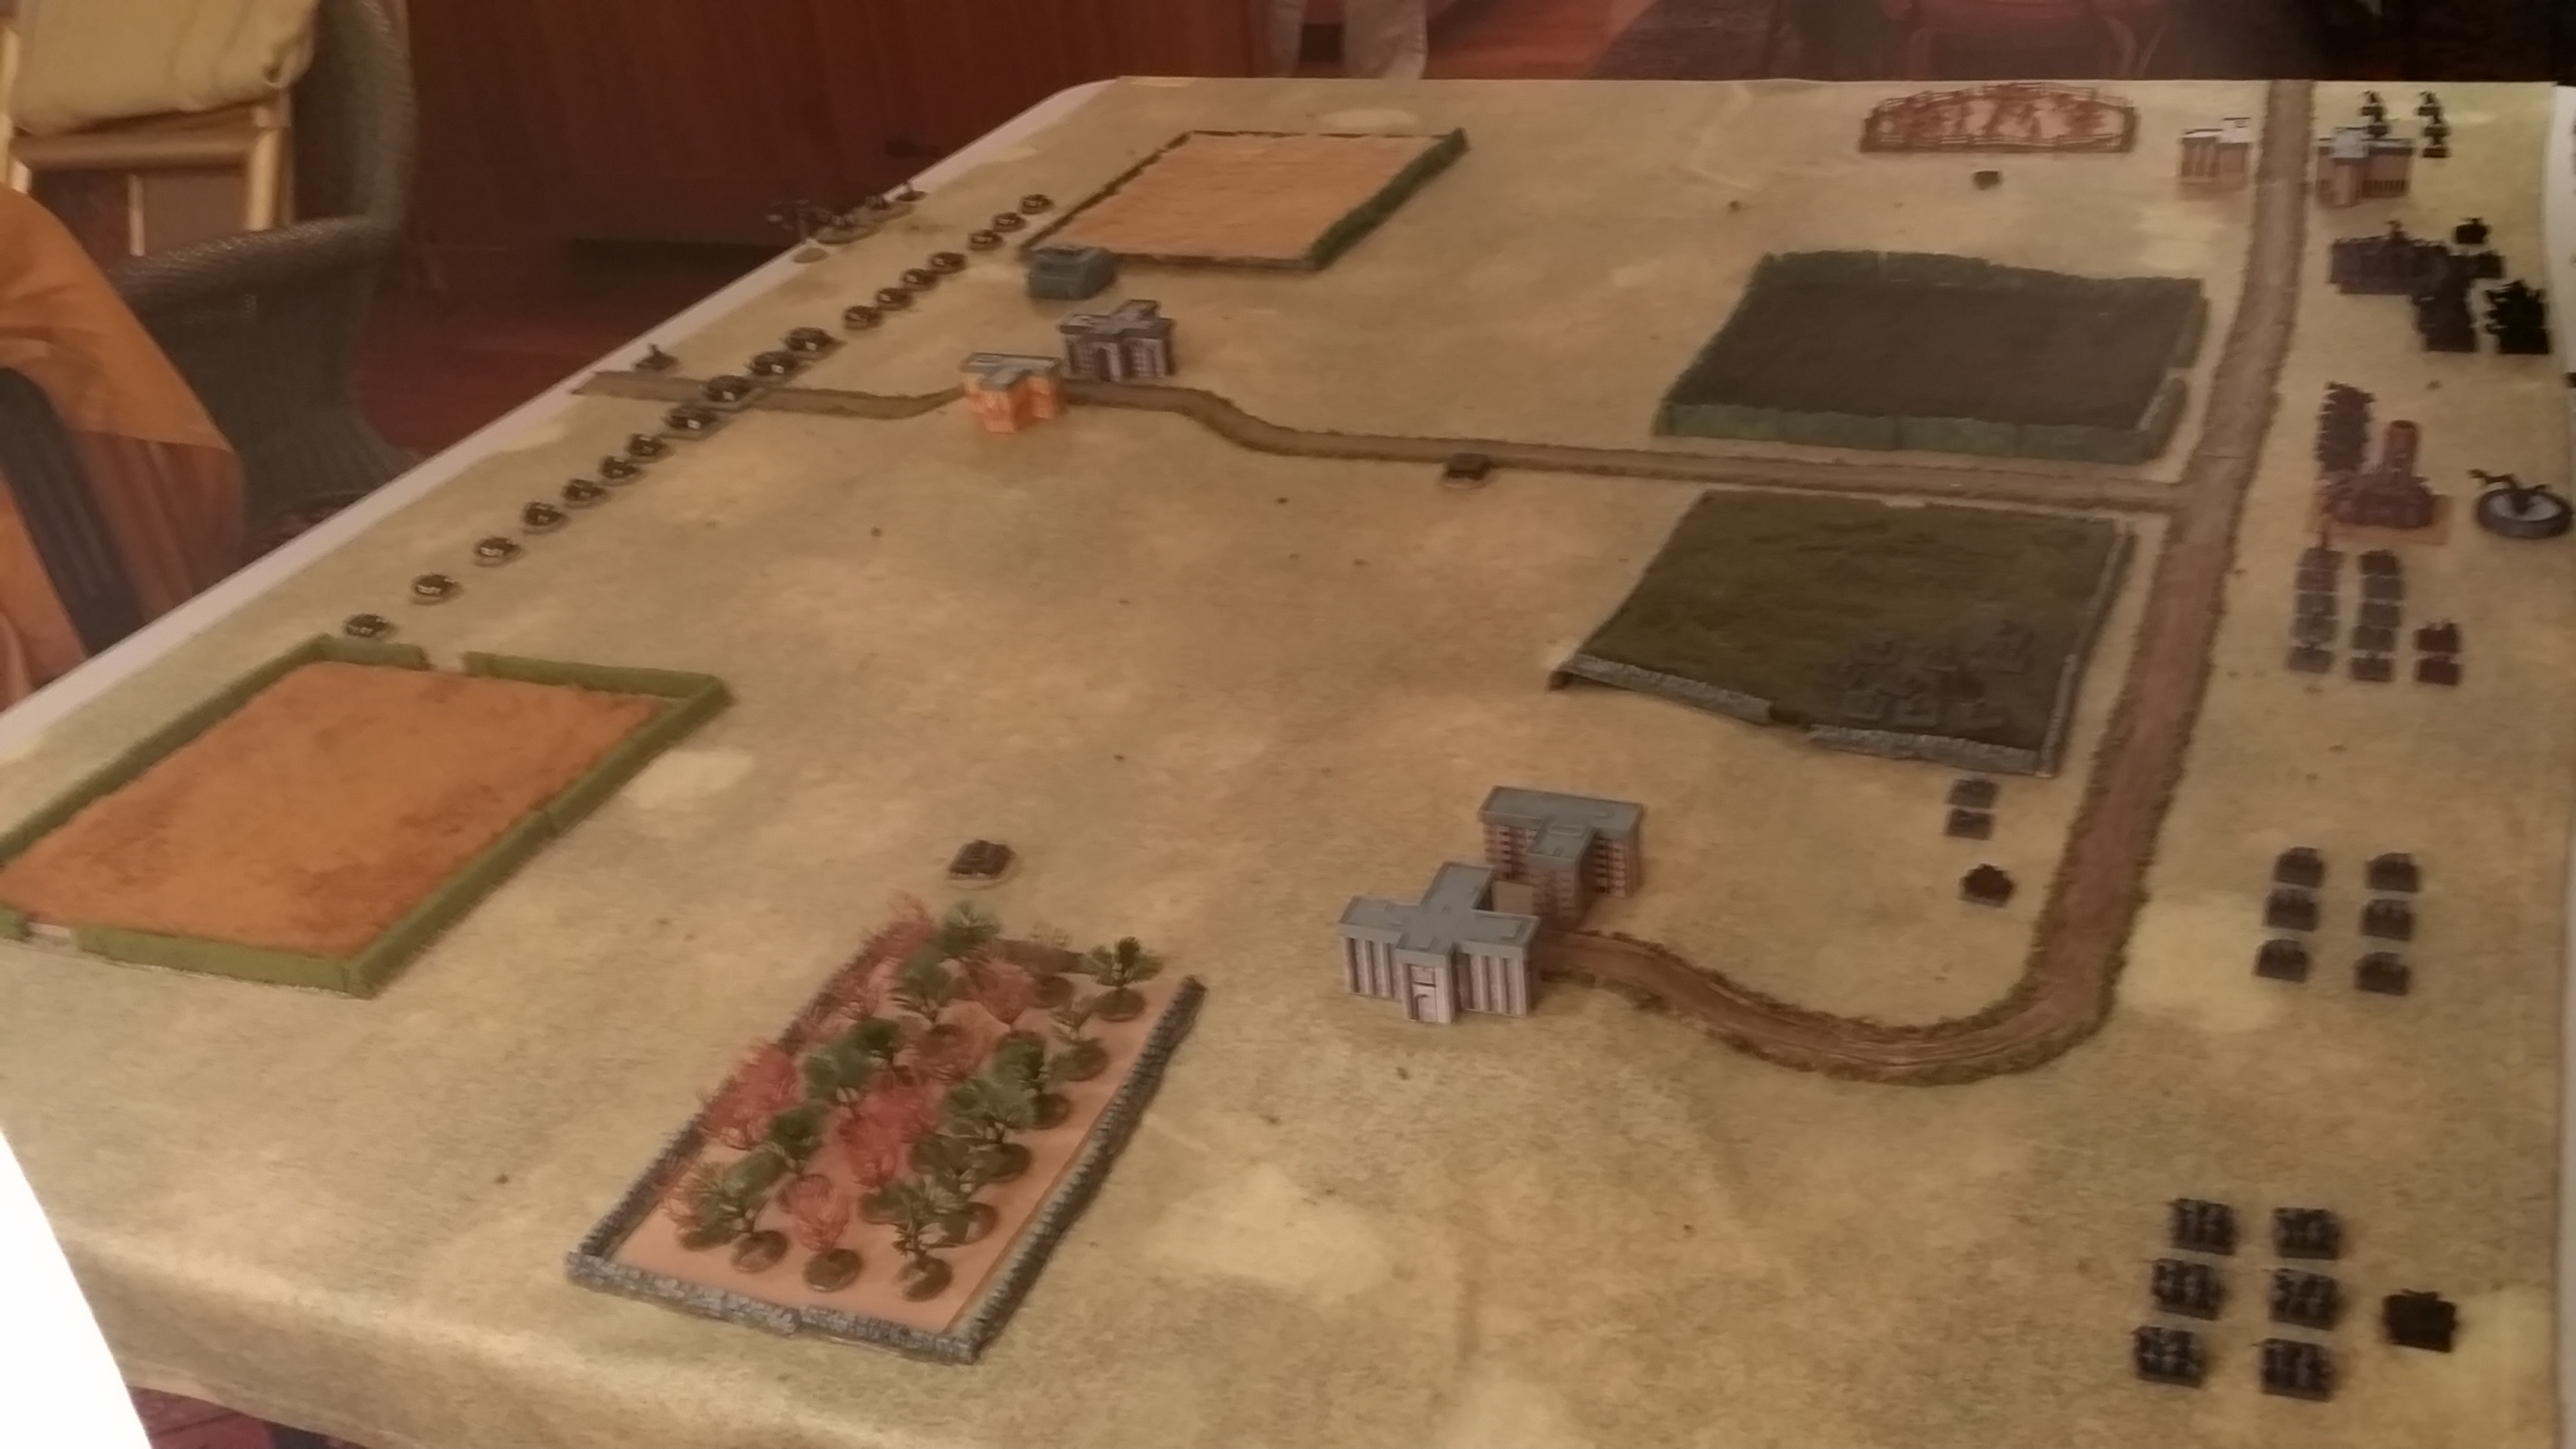
Check out what happened in our game last night.

047b
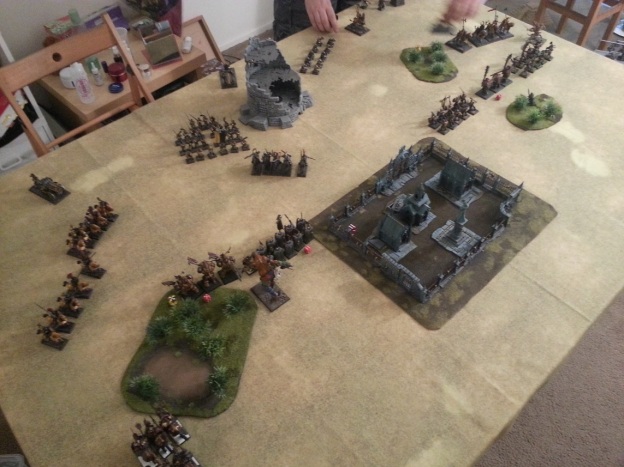
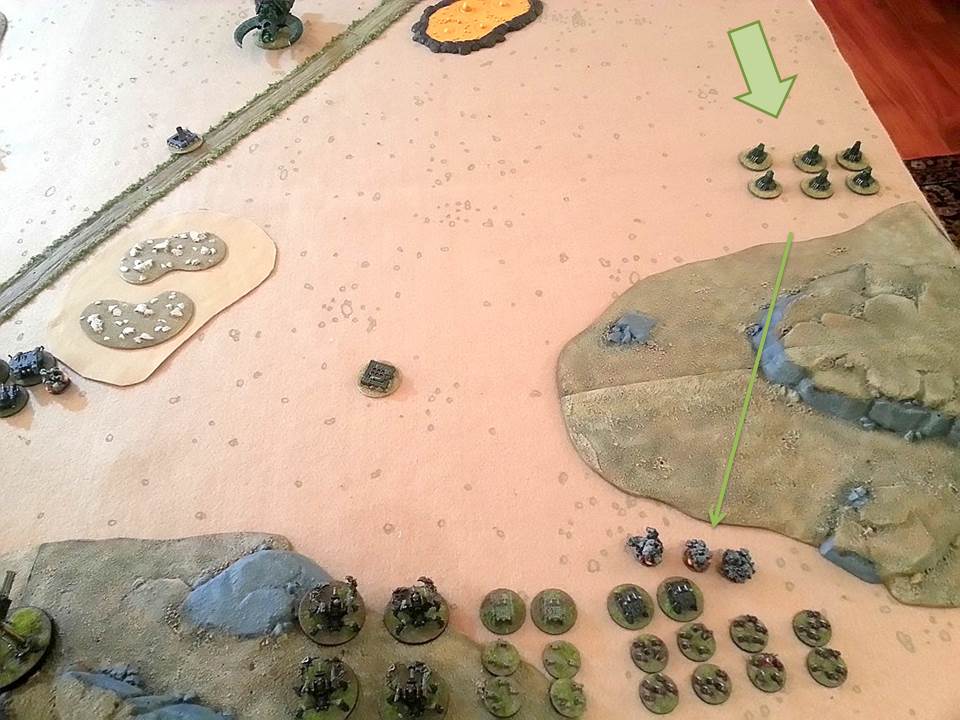
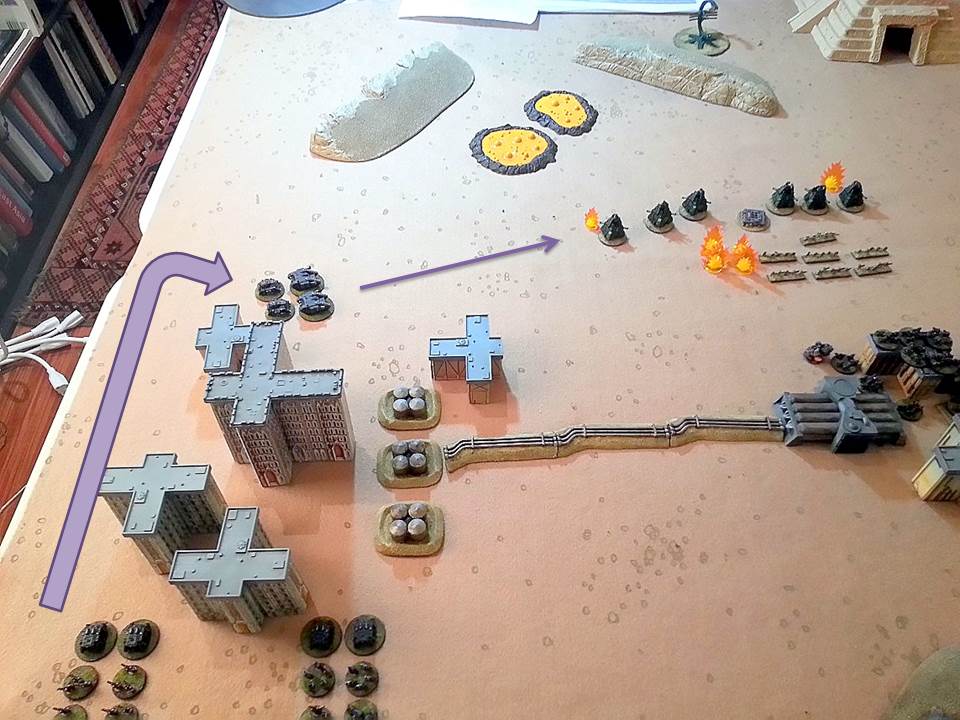
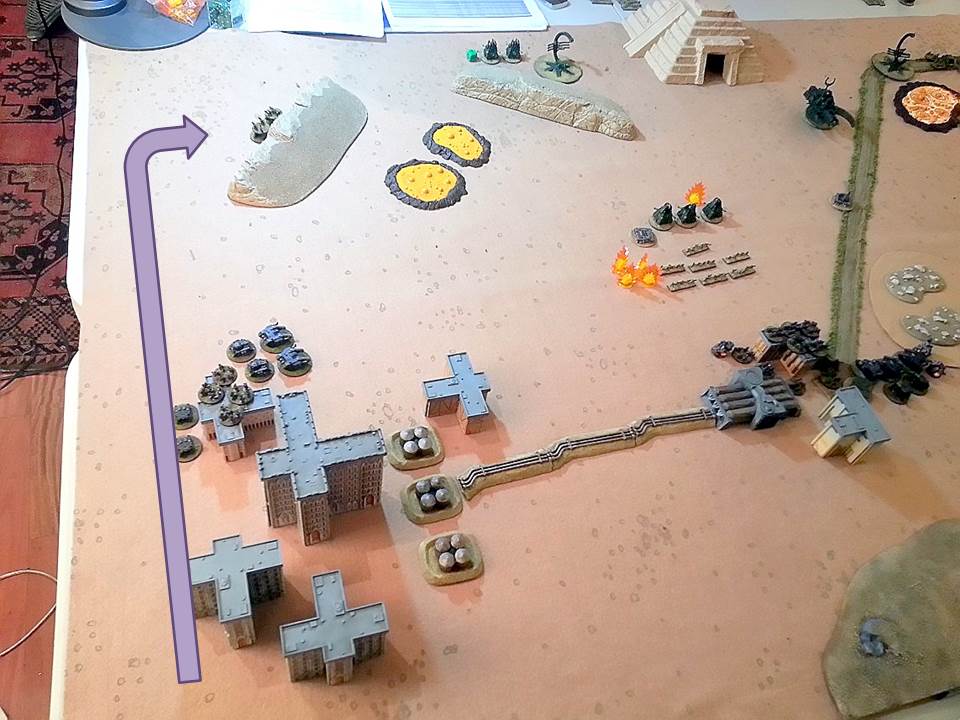
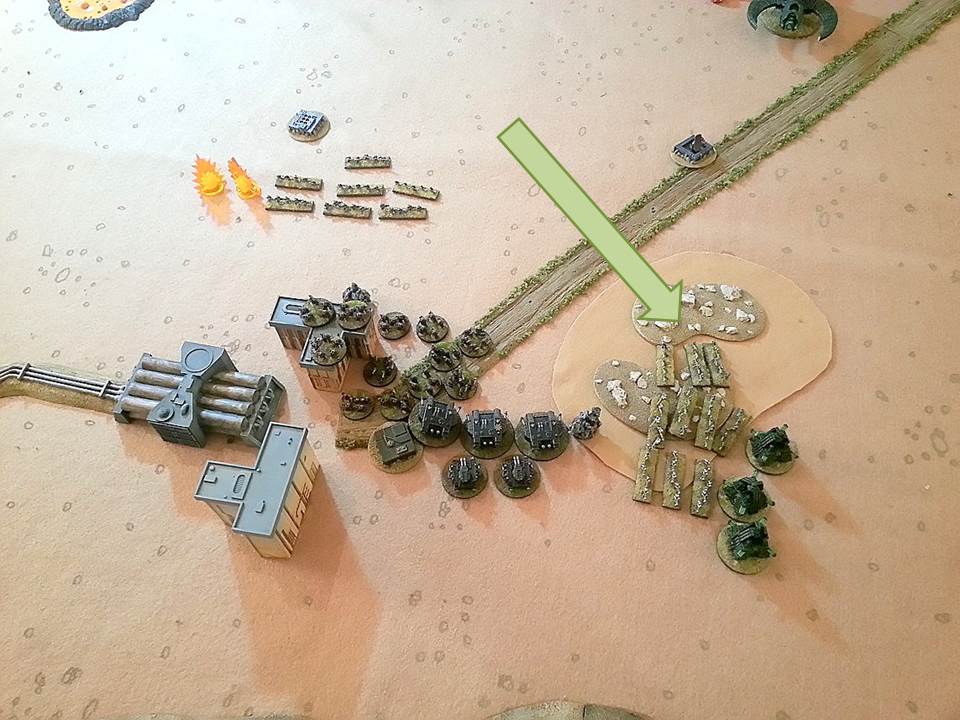
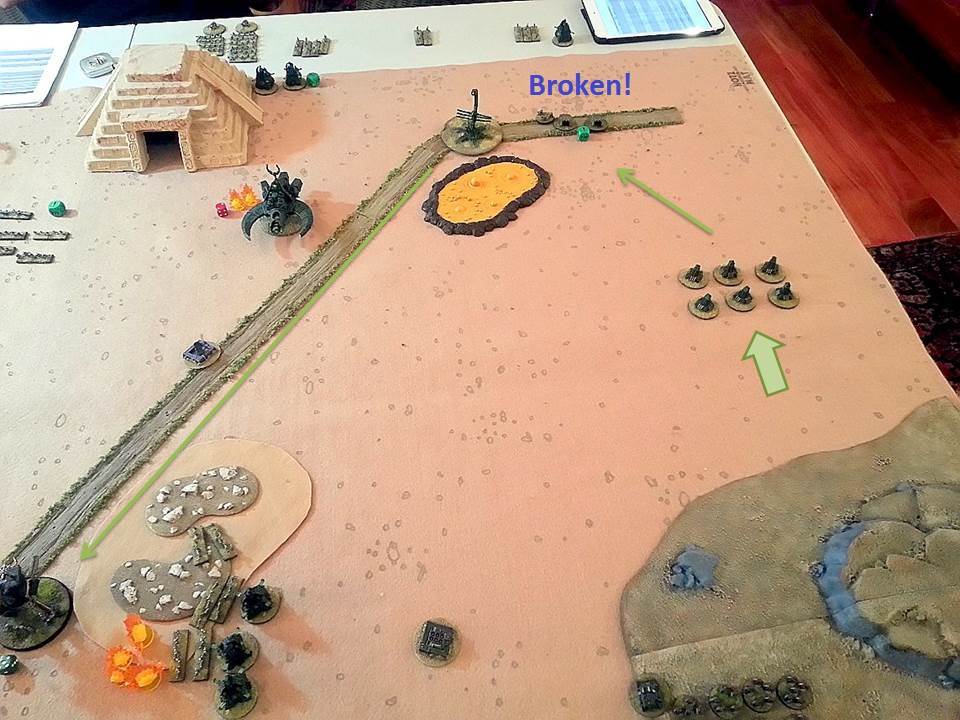
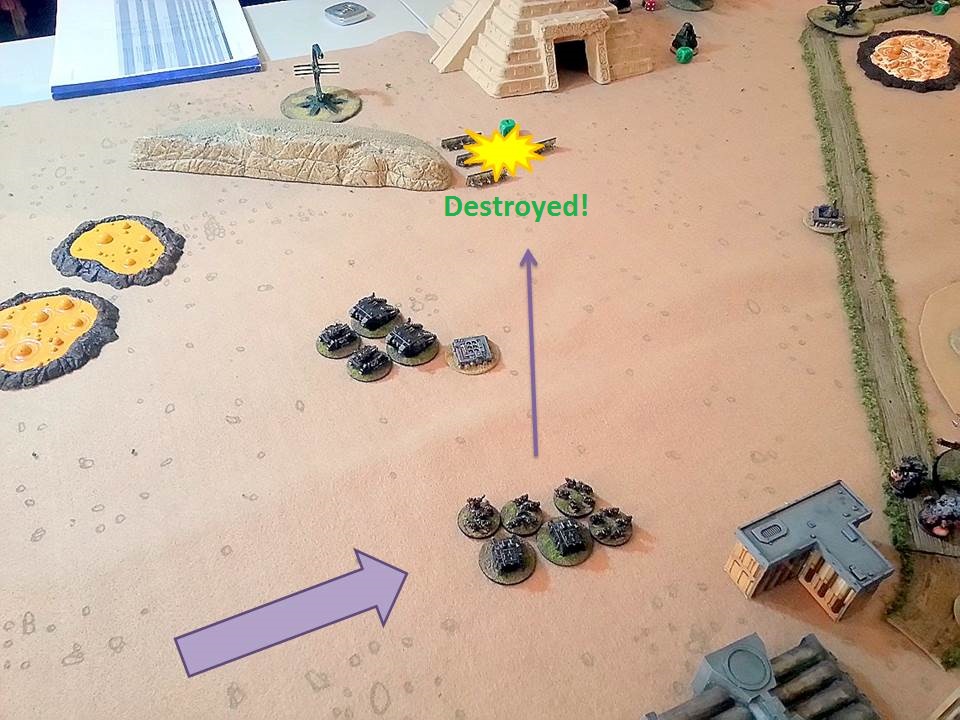
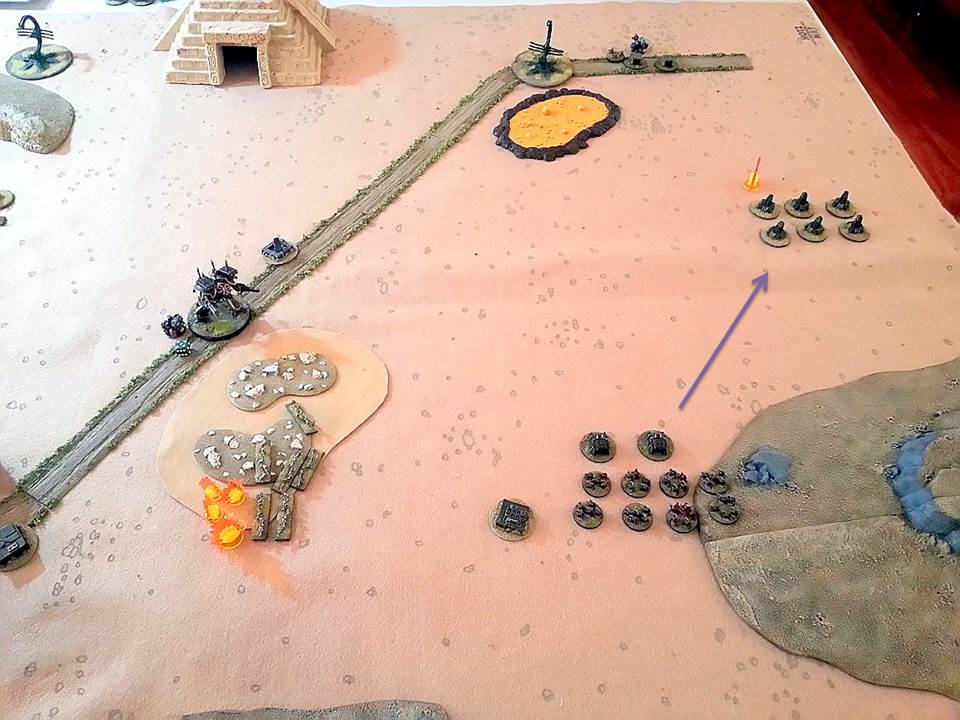
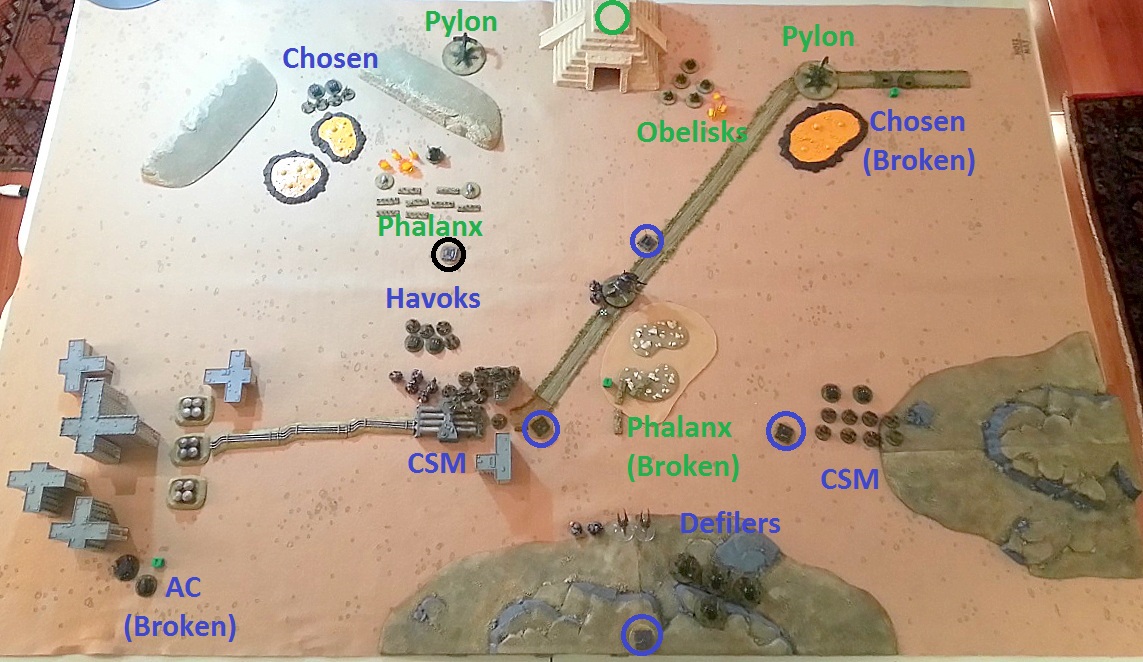
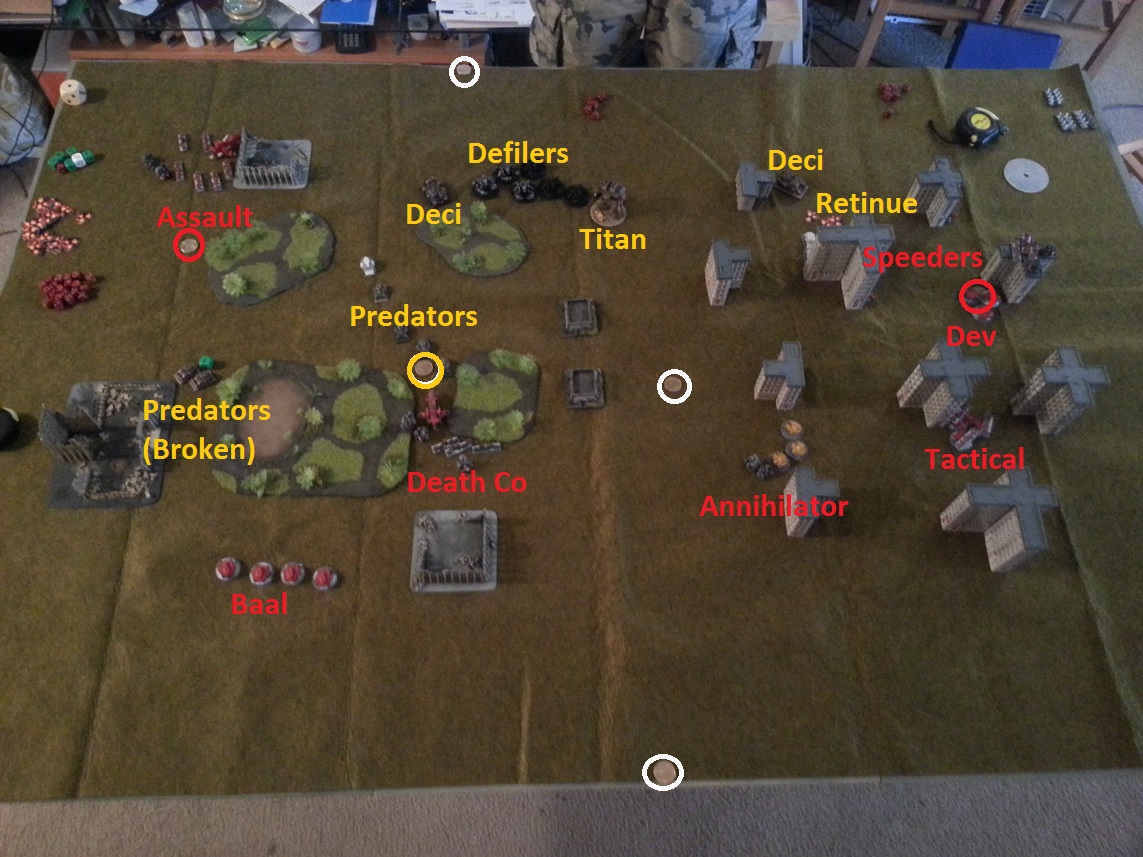
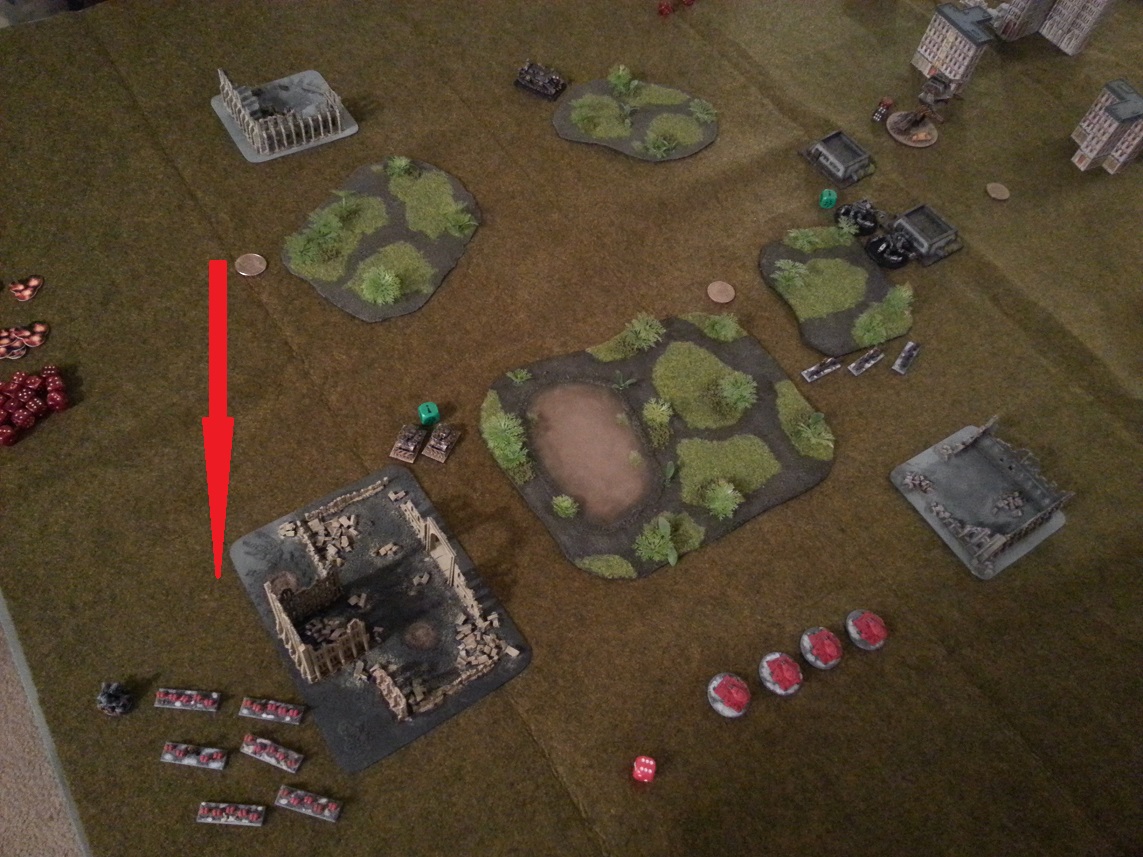
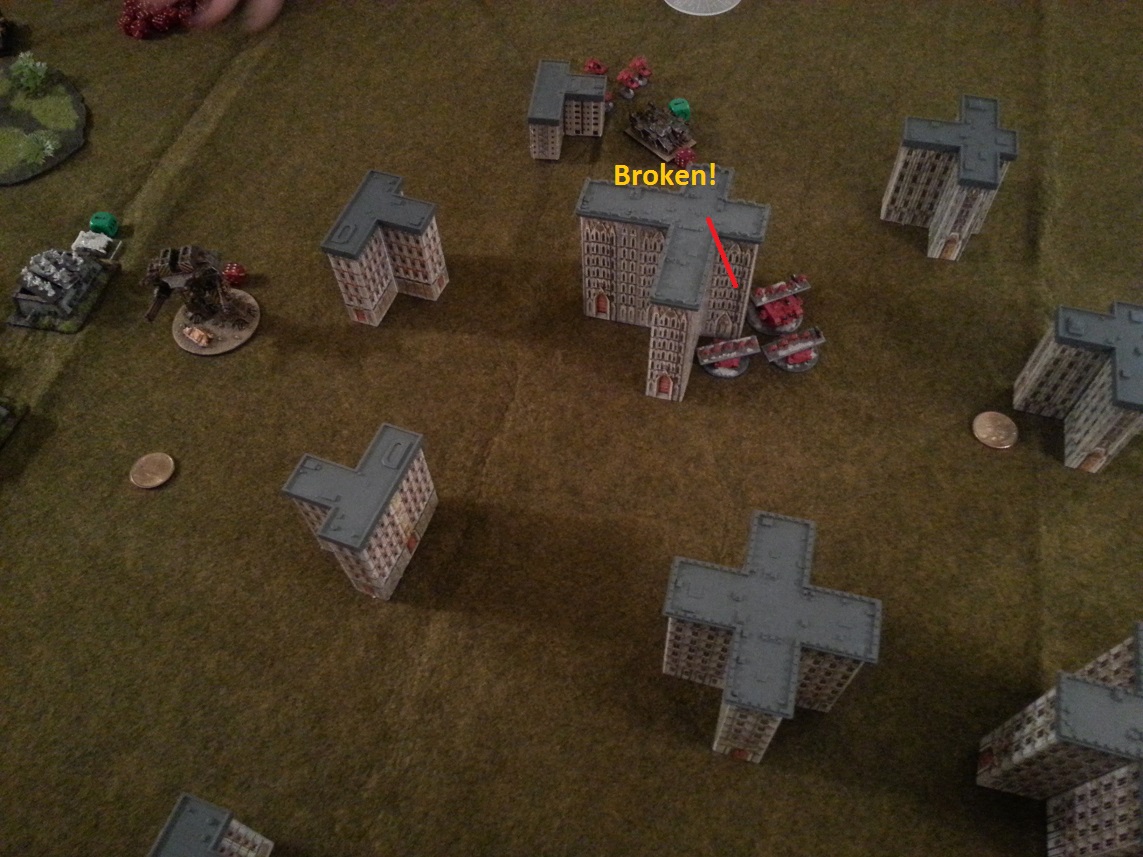
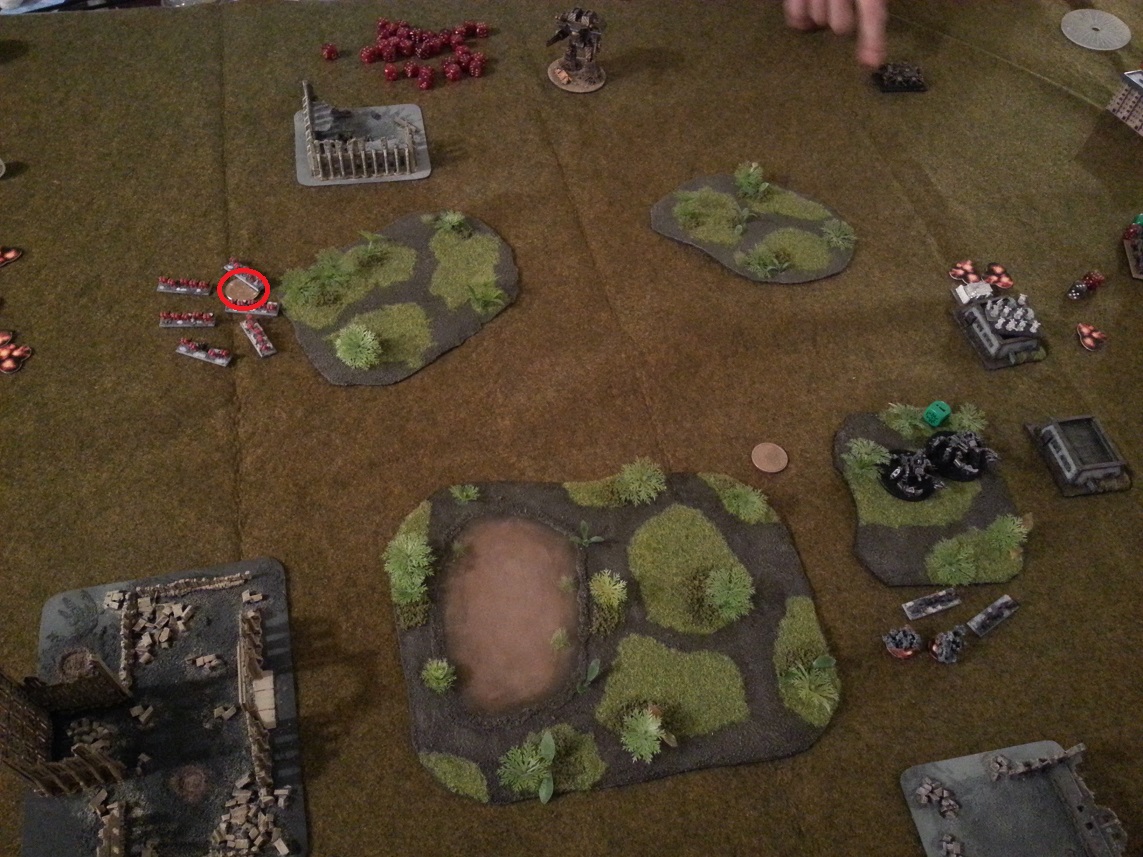
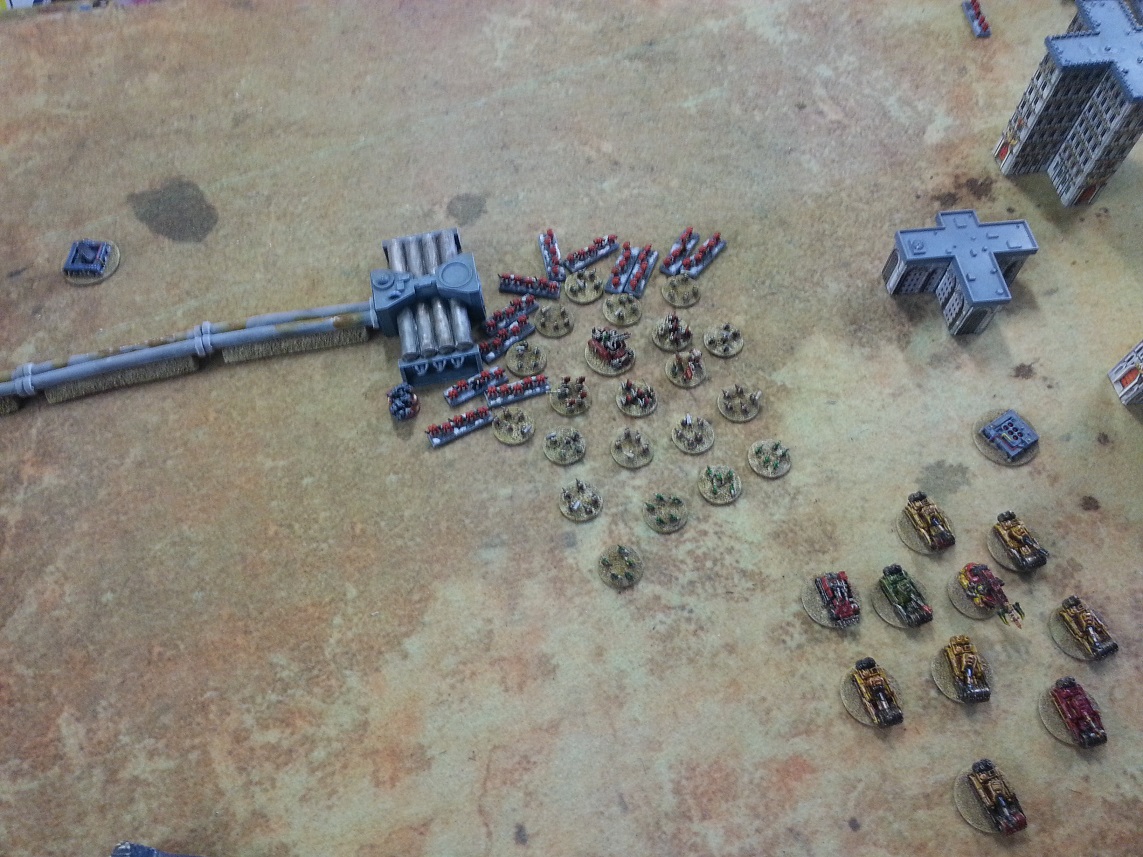
Apologies for the poor pics. Notice the large unit of Greatswords looming at the top of the table and also the Empire Knights off to the left. They didn’t have enough movement to make the charge against the Chaos battle line this turn, so in the Empire player’s turn, the Pistoliers charge the Warriors to tie them up.

058b
In the Chaos player’s phase, a unit of Khornate Knights comes around the flank and charges the unit of Empire Knights, tying up that charge threat and also gaining the nice charge bonus for their glaives.

071b
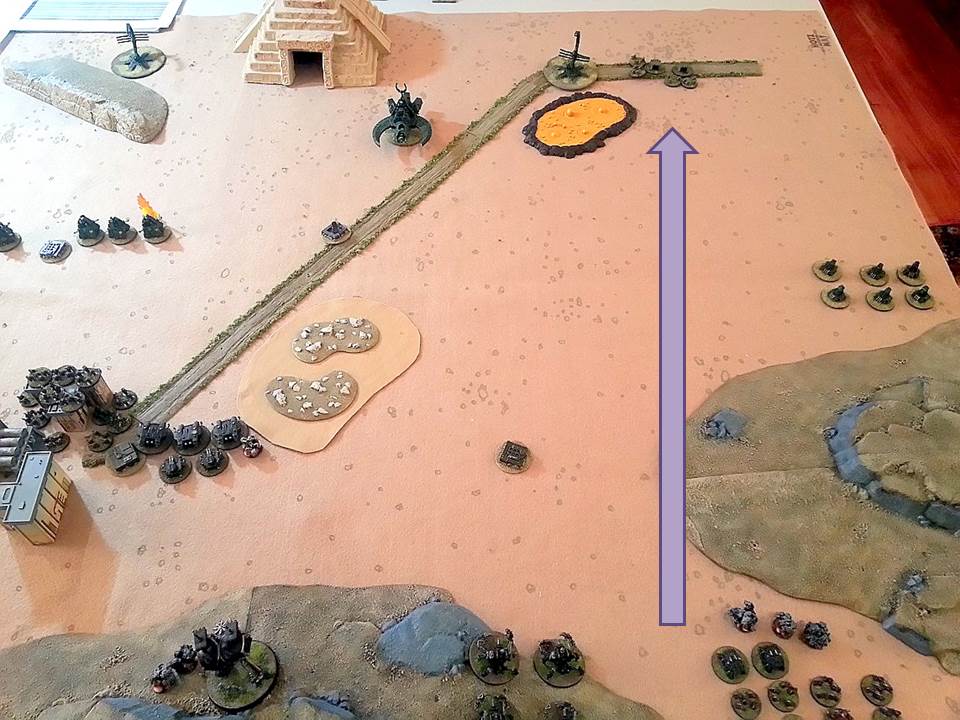
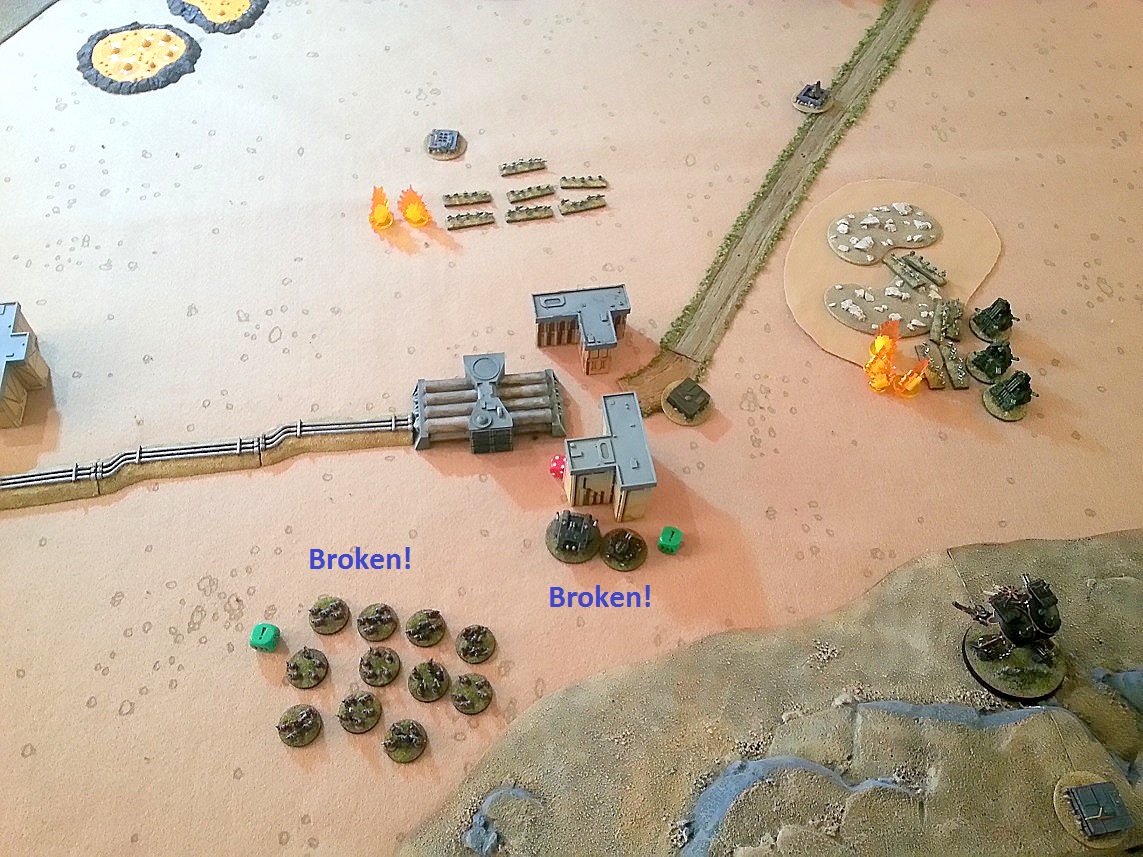
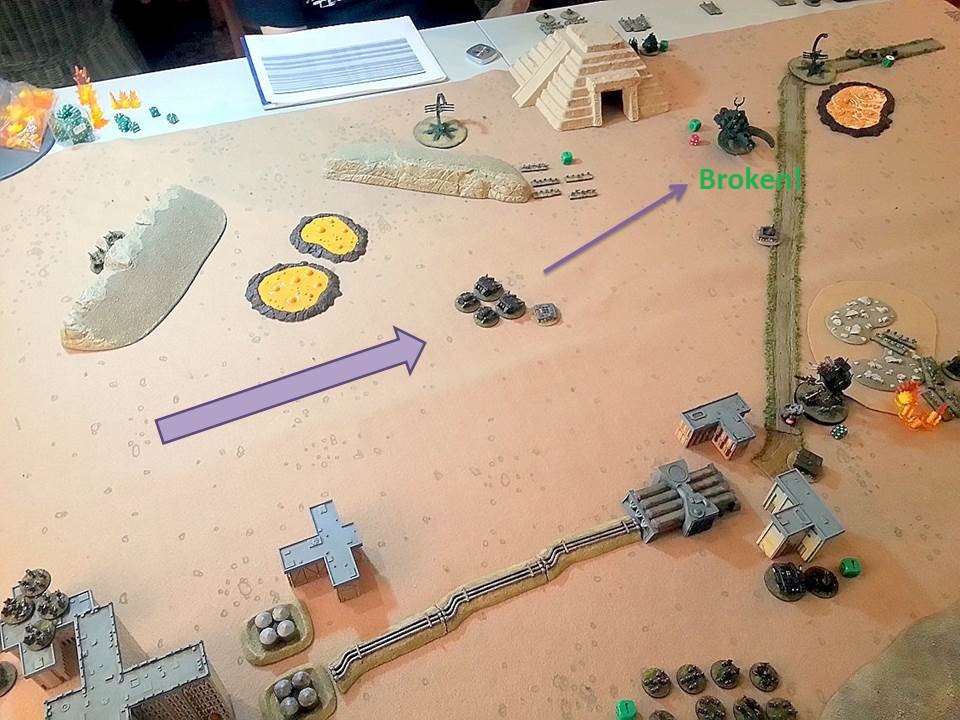
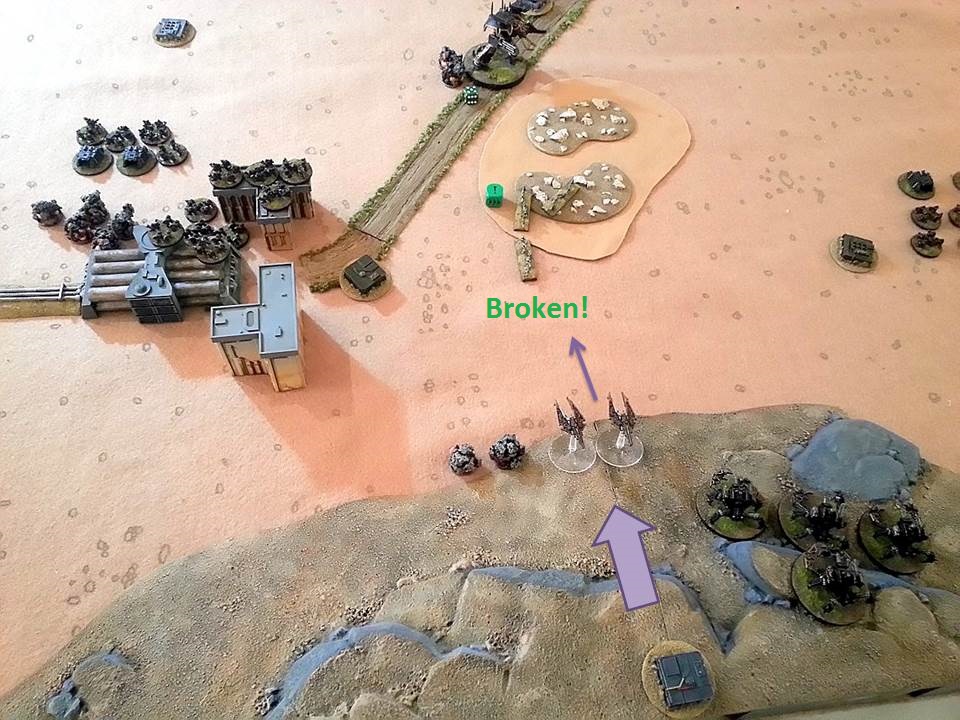
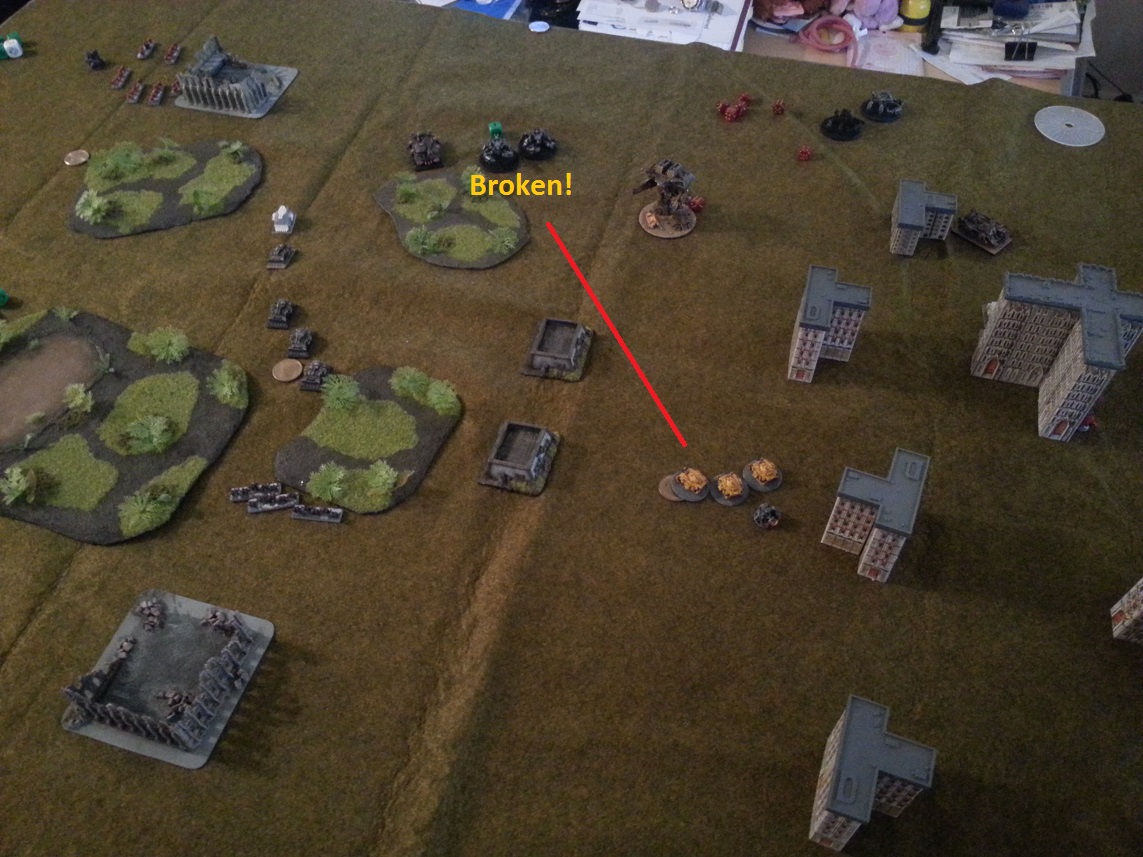
Well, look at this. Because the Pistoliers aren’t “locked” into combat, they’re free to simply leave. And in the Empire player’s movement phase, they do just that. They run (add D6 to their move) to the other side of the battlefield where they are needed – but of course they cannot shoot or charge this turn. Meanwhile, the Greatswords move in to charge range. Notice the Khorne Lord standing slightly forward of the Chaos Warriors. This is kind of important.

072b
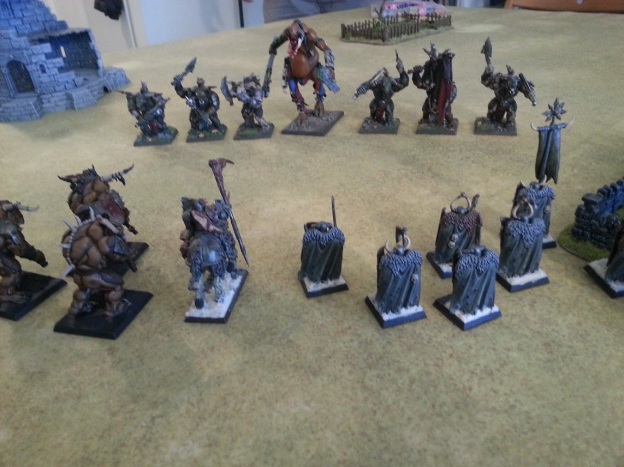
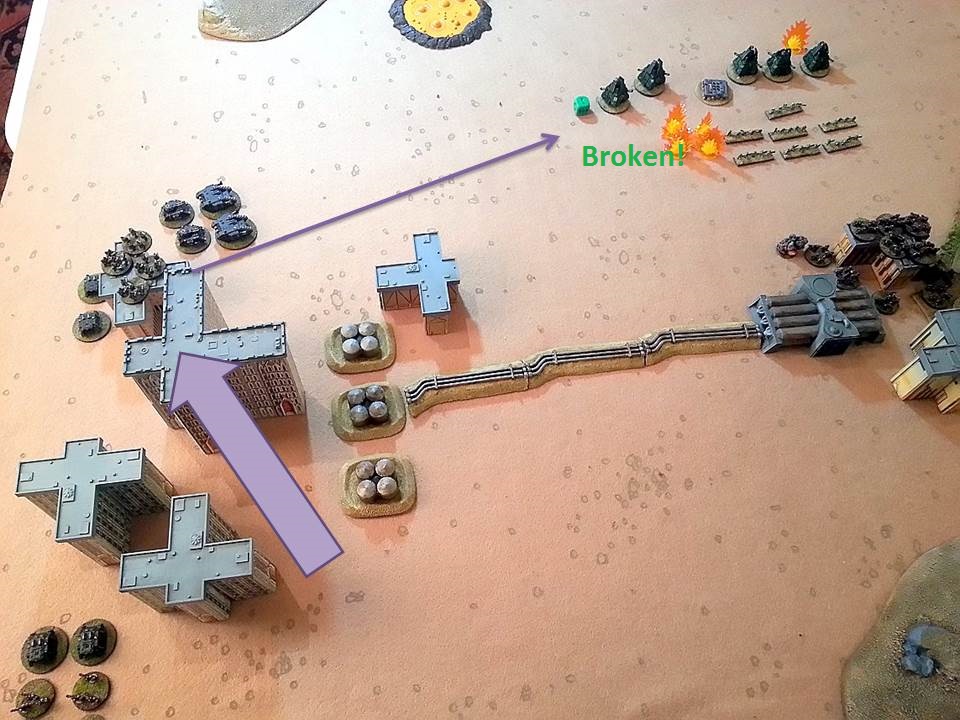
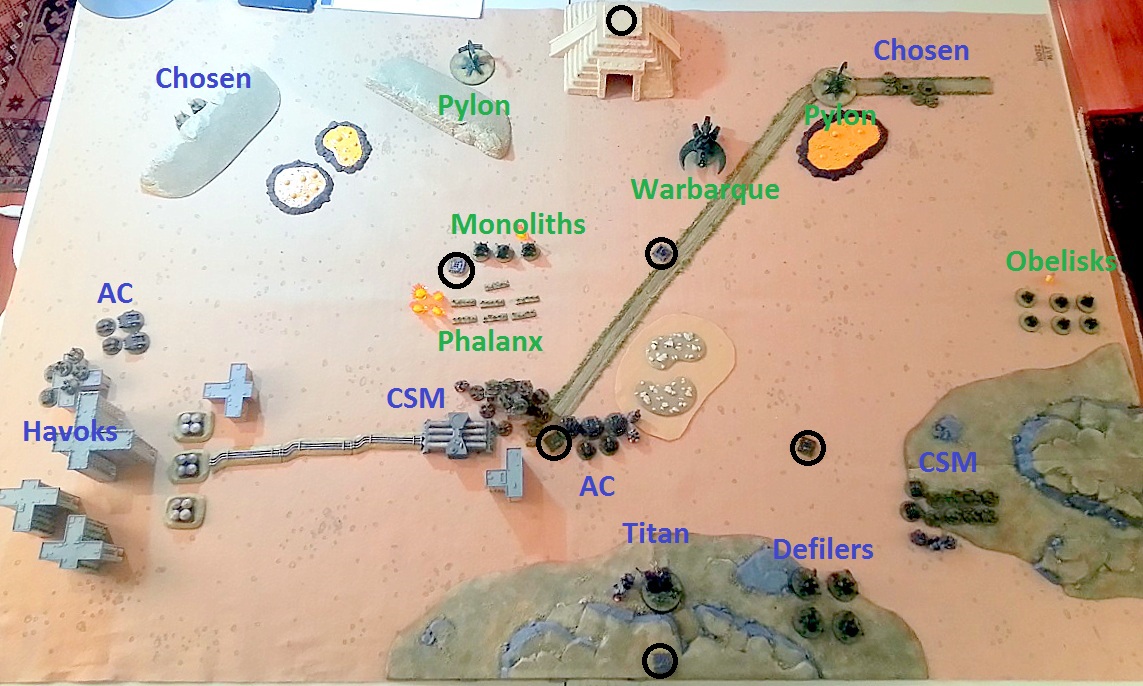
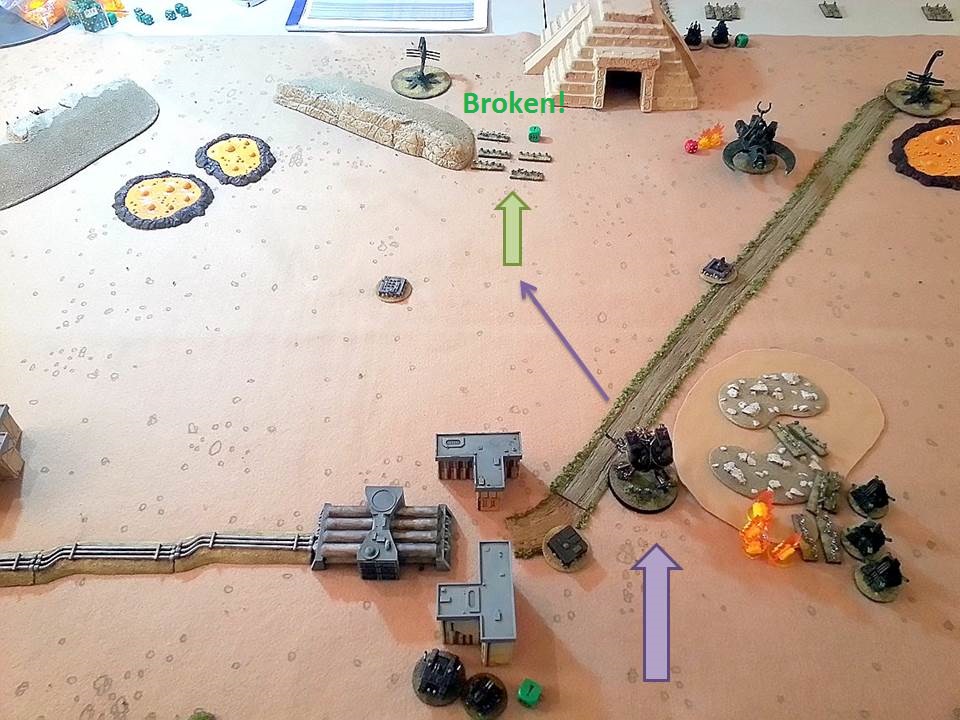
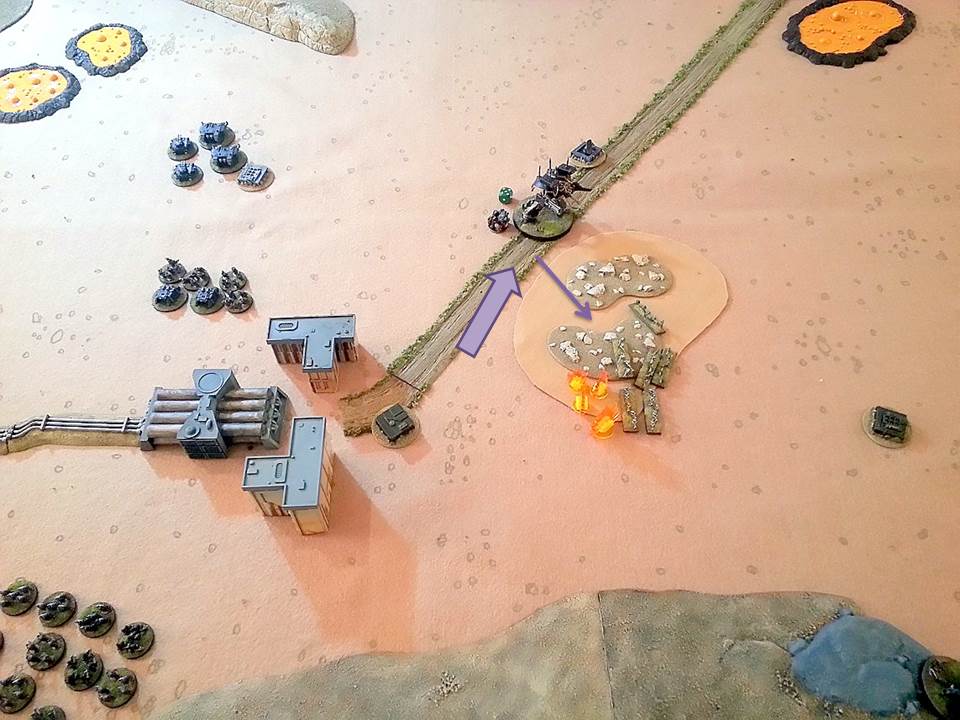
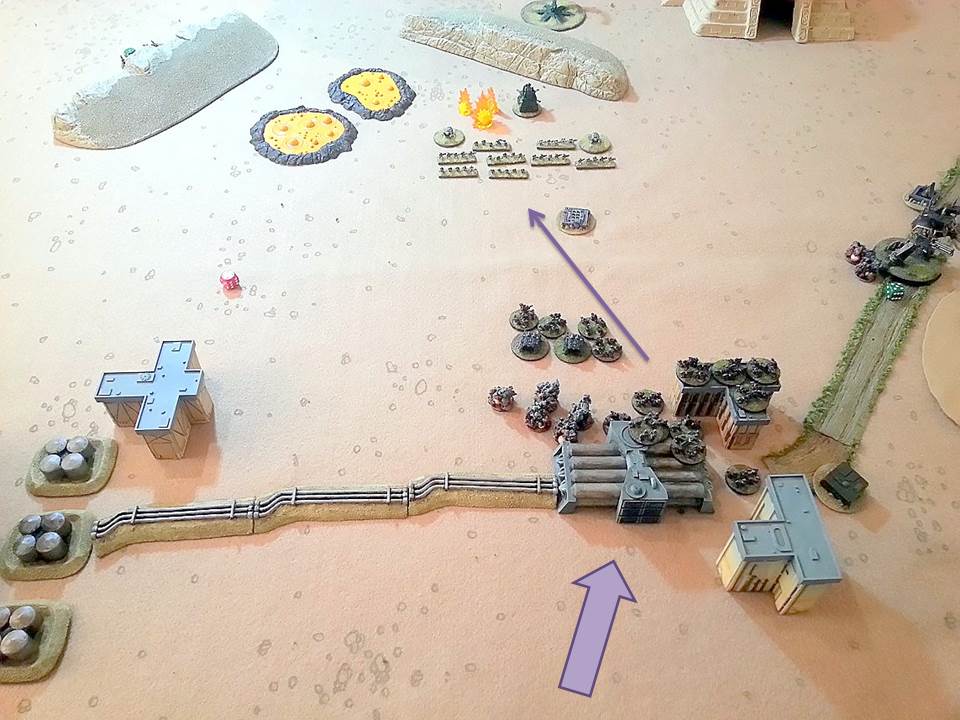
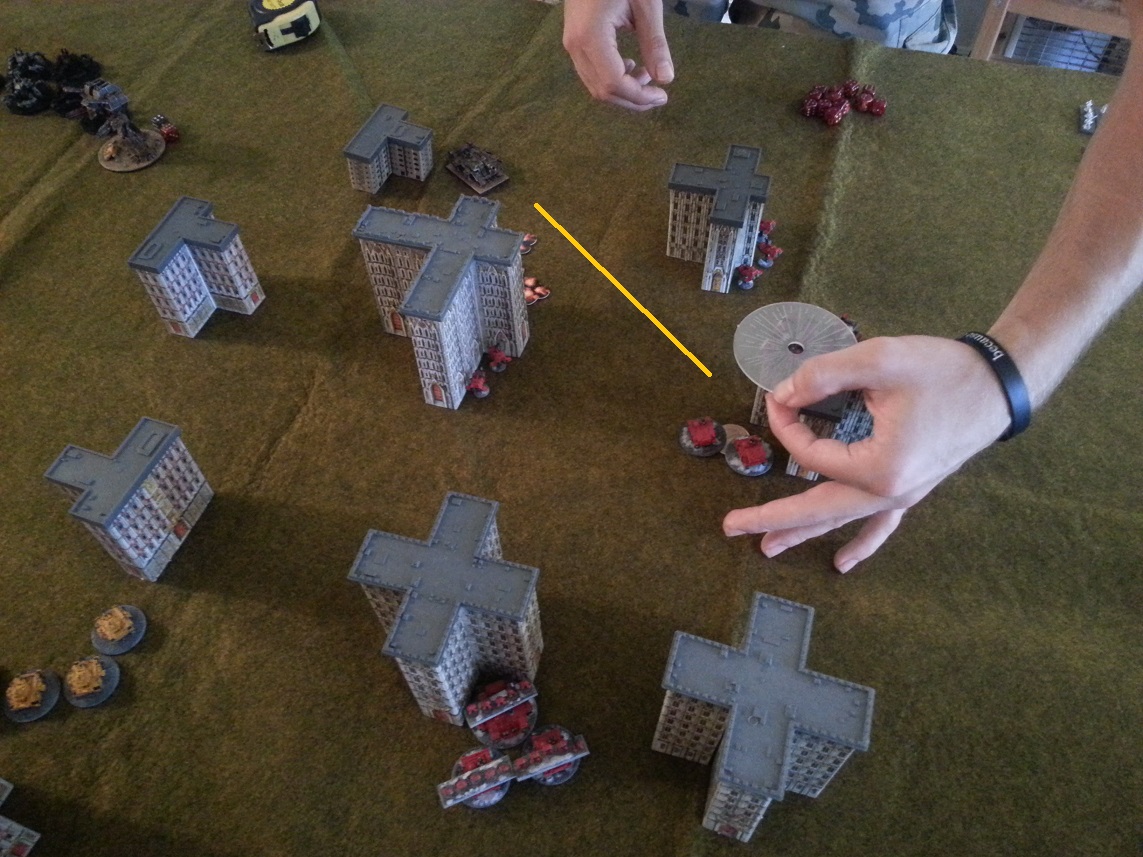
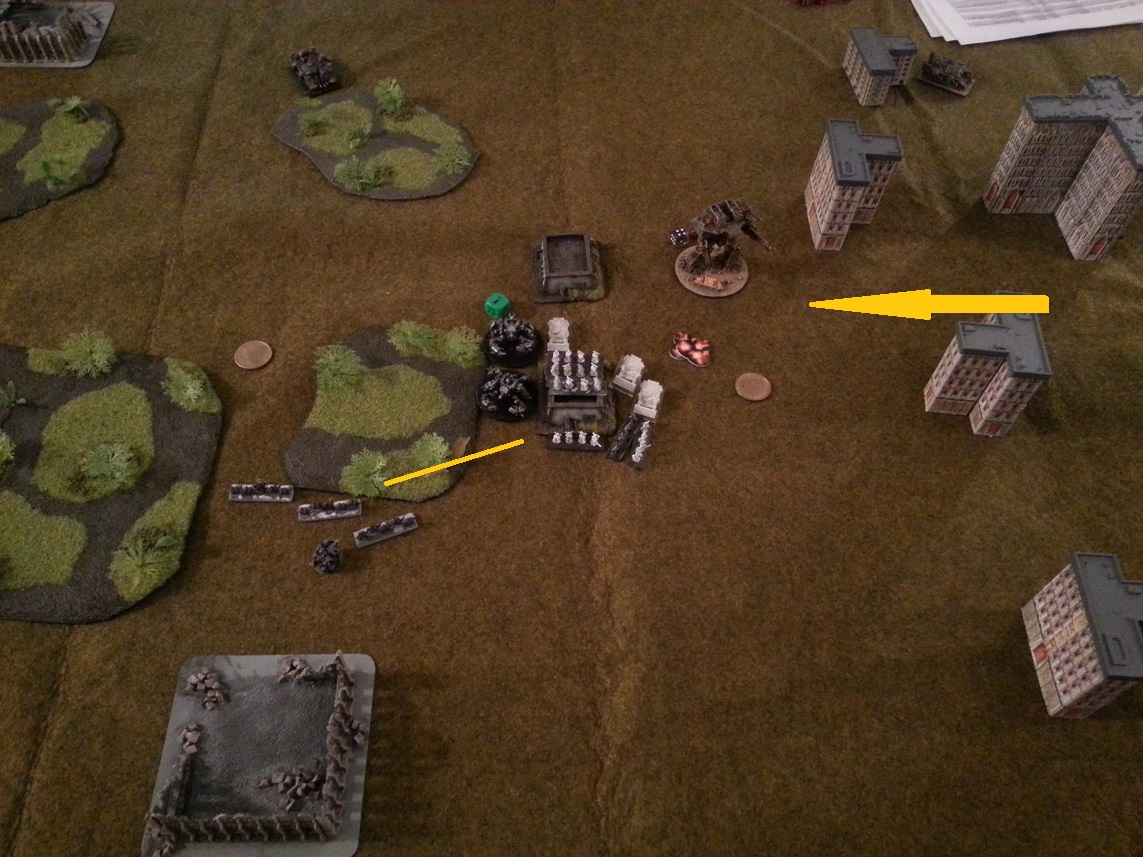
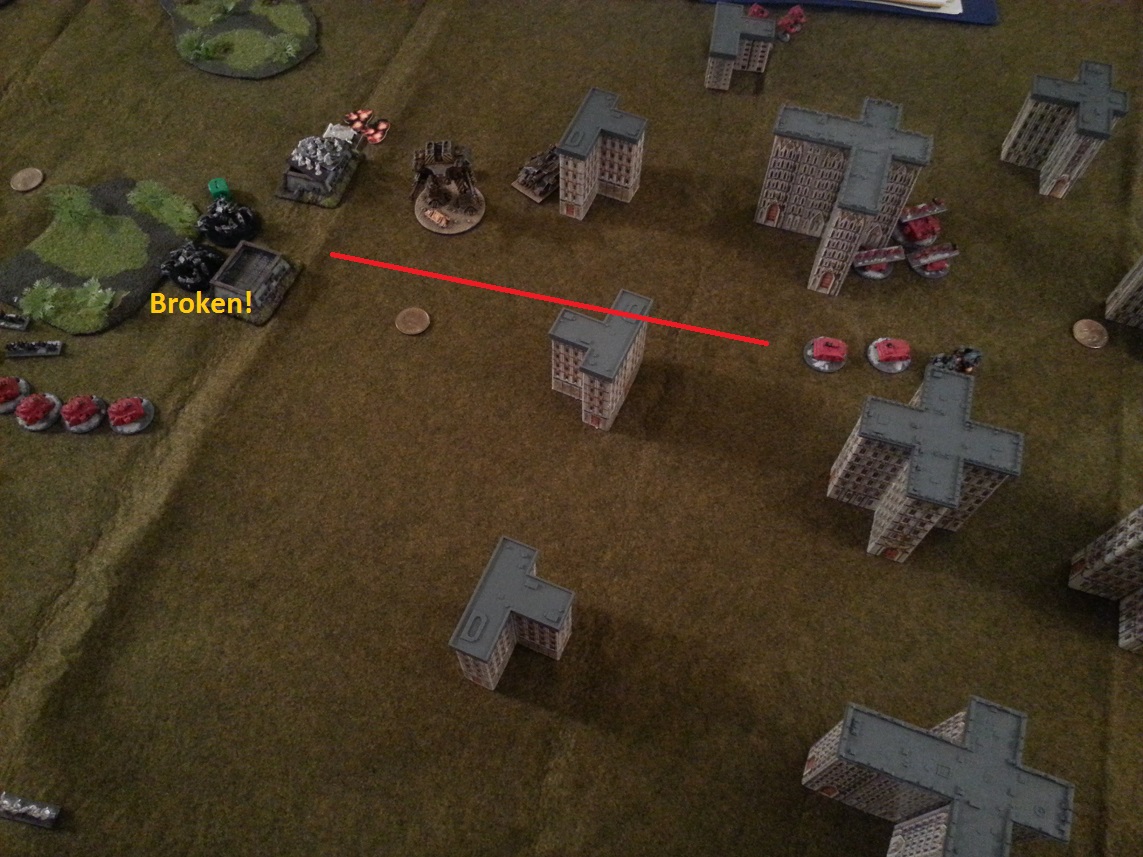
Now, the rule says specifically, pick an eligible unit and roll two dice. It doesn’t say anything at all about declaring a charge target. The Empire player wanted to charge the Warriors, but, as it turned out, his roll was just short of them. However, because of my careless placement of my Chaos Lord (red circle), he was able to fulfill the requirement the first model you move must finish within ½” of an enemy model by moving to within half an inch of the Chaos Lord. “When you pile in, you may move each model in the unit up to 3″ towards the closest enemy model”. There are no restrictions on movement during the charge phase other than that you must end the move within half an inch of an enemy model. So he arranged his Greatswords in such a way that the Warriors would be “the closest enemy models” during the pile in phase, and then he piled into them. Voila. Chaos Warriors charged. If you leave your nose out like I did, you may be leaving yourself open to a charge you didn’t want.

But the point of this is: Tactics! Age of Sigmar has them! This little charge, counter charge, flee, counter charge game is something that would have taken place in Fantasy. I personally find this system a lot more elegant, streamlined, and flexible and it produces the same (arguably better) result. No more being locked into combat until the bitter end is a great thing and opens up a lot of really cool options.

Flank charges exist

What we assumed: Combat is just a willy-nilly 40k style scrum in the center of the table in which you “pile-in” wherever you like and everybody gets to attack everyone and it’s just a big dumb giant love fest and this rule set is so dumb and GW is totally dumbing this game down for the dumb kids like everyone has been saying for the past 80 years.

What the rule actually says: “When you pile in, you may move each model in the unit up to 3″ towards the closest enemy model.” Oh. Hello again. You’re very clear and straightforward, aren’t you? You are saying I can’t just run around any which way I like in a mad dash to strangle my enemy. I have to… follow a rule. In addition, looking at the rules for Moving, it says “[A model] can be moved vertically in order to climb or cross scenery, but cannot be moved across other models”. Hrmmm.

076b
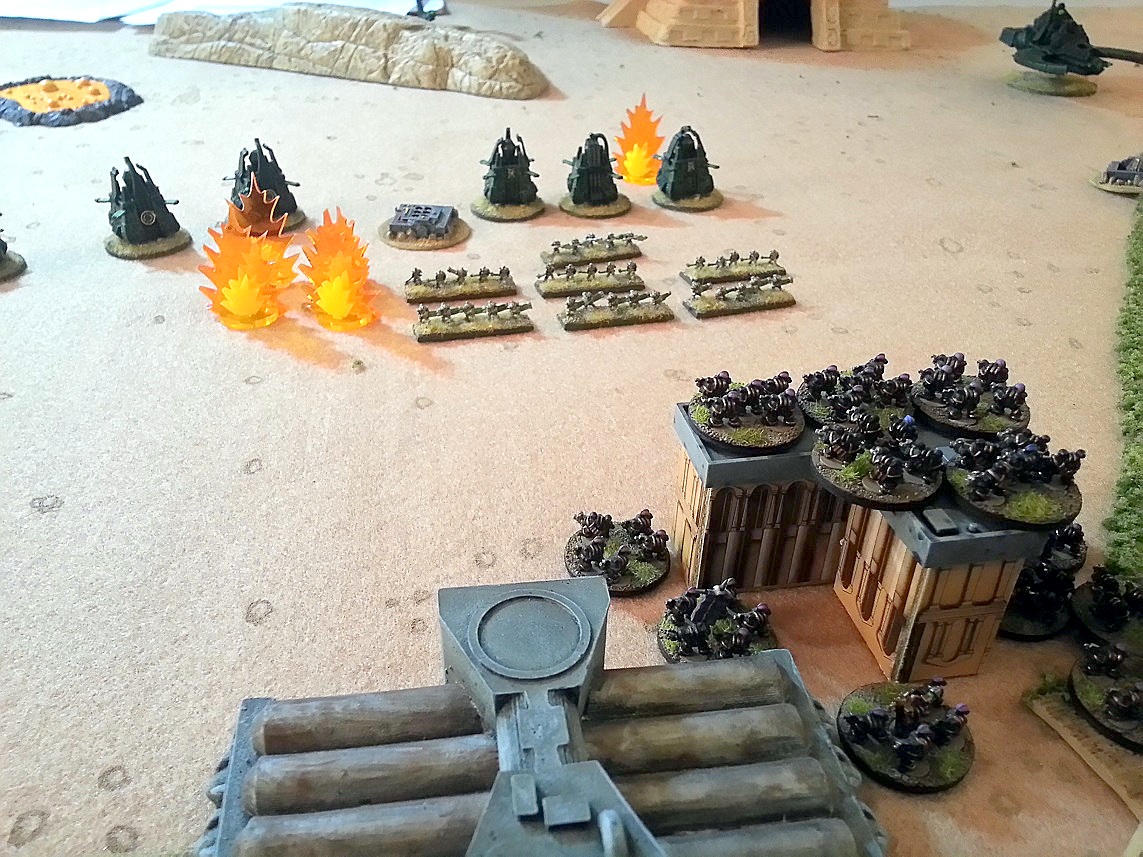
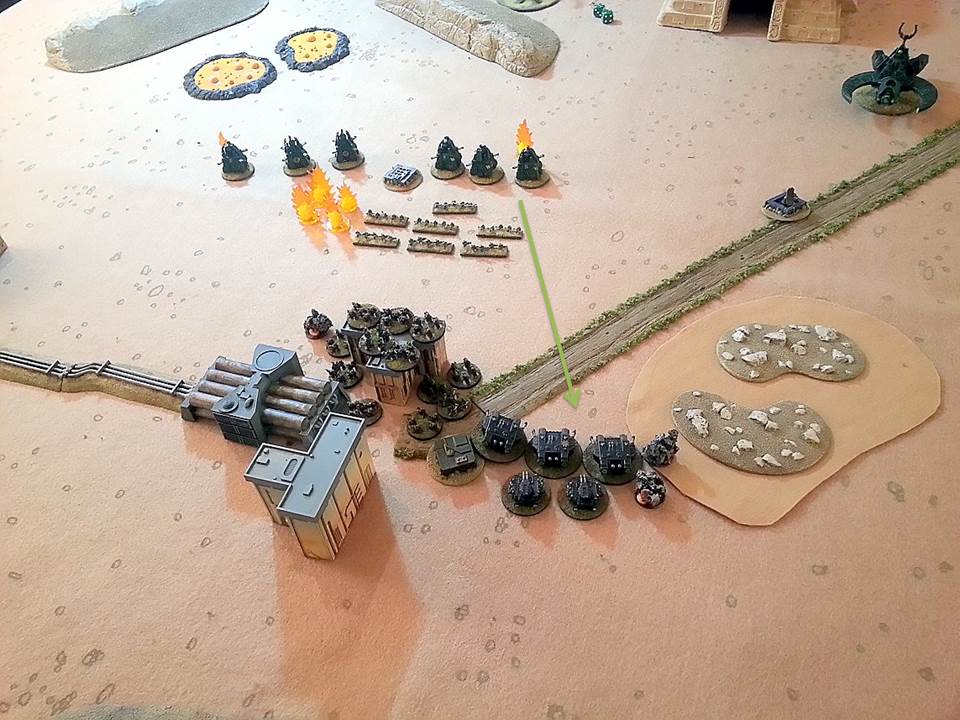
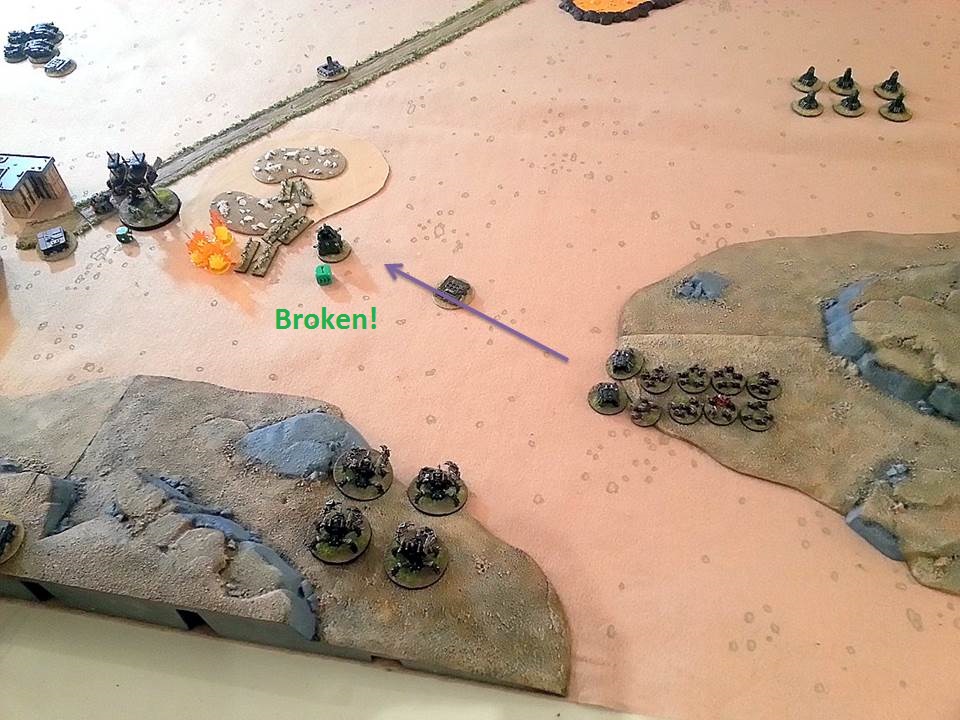
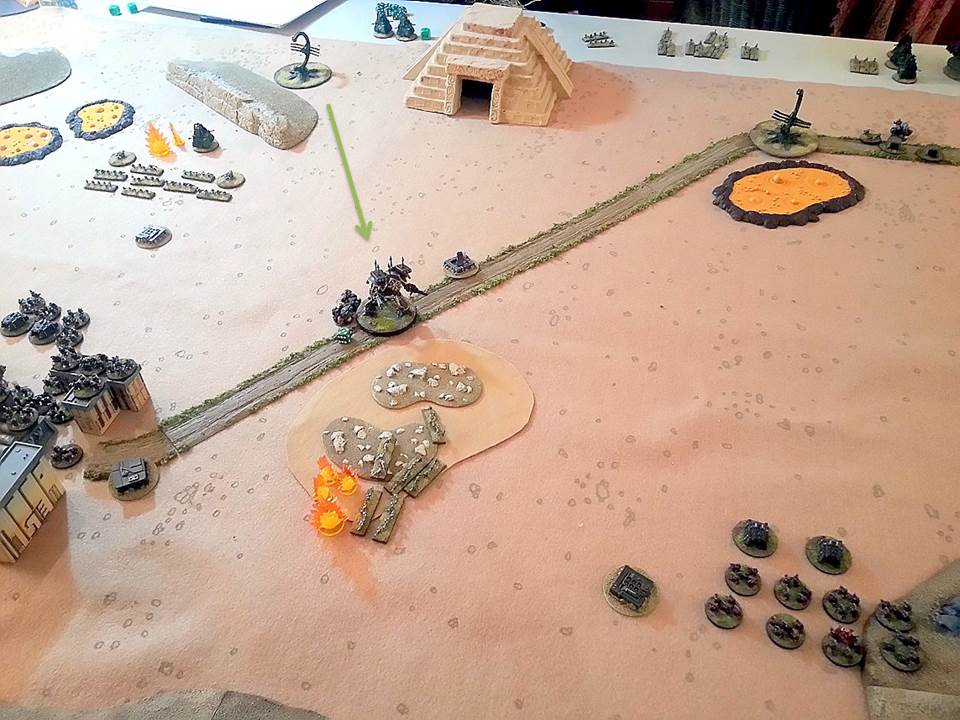
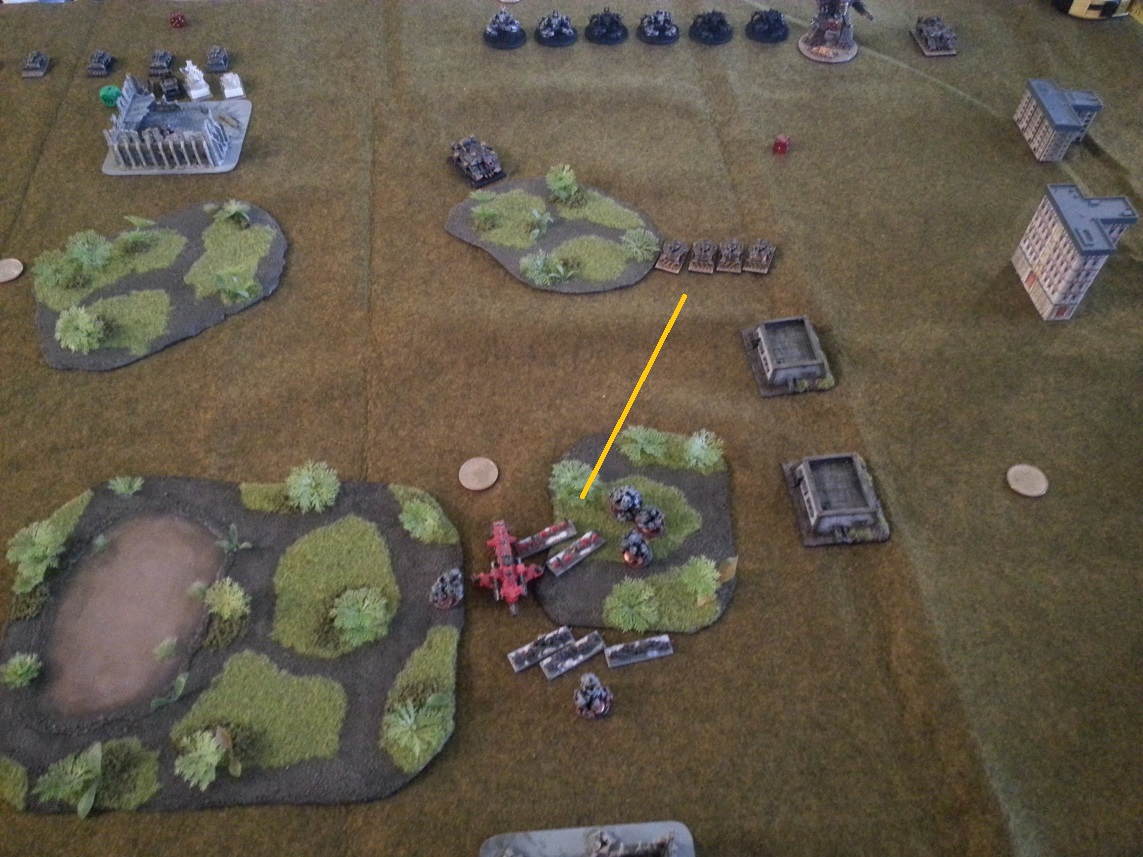
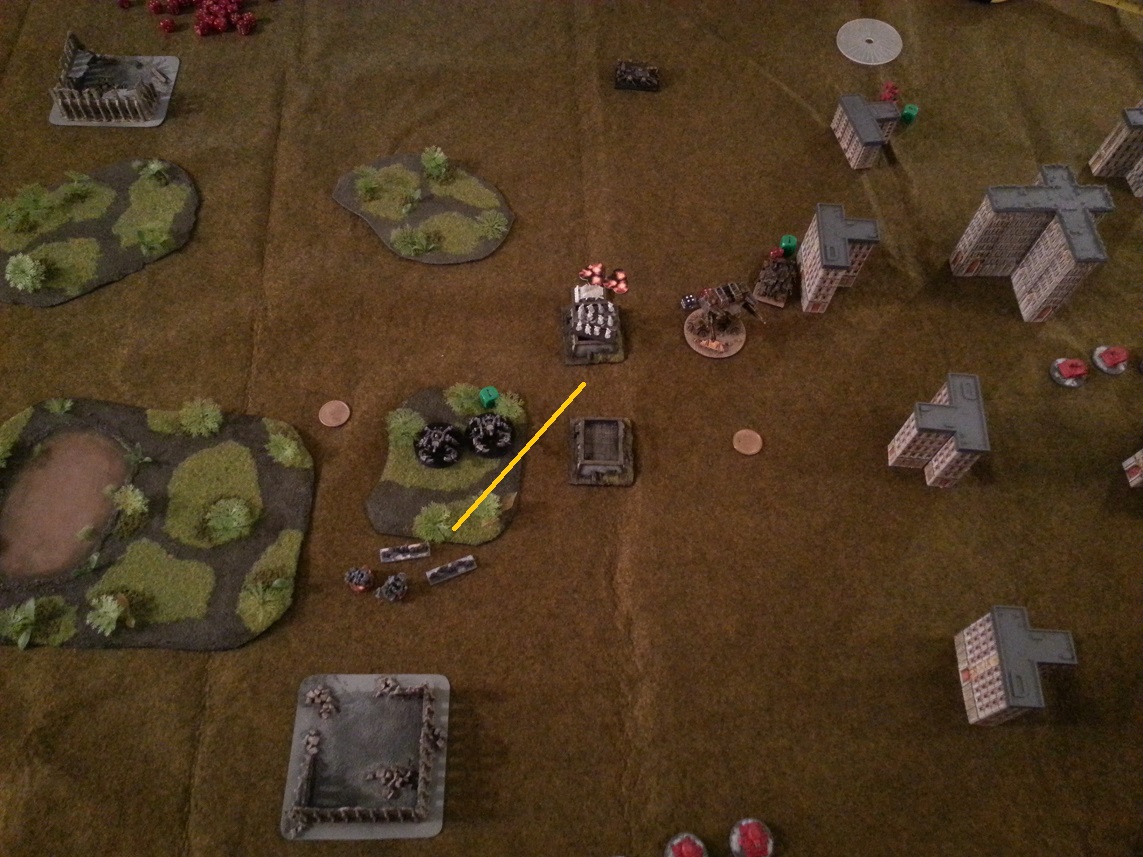
ohaider flank charge! Nice to see you! We thought you were dead, too. Granted, this is kind of a weaksauce flank charge here with only one knight, but you see the implications. The “closest models” to the three Chaos Warriors on the right are the Greatswords. They cannot pull away from the Greatswords to help their buddy who has been charged in his side. They’re stuck where they are. Now just imagine if my warriors were… gasp! ranked up…. and… oh my. They got charged in the side by three or four knights. Think this through in your head with me, ponder the implications, keeping in mind you may only move toward the closest enemy model in a straight line and you may not move through other models, friend or foe. It’s just as much of a question mark for you as it is for me. I will have to play a few more games to get a better feel for it. But the scenario in my head plays out an awful lot like a game of Fantasy.

Also, if you’ve ever played Warmaster, you know that the primary benefit of a flank charge is the asymmetric nature of the attack. You are able to apply more of your units against less of your enemy’s. Just because you don’t get a “+1 to combat res” doesn’t mean it’s not a big deal.

089b
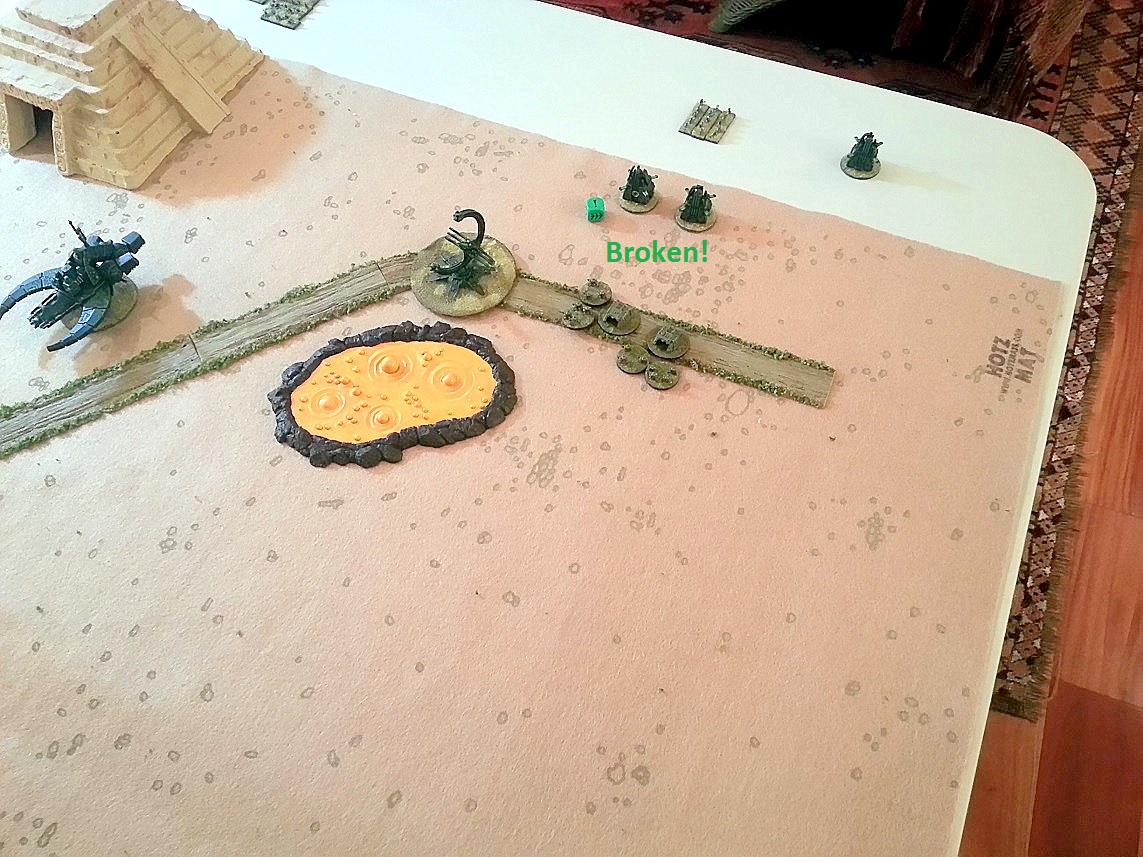
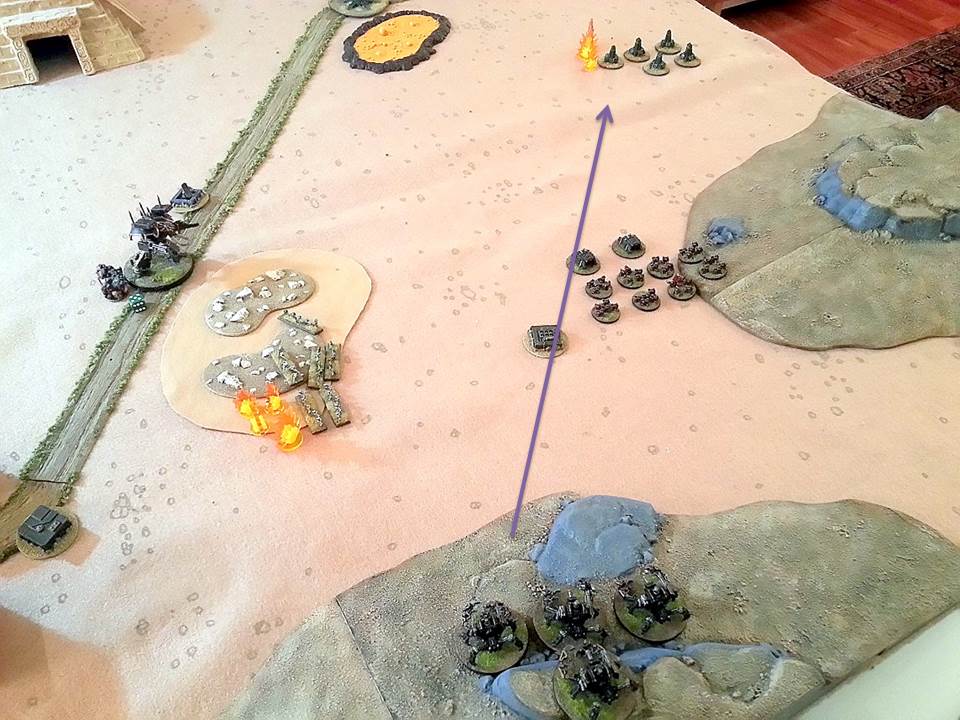
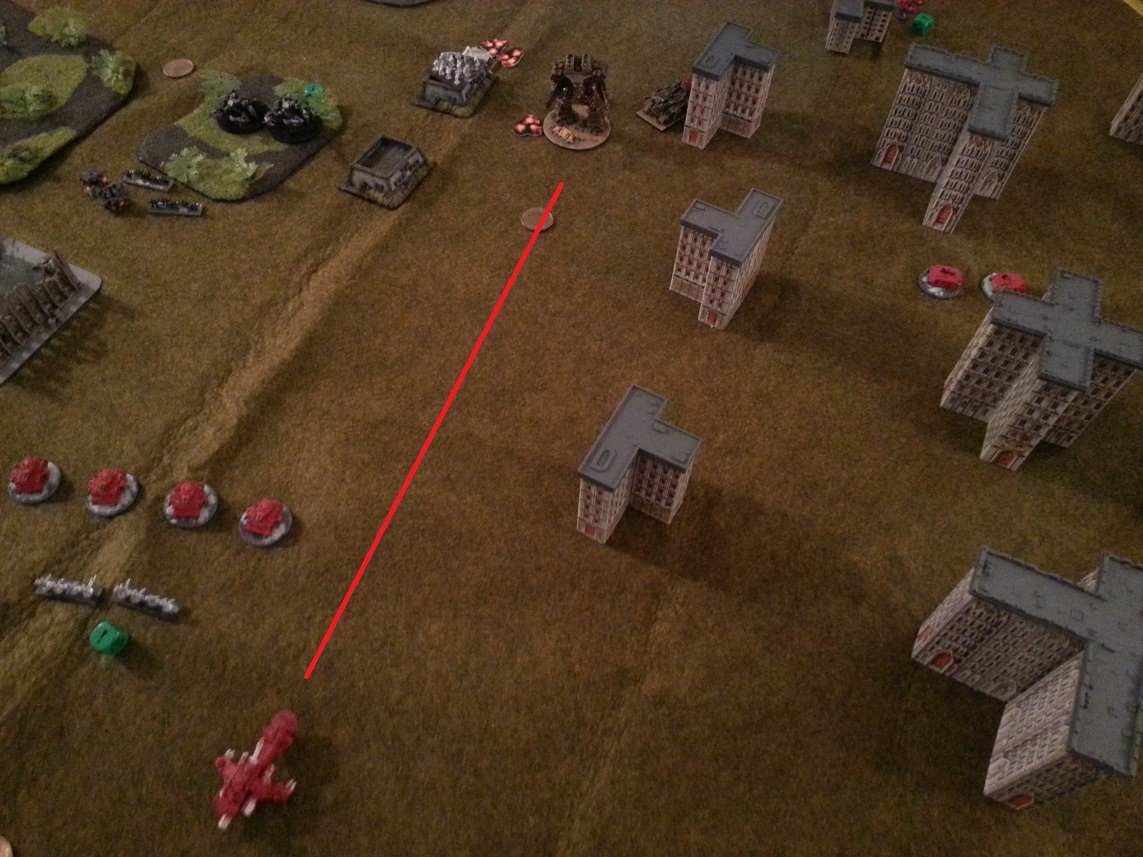
ohaider again flank charge! Now I’m really glad to see you because this time it’s me flank charging and it’s with a giant! Oh, how I missed you. (And in case you are wondering, yes, these same four Chaos Warriors survived like, a million turns of combat)

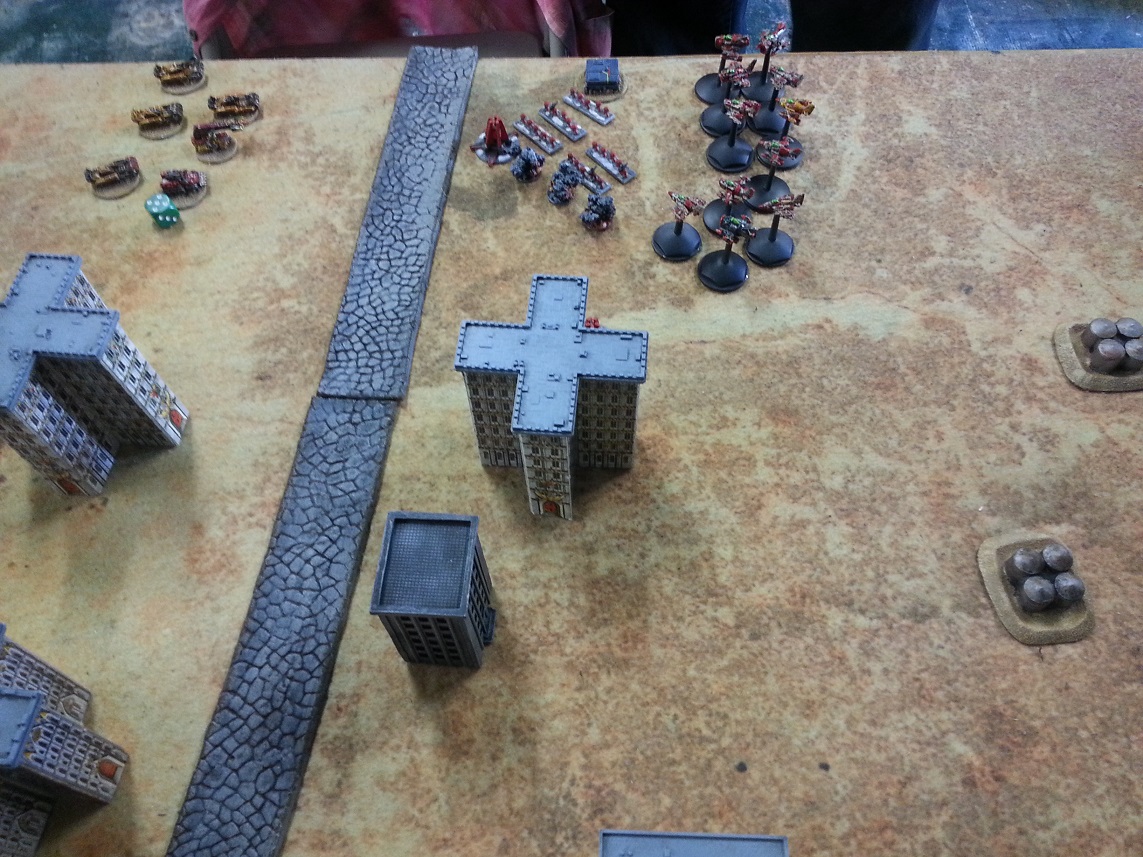
Here is another implication of the pile in rules
084b
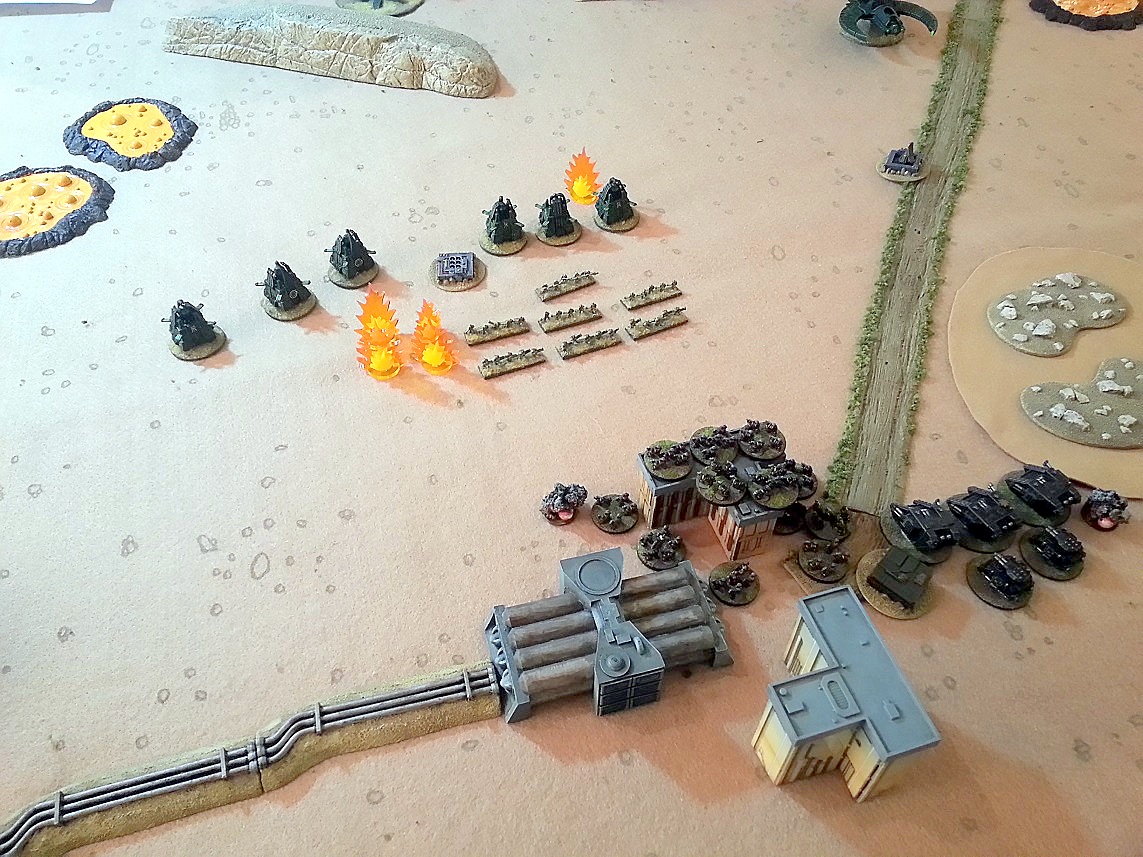
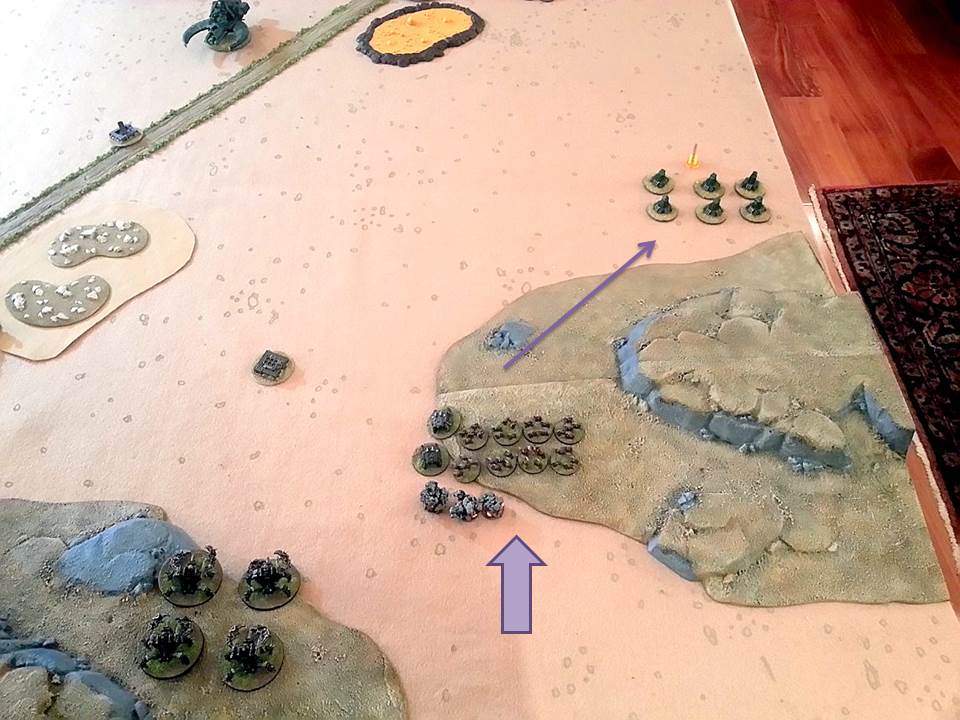
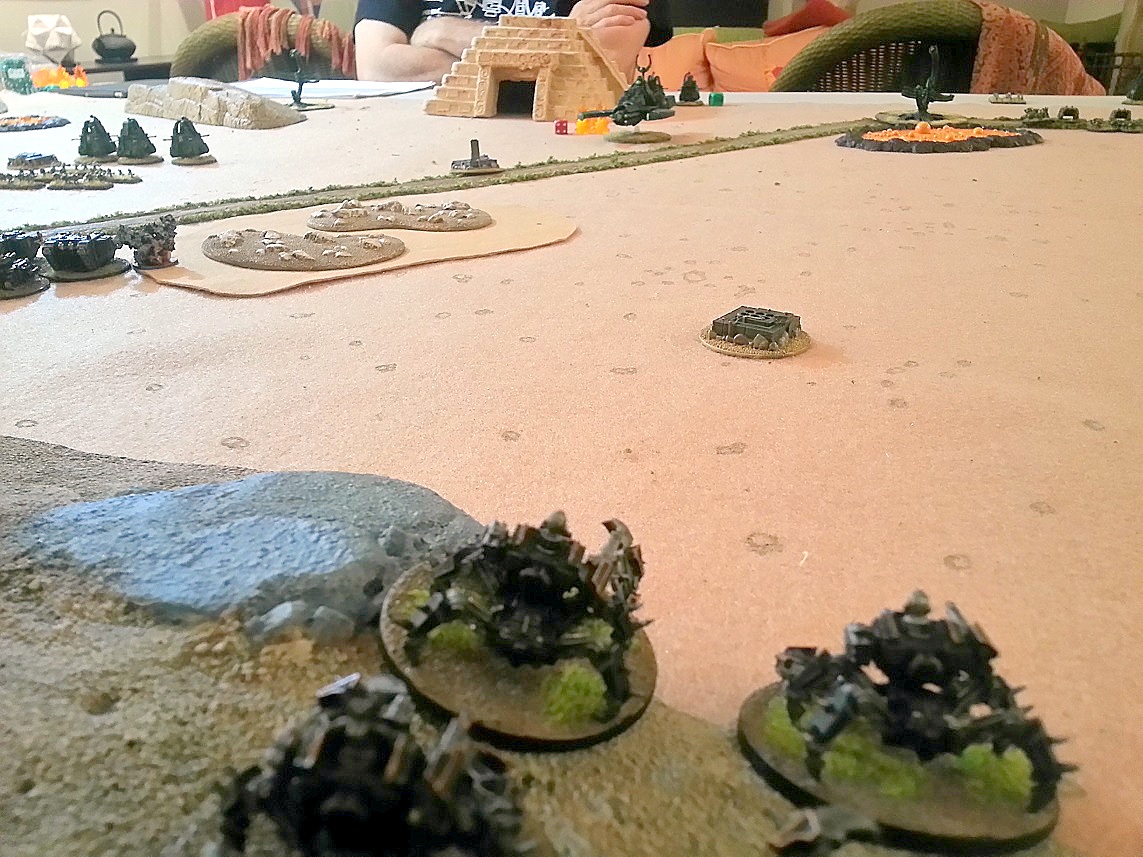
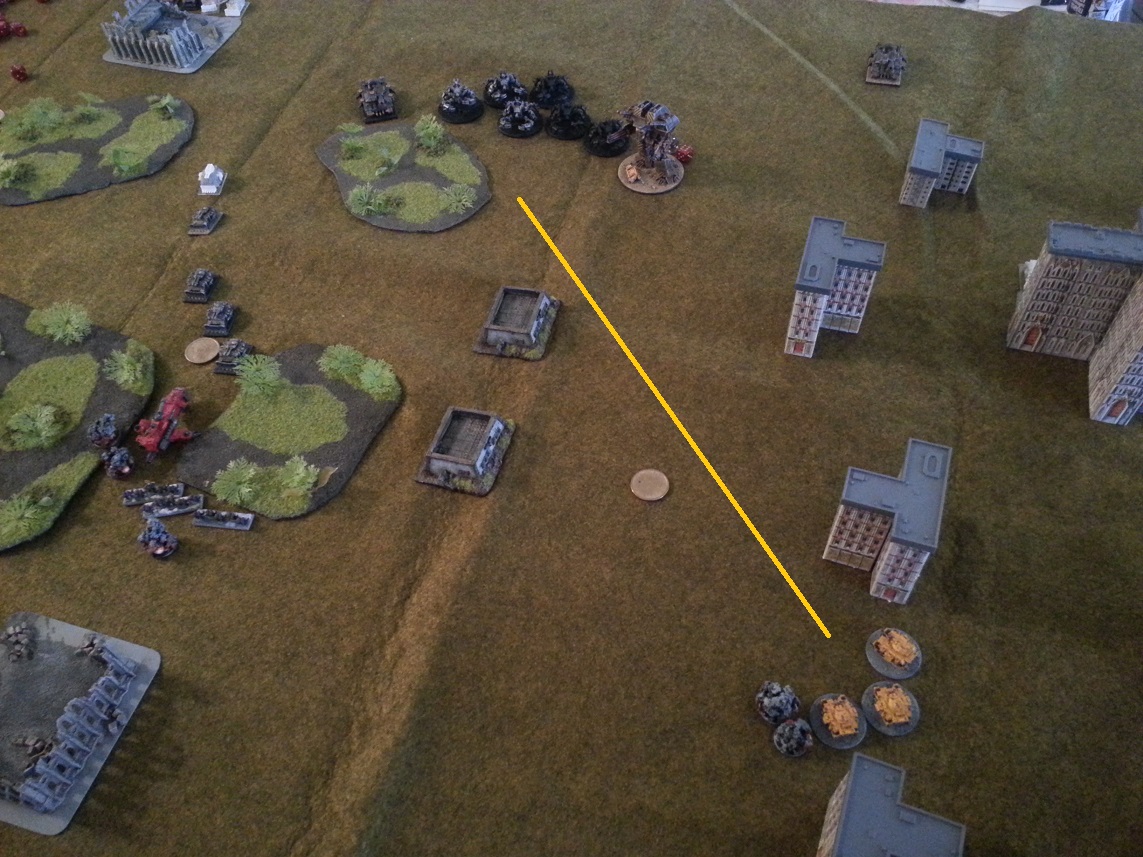
(Again, sorry for the crummy pics). The Khornate Knight circled in red here is stuck behind his three buddies fighting against the Empire Knight circled in blue. To pile in, he has to move toward the closest enemy model and he isn’t allowed to move through models. He can’t reach the Empire knight without violating one of those rules. He is stuck here. At least until one of his buddies dies and he can move up to take his place. I should have thought of that when positioning my charge!

(Post-publishing note on the above – I agree with some who say there is a lack of clarity surrounding whether the rule works this way or not. At the moment I’m about 80% in favor of the “directly toward” interpretation and about 20% in favor the “end movement closer to the closest enemy model than you were” interpretation. I do concede that it is unclear enough that GW should probably FAQ it at some point because it does have a huge effect on the way the game is played. In the meantime, come to an agreement with your opponent before you start playing or dice off for it)

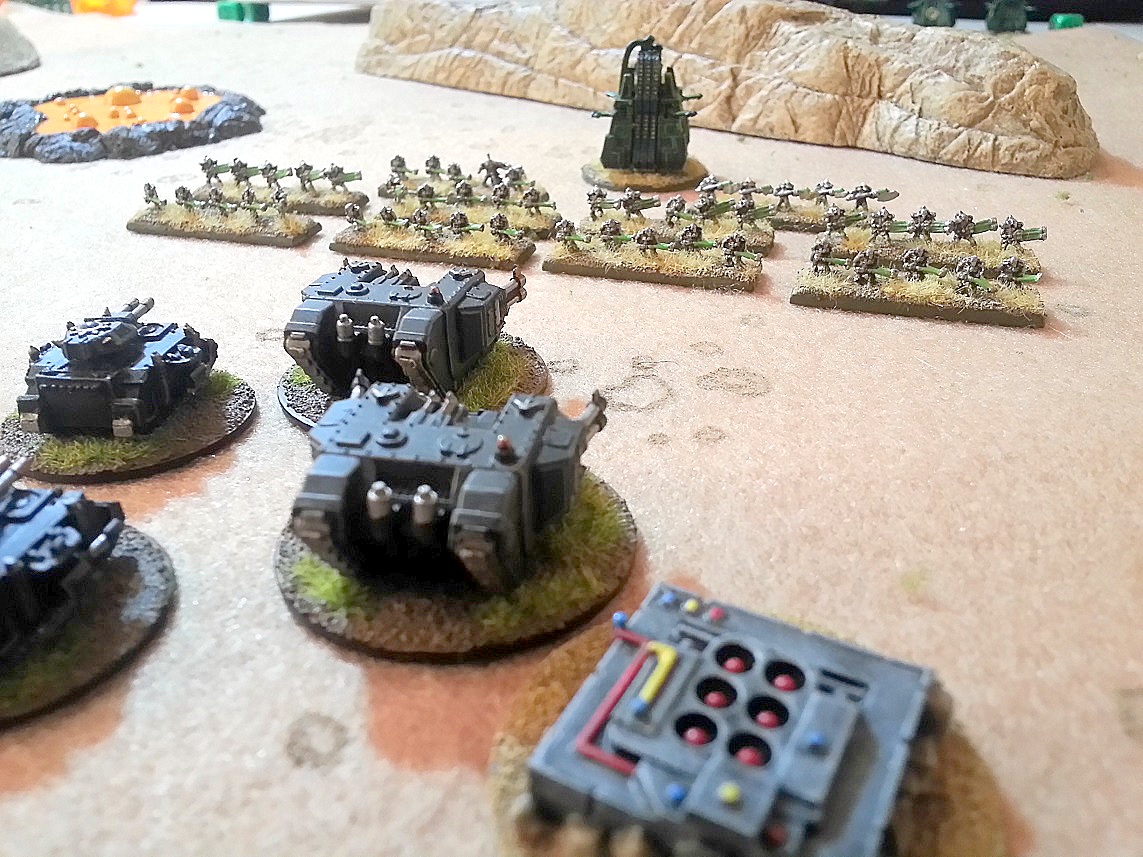
It’s almost like how things were when… units were ranked up in formations… on movement trays. Hey, wait a minute! Or… maybe I could have positioned my knights in a wedge formation… and the lead guy could have come within half an inch of an enemy on the charge… and then the other four guys could pile in three inches, and none of them get into each others’ way. Huh. Formations? Tactics? What sorcery is this?!

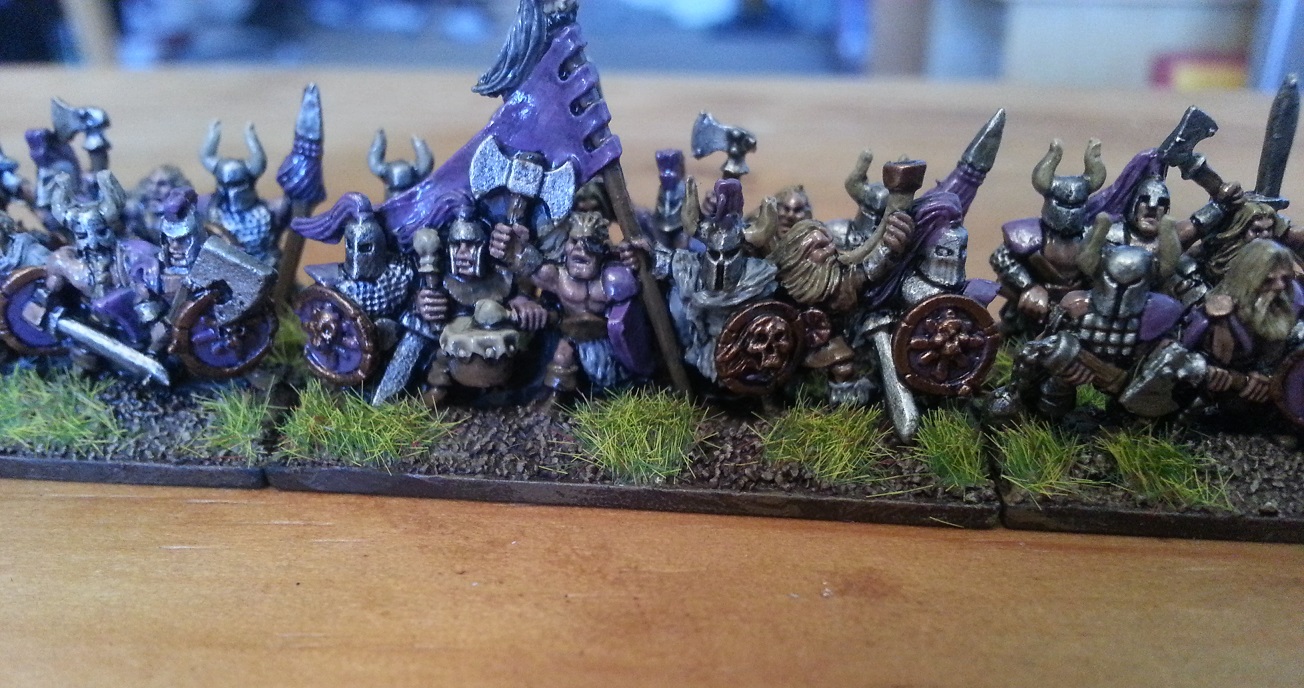
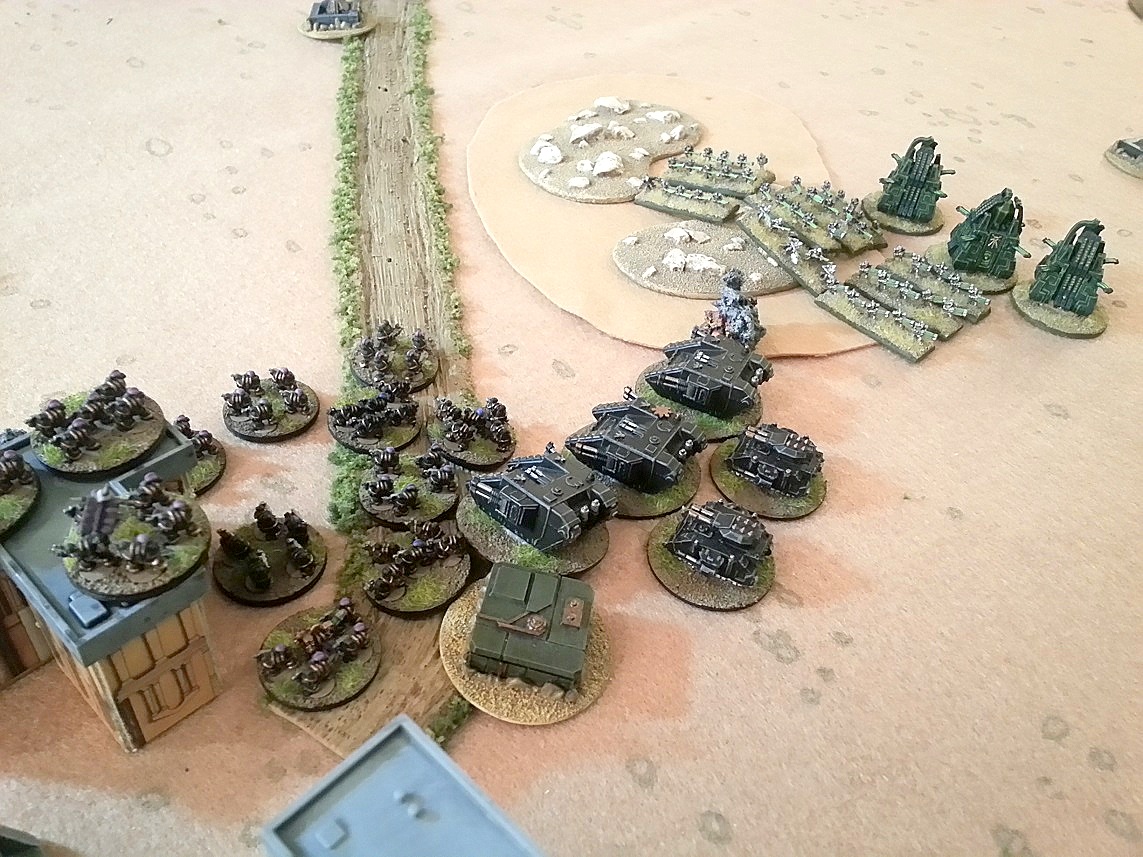
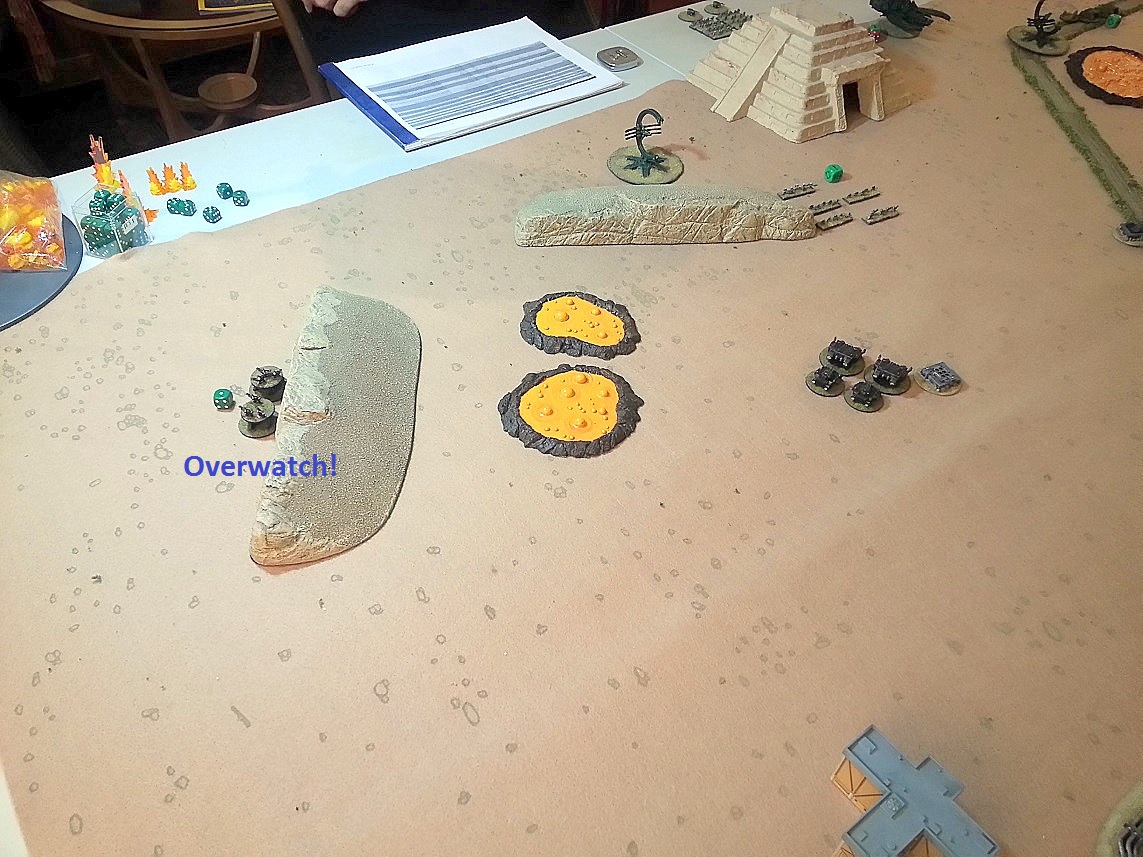
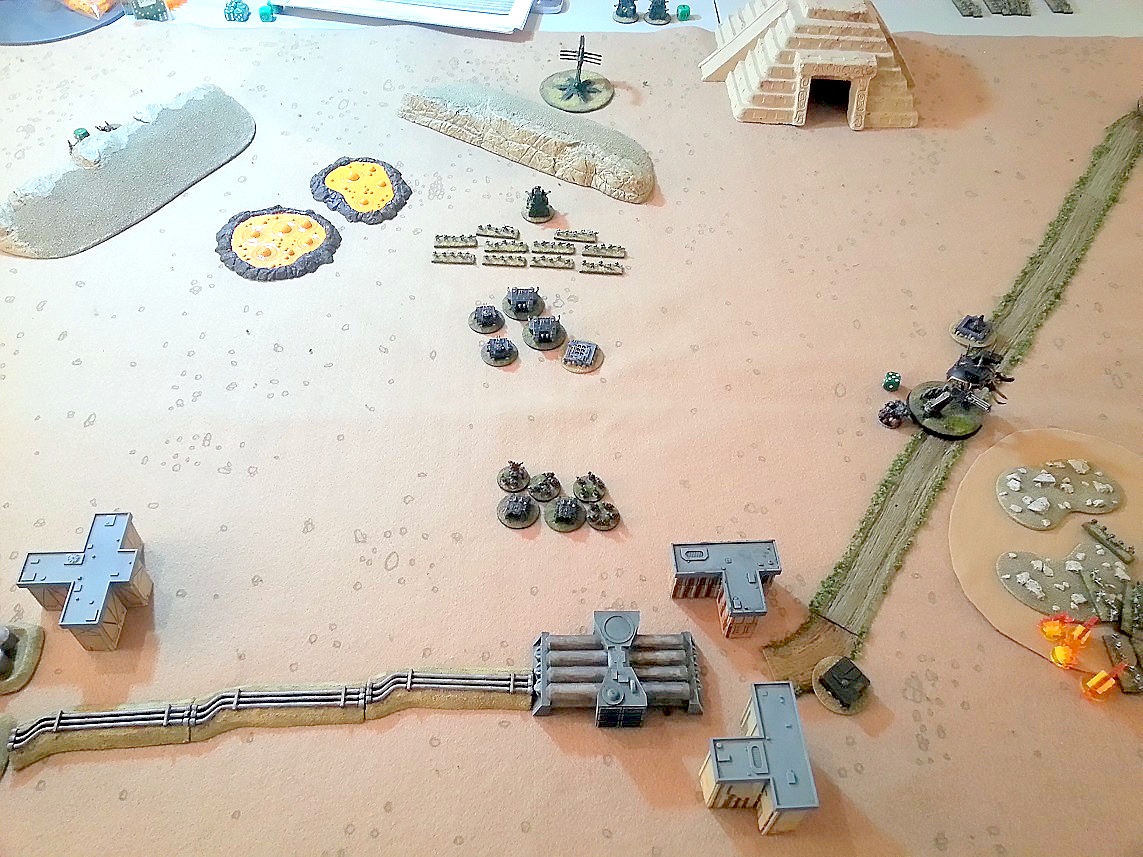
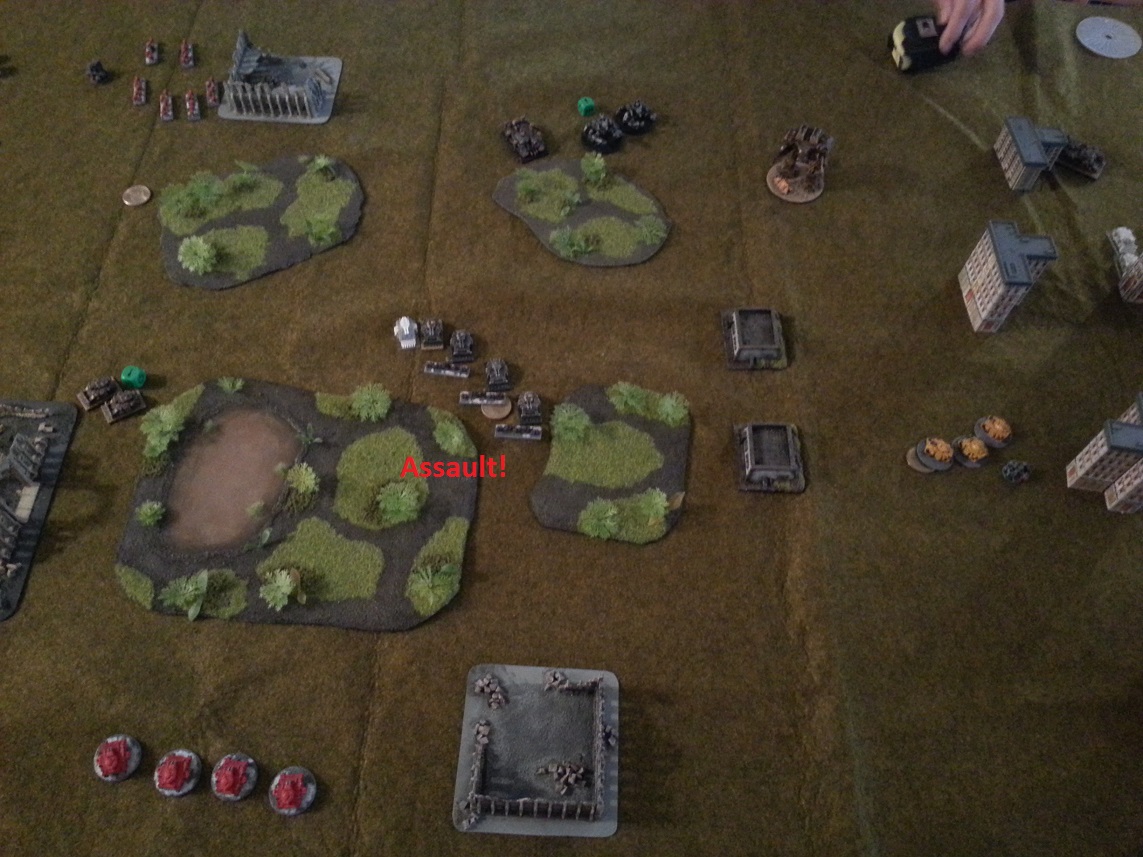
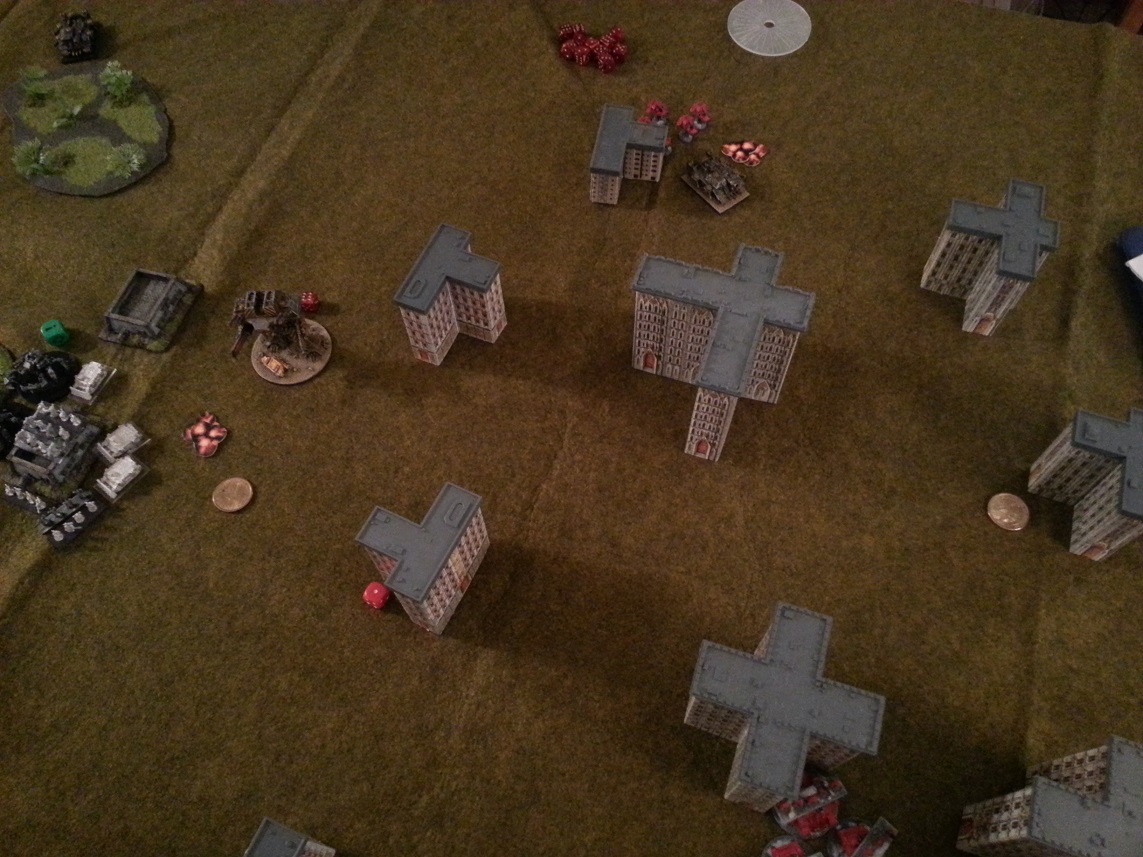
I had this inkling that the game still played more or less like Fantasy in my first skirmish size game. Now I really feel like it plays like Fantasy. I dunno. Take a look at this picture and tell me, does it look like a game of Fantasy to you? With battle lines and all that stuff?

024b

I found myself wishing I had movement trays…

That leaves us with the question of balancing games and the absence of a point system and all that… I have a lot of thoughts on that which I would like to save for another post, but, the long and the short of it is – I think it’s brilliant. It allows you to play the game as casually or competitively as you like. Think of the Magic: The Gathering model. Think of Warscrolls as cards. Now think of the different restrictions in place for the various Magic tournaments. Restrictions on deck size, the number of copies of the same card you can take, sideboard, etc. Think about how often someone will bring their four million dollar uber-meta-tailored deck against a new player or someone just looking to play casually. Not so often if he wants to keep finding people to play with, right? Now also think about how even the best decks will still have a bunch of commons in them. Now you’re getting an idea how Age of Sigmar will work going forward.

More on that later.

Age of Sigmar First Game and Thoughts

Alright, I gave a little bit of background in my last post where I shared pics of my super intimidating face paint marauders. I played Warhammer Fantasy a great deal back in 7th edition. I liked it, for the most part. I always felt that people took it far too seriously, but still, it was fun.

8th edition rolled around and while I was skeptical about some of the changes, I approached it with enthusiasm. Without going into great detail, however, a handful of things turned me off after only two or three games. The random charge distance was too random. The Steadfast rule meant there was almost no incentive to go for flanking maneuvers (but lots of incentive to BUY MORE MODELS!). The Winds of Magic rules were very poor and way too random. Certain spells seemed game breaking and made very little sense to me.

But the main issue was that I simply was not willing to buy and paint dozens of new models to keep up with the ever shifting meta. I’m really not one of these guys who is always grumbling on forums about how GW is a money hungry child killer, but this blatant cash grab on top of shoddy rules was beyond even my liberal threshold. I wasn’t angry. I just wasn’t interested. And so the mighty Warriors of Chaos have been on the shelf for the past five years or so.

Enter Age of Sigmar. The more rumors I heard, the more interested I became. But before I get into all of that, I want to get this out of the way – I know there is a lot of emotion surrounding the transition from Warhammer Fantasy to Age of Sigmar. I understand and respect that a lot of people are upset. GW just killed your baby and that’s not cool. I want to set that aside for now, however, and share the reasons I am excited about this.

AOS 1

The main thing I am excited about is that there is no point system. A lot of people are thinking the sky is falling over this one and zomg what are we gonna do about all the power gamers lurking behind every corner who are gonna plonk down 80 Bloodthirsters?!? Well, what you’re gonna do about jerks is what we’ve always done about jerks – ostracize them. Don’t play with them. I’ve never had any problems finding jerks to put on my “DO NOT PLAY GAMES OF TOY SOLDIERS WITH” list under any rule set or point system. I’m certain that they will remain on that list even in the Age of Sigmar. So, nothing at all has changed here.

What has changed is that the jerks will no longer be able to hide behind a point system that has never been anything more than an illusion of parity. The game is no longer about finding the best way to exploit a broken system. Gone are the days of “well, hey, it’s in the rules” and “it doesn’t say I can’t” and “yeah, sorry, I know the rules for it are broken, I just like the model so much I wanted 90 of them”. Now everyone will be able to see them exactly for what they are and tell them to go stand in the corner and come back when they’re ready to sit at the adult table.

The main thing, though, is this – this is how I like to play. Sandbox style. I don’t like anyone dictating how I can and can’t use my little plastic dudes that I spend a lot of time and money on. I know that no one has ever truly dictated how I can use my models, but when your local meta operates under that paradigm, it becomes yours by default as well. But now I can actually buy a box of 5 Skullreapers simply because I like the models and want to paint them. And hey! I can actually use them in a game now. Sure, I know it’s silly; but the question “can I actually use these five models somewhat effectively in the game or will it turn out I need to spend a million dollars for twenty of them?” is a factor in deciding to spend $55 on five little 28mm models. Now I can buy them and feel secure that I can make use of them. This is a win / win for me and GW.

AOS 2

In any case, I had a very hard time convincing anyone from the local crew to give this game a spin with me. I was discouraged by the negativity surrounding it and worried that I might not be able to find consistent gaming buddies going forward. But, one of them was up for it and we played our first game this afternoon.

Our text conversation to set the game up went something like this:
“How do you want to do this?”
“100 wounds each?”
“Yeah, but your 100 wounds may not be as badass as my 100 wounds, and that wouldn’t be fun”
“Hmm. What about we do like five Warscrolls plus two baddies?”
“Maybe. Or you know what? Bring whatever you want. You wanna put down 200 models? Come at me bro! I’ll kill them all!!”
“Challenge accepted! I’m bringing the whole damn box!”

Suh-weeeet. This is what wargaming should be, in my opinion. What ended up happening is that he brought all of his Beastmen over and we figured out roughly balanced forces on the fly. Did we get it just right? No! We didn’t understand how things worked yet. But that’s totally ok. We had a great time anyway. About halfway through the game, it became clear that I was badly outgunned, but I didn’t care. You ever heard of a fair fight? Neither have I. Sack up and do your best anyway.

On to the game. It took us a while because we had to keep digging up Warscrolls and rules, but that’s to be expected. We kept terrain simple and sparse, and didn’t use any of the magic spooky haunted house terrain or whatever it’s called. I always thought that was goofy in any case. Setup was easy. We were both surprised by how far apart the forces start. We shouldn’t have been, I guess, but you start 24′” apart. We did that kind of diagonal deployment and were also surprised by how small the deployment zone is. Something to keep in mind for deployment shenanigans later!

Oh, the forces. Think it was something like:

Me
3 Chaos Ogres
5 Chaos Knights
10 Chaos Warriors
10 Marauders
3 Beastmen Minotaurs (that’s right, I can mix n match and use these models I bought and painted now!)
1 Nurgle Lord on Demonic Steed

Him
3 Minotaurs
3 Minotaurs
3 Minotaurs
1 Gorgon
1 Doombull

He took them as a Warband or Formation or whatever it’s called, and the buffs that it gave his units were incredible! I think he got some kind of first strike gore attack on the charge and some extra attacks. It was pretty nasty! I didn’t run my little dudes as a Warband so got no bonuses.

We talked a lot and shared thoughts as we played. Regarding the Warbands, we’re pretty sure that going forward, GW is going to sell the game as a Warband vs Warband type thing instead of using a point system. This is only speculation, but my guess is that they might have “tiers” for formations or “suggestions” regarding the relative power levels of formations. And guess what? Those formations will require MOAR MODELS! This formation box set MAKES A GREAT GIFT!!!! And instead of being the quick and easy skirmish game I was looking for, it will be a 300 model per side clusterfuck like Fantasy 8th ed.

After a moment of cynicism and talk about “GW screwed us again! We shoulda known better than to trust those scoundrels!”, we settled down and realized – “dude, if you take a badass formation, I can just take more models than you or use badass units of my own”. So, again, it basically boils down to communicating with your gaming partner and making things fun for both of you.

In general, we were pleasantly surprised by the rules. The streamlined stat profiles are very welcome and speed the play along. The bravery mechanic works a lot better than we thought it might. You don’t actually lose models to failed bravery rolls as often as you might think. And I personally have always felt that simply removing models to represent broken morale was far more elegant than the weird fall back and rally drill in Fantasy.

AOS 3

Multi-wound models that do multiple wounds of damage and have -2 rend are really tough. His Minotaurs with great axes were mauling me with that rend. Also, halfway through the game, we figured out that when a Minotaur hits and does 3 wounds against a unit of Marauders, for example, that means he has wounded 3 Marauders! Not simply that he hit one Marauder and inflicted 3 wounds (two of which simply disappear into the warp). That’s three dead Marauders per hit. So, big monsters just tear through throwaway units. This is great. No more tarpitting powerful units with a handful of throwaway skeletons. And the idea of huge Minotaurs cleaving through hordes of lesser enemies by the dozen is appropriately dramatic.

Going back to the Bravery mechanic as it relates to big baddies – although they tend to have low Bravery values, because they have multiple wounds they won’t lose whole models as often. Which means they often will not have to make Battleshock checks in the first place. And even if they do, they’re likely only looking at a small modifier.

AOS 4

Characters can be hit or miss. I guess that hasn’t changed. I was bringing my knights around for a flank charge, and he broke his Doombull away to handle them. “Hold my beer”. He charges my knights with his Doombull and I’m thinking “pshh, whatever. I’m gonna wreck this dude”. Yeah, not the case. Knights aren’t as tough as they were. Three wounds apiece is nice, but 4+ armor being smacked by a -2 rend weapon that does 3 wounds a pop isn’t good for their health. The Doombull took care of them over the course of three combat rounds or so, and I think I put maybe three wounds on him in return.

On the other side of the table, my Nurgle Lord on Chaos Steed was stinking the place up. Both literally and figuratively. His command ability only works on units with the Mark of Nurgle. Um, which I forgot to bring. But in retrospect I guess I could’ve just nominated some units as having Mark of Nurgle once I read the rule in the middle of the game. I’m sure my opponent wouldn’t have had a problem with it (see, that good faith communication thing again). Other than that, his output is lukewarm. He gets three attacks that aren’t terribly powerful and he is fairly squishy. I’ll be sure to bring a real general next time.

AOS 5

The Sudden Death conditions are fun and exciting. Even though it turned out that his force was a lot more powerful than mine, I did outnumber him, so he chose the “Blunt” objective, and I nominated my Knights as the unit he needed to kill. As I mentioned above, his Doombull got the job done by about turn four, but we kept playing anyway just for the experience. When all was said and done, I ended up getting tabled. But I took a bunch of those bastards with me! And the only thing that matters are those pretty skulls for that skull throne, right?

The Verdict – this is a fun game. I enjoyed it a great deal, and so did my opponent. Again, I totally understand why people are pissed off about this big move. However, you would be doing yourself a disservice by not at least giving this game a try. Hey, keep playing 8th edition, too. No one is saying you can’t. Take a look around my humble blog, and you’ll notice it is nearly entirely devoted to a “dead” game (Epic). But when you don’t have four hours to set aside for a game, give this one a spin. You can even incorporate both Age of Sigmar and 8th Edition games into a league, campaign, or tournament.

No, it isn’t an incredibly sophisticated game, and if you’re looking for a serious tactical fix, Epic or Warmahordes is probably what you’re looking for. But it is fast, fun, and characterful. I know all the Serious Business people out there are up in arms about these silly rules, but having to grunt when rolling your Minotaurs’ attacks is a kick, and special rules like the Ungor’s “Attack the Weak and Injured” are flavorful and fun. Getting bonuses for shooting at units and characters under half strength as they hobble about the battlefield? So cowardly, so fun.

If you’ve got a Fantasy army already, quit being a stick in the mud. If you’ve always been interested in Fantasy but didn’t want to make the 500 model commitment to play, give Age of Sigmar a go. That new box set sure is shiny and it really is a great deal for fans. I’ve got some Skullreapers and Blightkings on the way for reinforcements. Might just have to get some of those new Goretide models at some point as well.

I’m excited about Fantasy and 28mm wargaming again!

AOS 6

Some Old Warhammer Fantasy Stuff

Last week I got into a conversation with a guy who started following my blog. I took a look at his blog and was really impressed with his work, especially his Chaos Marauders with face paint. I mentioned to him that I once had painted some face paint on marauders, and he asked me to post pics. I haven’t played Warhammer Fantasy since 7th edition, but I am slightly intrigued by this Age of Sigmar thing… might just dig these bad boys out of storage for a little tabletop bloodshed. We shall see.

Anyway, as I mentioned, these haven’t seen the light of day in years. I can’t believe it’s been six years or so since I painted them. Interesting how our skills and tastes evolve and change over time. Nowadays this muted palette wouldn’t excite me much, but at the time I wanted to invoke a sense of grim hopelessness with the gritty style. Like, these guys are here to crush you, see you driven before them, and hear the lamentations of your women. In any case, I painted 40 of these bastards and wanted to claw my eyes out when I was done. Big reason why I lost interest in Fantasy. Just couldn’t keep up with the painting demands. 8th ed rolls around and I’m already 150 painted models in… lolwut? I gotta paint 80 more models to stay afloat? No thanks /tableflip

Without further ado, here they are! The first 20.
BarbariansLeft1

And the next 20.
Marauders2

Some close ups
BarbariansClose1
BarbarianClose2
BarbarianClose3
BarbarianClose4

The close ups are all from the first batch. Unfortunately, it doesn’t look like I have close up shots of models from the second batch. A shame, too, because that was the better of the two. Maybe if / when I dig them up, I’ll take some.

There you have it. If you’re interested in more of my 28mm work, be sure to check out my Flesh Tearers. I do enjoy working at the 28mm scale because there is so much more room for expression, but it is terribly time consuming and, unfortunately, I don’t ever see myself doing an entire 28mm army again. But maybe some one-offs here and there. If Age of Sigmar truly is playable at the skirmish level, I might just grab a handful of those shiny new Chaos models…. we’ll see!

DIY Epic or Make Your Own Epic Necron Army!

Back with another quick blog post here. This time I wanted to share some really cool and easy DIY Epic Necron ideas that some of the members of our group have come up with.

Its true; Epic Armageddon is no longer officially supported by GW. But it’s far from dead. The rules are all still freely available on the internet, and army lists are still actively being developed and playtested by fans. The NetEA Website is your one stop site for rules and army lists ready to play straight from the box. All completely free!

Ok, so you have all the rules you need and every army list you could possibly dream of. Now how do you find an army? You can occasionally find good deals on ebay. Space Marines and Orks are fairly abundant and reasonably priced. Or, you can buy proxies and get creative! GW never actually made Necron models for Epic, so, if you want to play with them, you have to do it yourself. Kind of, anyway. And that’s exactly what some of the guys in our group have done. We happen to have three Necron players in our little group. And with all of the cool kit available for Necron out there, it’s very easy to make an army. Check out their stuff!

DIY Necron 2

The “warriors” and “immortals” are Edenite Infantry from Steel Crown Miniatures As you can see, they make some pretty nice Necron proxies. While you are on their site, have a look at their other 6mm products as well. The pylons and monoliths that you see in this picture were never produced by GW, and are, unfortunately, no longer produced and very difficult to find these days. However! Where there’s a will, there’s a way. Have a look at what one enterprising member of our group did.

DIY Necron 3

Voila! Monoliths! How cheap and easy is this? And they look great! I might even go as far as to say I prefer them to the “official” models. If you play 40k at all, you may recognize them as Dispersion Shields that the Lychguard carry. Don’t play 40k? Don’t have any buddies who have some of these shields spare? No problem. You might just be able to buy them here or here Of course, a quick search for “Necron bits” or “40k bits” on ebay or google will reveal any number of fine suppliers.

DIY Necron 4

And there you have your Pylon! I think he said this was made from a 40k Necron Deathmark rifle and uhh… I don’t know. I don’t play 40k anymore! But dig around on those bits sites and I’m sure you will find what you’re looking for.

What’s one of the coolest things about playing 40k at this scale? You get to take big ass tanks and flyers and titans and a) not spend a fortune and b) not have them take up the whole table! The Necron in Epic get to take some pretty cool toys. One of them is a baddie called a Warbarque. Think of it as a creepy, floating Warhound titan. That shoots… death rays. And stuff. To my knowledge, no model was ever produced for this, bootleg or otherwise, so you are free to let your imagination run wild.

DIY Necron 5

This is what one person came up with. I believe it is entirely made up of bits from the 40k Necron range.

Or you can go for a ready made option. Another lovely model from Steel Crown

DIY Necron 6

This is the Khazari Droid Controller. Or the Heavy Metal Grimdark Version is also available (now with MOAR SKULLS!!).

Need a Ghost Arc? Well, there might be some trolls who live under a bridge in eastern Europe out beyond the reach of Grandma Wendy who might be willing to sell you a “Necropolis Ghost Ship” (UPDATE: Some little GW fanboy who thinks he’s the IP Police narced to GW, and it is now no longer available – get a life, would you?)

Ghost Arc

Oh! What about a Nightbringer? That can be arranged as well!

DIY Necron 8

There he is in the middle of the ruins looking all dark and brooding. This is a Cairn Wraith from the Warhammer Fantasy Vampire Counts line.

Again, with all the cool kit that is available from the 40k range and elsewhere, your imagination is the limit. Want to make a Tesseract Vault? You can do that! Take a look at this (very) WIP model from the workdesk of one of our guys –

DIY Necron 7

Bend some wire into shape and paint it bright green to make it look like crackling energy and / or put a little glowy dude in the center there and you have something pretty cool. For more inspiration, I bet a quick dig through the Warhammer Fantasy Tomb Kings range would yield all kinds of fun bits that you can use.

There you have it. I’ve provided you with all the ideas, rules, and links to make it happen! And when these links go dead, well, at least you know what terms to search for. This means that YOU NO LONGER HAVE AN EXCUSE! You must build an Epic army. You know you want to! You’re here, aren’t you? A man doesn’t walk on the lot unless he wants to buy! 🙂

Oh, and the price? Our guys spent between $150 – $200 for an entire army. The one with the really nice green paint job and the rare items spent $300 – but it was already painted and had the rare items. Necron not your thing? Check out the links to other proxy models on the right. Now you really have no excuse!

If you find this article useful, please do let me know in the comments. Also, if you have an Epic army that you’ve done a lot of DIY work on, let me know! I’d love to feature it or link to it.

April 2015 Update

It’s been quite some time since I created a new post for this blog! We’ve been active playing Epic 40k / Armageddon here in Los Angeles, but I’ve just been too busy with other projects to post much.

We’ve started our second league and just finished round 1. We’ve got a great range of armies represented – Black Legion, Death Korps of Krieg, Newcron, Oldcron, Tyranids, Lost and the Damned, and Tau. Very excited to see who ends up on top.

And now, pics!

This is from a fun game I played a few months ago. Black Templar vs. Black Legion

BL vs BT 1BL vs BT 2BL vs BT 3


Our newest member’s Tyranid army. That’s a lot of bugs! I think he said it’s 12,000 points! Anyone got a giant can of Raid?

Tyranid Pic 3

My Black Legion facing off against his Tyranids. Fun game. Bugs are hard to kill!!

BL vs Nids 1

Black Templar (attempt to) purge the Lost and the Damned from an agri-world

LaTD vs BT

What I’ve got on deck. Like any good addict, I haven’t even finished my Black Legion but am already dreaming of Cadians. To the left is a “Novum Dictum Command Centre” from Troublemaker Games that I plan on using as a Leviathan.

Epic Stuff 040915

Some test infantry for my Cadians. I just had to use the jungle fighters from Dark Realm Miniatures for this army. I know they don’t look like Cadians. I don’t care. Too cool. To the left are Stormtroopers from the same range. Great models! I highly recommend.

Cadian Test

A totally sweet work in progress shot of the Ordinatus Cadia that one of our members is building for me. This guy is a wizard with the plasticard. This is only a rough outline. Can’t wait to see the finished product.

Ordinatus Cadia

That’s that for now! I hope to be able to update this blog a little more regularly. And, as always, if you are looking for Epic 40k / Epic Armageddon players in Los Angeles, don’t hesitate to reach out. We’re here!

A Day of Epic Gaming and a 16,000 Point Mega Battle!

The Los Angeles Epic crew had a fun day of nerding out playing Epic today.  We also had our league championship match.  Biel-Tan Eldar defeated Adeptus Mechanicus PDF to take the crown.  Three tables of gaming and tons of fun, featuring a 2 vs 2 mega battle with 8,000 points per side.  Ghazkull’s Horde vs. Iron Warriors and Black Legion!

The forces face off!  Note the Ork commander’s shirt 🙂Epic4a

A swirling vortex of violence!  That’s a lot of Orks!
Epic6a

Chaos sets up an armored wall of death to repel the Ork onslaught
Epic9a

Both sides are battered, but the Orks are taking the worst of it
Epic10a

Chaos armor surveys the battlefield
Epic11a

The Orks are routed!  Chaos repels the Ork invasion
Epic13a

Check out this super cool Ork objective
Epic1a

And on another table… Tyranids take the city by storm!
Epic2a

Starting a Warmaster Chaos Army – Thank God for Army Painter Quickshade!

I’m getting started (slowly!) on a Warmaster Chaos army.  I took one look at these little guys and said, “Oh, hell no!” to all of the fiddly little details all over them.  I wanted a way to paint them quickly and easily with good results.  I had heard good things about the Army Painter Quickshade, so I gave it a try.  I brush it all on rather than dip, and I’ve been very pleased!

BEFORE
Dragon Ogres Before 1 Dragon Ogres Before 2

AFTER
Dragon Ogres After 1 Dragon Ogres After 2

I think they look great!  You just slap a base coat on and the QuickShade takes care of the rest.  I knew I was going to be using cool colors for this army, so I selected the darkest shade.

Here are some more models I’ve painted.

019a 021A 022A


Can’t wait to play!


Showcase Battle Report – Black Legion vs. Necron

“And it is called the Celestial Orrery?”

“Yes, my Lord” replied Ashkharaofth, Grand Sorcerer of Tzeentch, Seer of Ways.  “It is an ancient artifact, older than Mankind itself.  Within the web of living metal and hologram may be found every star in the galaxy.  By merely snuffing out one of the lights with your fingers, you cause its physical counterpart to go Supernova, engulfing nearby worlds in fiery oblivion”

Abaddon considered for a moment.  “Such wondrous technology is wasted in the hands of the Necron.  It shall be mine.  Where do we find this artifact?”

“Its location is shrouded in mystery to even me, my Lord.  Ancient rumors, whispers, and hearsay are all that I hear when I conduct the sacred divination rituals.  However… Tzeentch has blessed me with a vision.  I see a nearby mining planet… the ancient dead awakened from their slumber… whispers… voices… yes…  long forgotten gods… massacre… bloodshed…” Ashkharaofth appeared lost in reverie.

“It is here, my Lord”, he said, pointing to and highlighting a planet in the holographic map of the galaxy before him.  “The whispers tell me that the information we seek may be found here, on the mining world of Arjuna IX”

“You mean to tell me that the Orrery is located on this insignificant mining colony?”, Abaddon inquired, incredulous.

“No, my Lord.  My visions indicate that this is an awakening Tomb World.  Perhaps we may find clues as to its location by—”

“FIND IT!!” Abaddon roared, wind blasting from the sheer force of his voice, his eyes glowing red with impatient rage.  “I care little for your riddles and less for your presence!  Get out of my sight and do not return until you have found it!”

“My Lord”, the Sorcerer bowed deeply and scurried out of Abaddon’s chamber.

An expeditionary force lands on the Imperial mining colony.

The Armies

Black Legion
RETINUE [425]
8 Chaos Space Marines, (Chaos Undivided), Chaos Lord, 4 Havocs

RETINUE [365]
8 Chaos Space Marines, (Chaos Undivided), 4 Rhino, Chaos Warlord (Supreme Commander)

ARMOURED COMPANY [325]
(Chaos Undivided), 2 Chaos Predator, 3 Chaos Land Raider

ARMOURED COMPANY [250]
(Chaos Undivided), 2 Chaos Predator, 2 Chaos Land Raider

HAVOC RETINUE [225]
4 Havoc units, (Chaos Undivided), Chaos Lord, 2 Rhinos

RAVAGER TITAN [650]
(Chaos Undivided)

DEFILER ASSAULT PACK [275]
4 Defilers, (Chaos Undivided)

CHOSEN [145]
4 Chaos Space Marine Scouts, (Chaos Undivided), 2 Rhino

CHOSEN [145]
4 Chaos Space Marine Scouts, (Chaos Undivided), 2 Rhino

HELL BLADES [200]
3 Hell Blade Fighters, (Chaos Undivided)

BR001

BR002

BR003

BR004

Necron
INFANTRY PHALANX [505]
Necron Lord, 6 Warriors, 2 Tomb Spyders, Pariahs, 3 Immortals

INFANTRY PHALANX [405]
Necron Lord, 6 Warriors, Pariahs, 3 Immortals

INFANTRY PHALANX [405]
Necron Lord, 6 Warriors, 3 Immortals, Pariahs

MONOLITH PHALANX [275]
3 Monoliths

MONOLITH PHALANX [275]
3 Monoliths

PYLON [200]

PYLON [200]

ARMORED PHALANX [300]
6 Obelisks

TOMB COMPLEX [75]

WARBARQUE [350]
Supreme Commander

BR005

BR007

BR008

BR006

After dropping on planet and massacring the miners, the Chaos forces march steadily toward the menacing ziggurat, wary of the unknown enemy…BR009

They don’t need to wait long.  Strange glowing structures appear out of thin air before them, shimmering into existing as if a mirage
BR010

Quickly the battle is joined.  A Black Legion armored company advances and fires on the strange monoliths, but the laser blasts are simply absorbed by the alien metalBR011

The Necron Pylon crackles to life, and searing beam of light flickers toward the titan, dropping one of its shieldsBR012

It is followed an instant later by another blinding beam, which drops one more shield
BR013

The Defilers open fire on the Warbarque with their long range battle cannons.  But, again, the shells are merely absorbed by the strange alien metalBR014

The alien craft appears to spit the shells out of its hull.  All damage is repaired as it fires upon the Black Legion Armored Company, but causes no damage
BR015

The eerie Monoliths float listlessly forward, and beams of light pour forth, destroying two RhinosBR016

The Chosen of Nurgle march forward fearlessly, looking to assault the Pylon or to harass the Necron flanks
BR017

Metallic undead infantry come pouring forth from glowing portals located in the center of the MonolithsBR018

The garrisoned Chaos Space Marines unleash a hail of overwatch autocannon fire, cutting down three standsBR019

The Necron fire back, but only cause some suppressionBR020

A Black Legion Armored Company sallies forth and fires on the Monoliths, but, again, the strange metal seems impervious to their lascannon fireBR021

Monoliths fire beams at the Land Raiders, but their thick hulls hold true
BR022

CSM Havoks occupy a building and let loose with their autocannons.  The shells find their mark, and one of the Monoliths shatters!  Finally!  The Monolith formation is broken
BR023

The Necron have no more activations for this turn.  A CSM Retinue advances along the right flank and fires on the Obelisks, but cause no damage
BR024

The Slaanesh Chosen march along the left flank and take cover behind a large sand dune
BR025


The Titan marshals, clearing blast markers and regenerating shields.  The Hellblades, wary of the Necron Pylons, go on combat air patrol for the time being
BR025b


End of Turn 1BR026


The Monolith formation that sustained damage in the last turn disappears from the battlefield and reappears in an entirely different location!
BR027

The Chaos Space Marines, with their superior tactical abilities (Strategy Rating 4), go first. The Chosen fire on the formation and immediately break it.
BR028

The Black Legion retains the initiative.  Defilers fire battle cannon shells at the Warbarque, finally managing to damage it
BR029

In a cunning move, a Necron Monolith formation disgorges a phalanx of Warriors, Immortals and Pariahs into the flank of an Armored Company and CSM Retinue
BR030

An intermingled assault ensues!
BR031

The Necron are victorious.  The Armored Company and Retinue break and flee!
BR032

The titan advances and unloads on a Necron phalanx, breaking it
BR033

The Obelisks float unnaturally and unleash dizzying colored lights on the Chosen, killing and breaking the formation.  The Necron retain and a Pylon fires at the titan, but only drops one shield
BR034

A Black Legion Armored Formation advances and fires on the Warbarque, failing to penetrate its hull but confusing its systems enough to break itBR035

The other Necron Pylon fires at the titan, but the Necron technology is having a hard time getting past the shields.
BR036

The Slaanesh Chosen go on overwatch, choosing to take cover and threaten the Necron flankBR037

The Necron are out of activations.  A CSM Retinue sustains fire on a Monolith formation, destroying two and breaking the formation
BR038

Havoks advance and fire on the broken Necron Phalanx, destroying it utterly
BR039

The End of Turn 2
BR040

The Warbarque teleports back onto the battlefield, but the Armored Company is waiting for it.  Their lascannons find their mark and destroy the Warmachine
BR041

The Black Legion retain the initiative.  The titan lumbers forward and opens fire on a Necron phalanx, but destroys only one stand
BR042

The Monolith floats over the dune and unloads its deadly cargoBR043

The Necron phalanx assaults the Armored Company
BR044

Their gauss weapons shred the hulls of the Chaos tanks
BR045

The CSM Retinue shifts slightly to capture a nearby objective and fires at the Obelisks, again doing no damage
BR046

Black Legion retains the initiative.  The broken CSM Retinue rallied in the recovery phase.  It now pushes forward and fires on a phalanx, killing two stands and occupying an objective.
BR047

A Pylon sends a crackling bolt of pure energy at the titan but misses
BR048

The Defilers fire their battle cannons at the Obelisks and manage to destroy one
BR049

The Necron phalanx marshals and moves to contest a Black Legion Defend the Flag objective.  Its position in the Black Legion half of the battlefield also denies them the They Shall Not Pass objective.  Will they hold on?
BR050

If the Chaos Marines can shift the other Phalanx from this position, they can capture the Take and Hold objective.  Slaanesh Choosen circle around and set up a crossfire, but don’t do enough damage to break the formation
BR051

The Obelisks float over to protect the Necron tomb, and fire on and break the Nurgle Chosen
BR052

The Havoks sustained fire on the Phalanx, hoping to capture Defend the Flag and They Shall Not Pass objectives.  But the Necron hold on just one blast marker away from being broken!
BR053

The Hellblades, which stayed off the battlefield all game in fear of the Necron Pylons, fly on and fire on the Phalanx, breaking it!
BR054

The Black Legion have captured the Defend the Flag and They Shall Not Pass Objectives.  The Necron, seeing the futility of continuing to fight, disappear from the battlefield
BR055


The Chaos Space Marines advance on the ancient and mysterious ziggurat, not knowing what they might find inside….
BR056

Post Game Thoughts
What a fun game!!

This was my first time using my Black Legion army and it was my opponent’s first time using his Necron army.  This was purely a friendly match, not a league game or anything, so our goal was just to enjoy ourselves.  The Necron have a lot of funky special rules that probably take a while to get the hang of, so he didn’t know what he was doing, especially at the beginning of the game.  We’ll chalk it up to the Necron battle protocols not quite being booted yet – they are freshly awake after millions of years asleep, after all!

But we still had a lot of fun.  The Necron seem very interesting and I think have a great deal of potential for making a crafty and dangerous opponent.  I can’t wait to see what he comes up with as he gets a feel for the army.

I was quite impressed by the Black Legion.  This is pretty much my first time running anything other than loyalist marines, and it was cool playing by the same set of rules as everyone else for once.  The Black Legion feels like a horde army with bad ass armor saves.  Kind of like an elite Imperial Guard.  I was impressed by their resilience on defense and aggression on offense.  Super cool army that I look forward to getting familiar with in the future.

I’ll be continuing to write more showcase battle reports, and we will have a part two of this particular narrative!  Stay tuned!

Epic League Game – Blood Angels vs. Iron Warriors

This is game 7 of the the Los Angeles Epic league, and this one is a real grudge match.  My opponent this time is Volrath with his Iron Warriors, the last time we faced off, in a friendly non-league match, he was able to table my Blood Angels.  As the Blood Angels army champion, I’ve tweaked the list a bit, and this time I’m out for revenge!  Let’s see how it goes.

The Lists –

BLOOD ANGELS

DEATH COMPANY [300]
Chaplain, 4 Assault Death Company Units

DEVASTATOR DETACHMENT [250]
4 Devastators

THUNDERHAWK [200]

PREDATORS [275]
4 Baal Predator

PREDATORS [275]
4 Predator Annihilator

TACTICAL DETACHMENT [450]
6 Tacticals, Supreme Commander, Land Raider

ASSAULT DETACHMENT [375]
6 Assault Units, 2 Assault Units, Chaplain

THUNDERHAWK [200]

DEVASTATOR DETACHMENT [275]
4 Devastators, Blood Angels TL Lascannon Razorback

LAND SPEEDERS [200]
5 Land Speeder

BIKE DETACHMENT [200]
4 Blood Angels Bike, Attack Bike

IRON WARRIORS

IRON WARRIORS COMPANY [400]
6 Chaos Space Marines and 2 Havocs, Stalker, Warsmith (Supreme Commander)

IRON WARRIORS COMPANY [350]
6 Chaos Space Marines and 2 Havocs, Iron Warriors Lord, Stalker

IRON WARRIOR TERMINATORS [275]
Iron Warriors Lord, 4 Iron Warrior Terminator

DEFILER ASSAULT PACK [400]
6 Defilers

ARMOURED COMPANY [200]
4 Chaos Predator

ARMOURED COMPANY [250]
5 Chaos Predator

SUPER HEAVY COMPANY – DECIMATOR [225]
Decimator

SUPER HEAVY COMPANY – DECIMATOR [225]
Decimator

RAVAGER TITAN [650]

The forces face off
BR001

Blood Angels win the initiative roll and force the Iron Warriors to go first.  A CSM Retinue advances behind cover.
BR002

Blood Angel Land Speeders Zoom across to the other side of the table and take cover.  The deployment of my bikes and speeders here was mainly a feint to get the IW to divert resources to the left flank – my plan was to make my primary push through the city on the right flank and apply unequal force to collapse his battle line.
BR003

The second Iron Warrior Retinue advances forward on top of a Blood Angel objective.
BR004

Volrath has a tendency to play very aggressively with his Iron Warriors, which often works very well for him, but sometimes it leaves individual units exposed and unsupported. Knowing how tenaciously CSM Retinues can cling to objectives throughout matches, I jumped on this opportunity to destroy one.  The bikes lay down a blastmarker.
BR005

And then I retain the initiative to call in a Thunderhawk Assault with the Death Company
BR006

With support fire from the Bikes, the Blood Angels are able to break the CSM Retinue.
BR007

Iron Warrior retribution is swift and violent.  A Decimator entirely wipes out the formation of Blood Angel Bikes.
BR008

The Iron Warriors retain and Predators advance to fire on the Devastator squad, causing no casualties.
BR009

The Blood Angel Tactical formation with Supreme Commander advances into the city, being very careful to take advantage of cover.
BR010

The Iron Warrior Ravager Titan advances and destroys the Devastator Squad.
BR011

Iron Warriors retain the initiative and advances Predators, which then fire on the Thunderhawk, causing no damage.
BR012

Blood Angel Predator Annihilators advance and break an Iron Warrior Predator formation – my goal was to start breaking and destroying his smaller formations to cut into his activation count.
BR013

The Defilers advance and open fire with their battle cannons, but only kill one Predator.
BR014

Blood Angel Predators advance into cover and unload on the CSM Retinue hiding behind a building, needing sixes to hit and causing an unbelievable four casualties and nearly breaking the formation.
BR015

A Decimator lumbers forward and unloads on the Devastator formation, but only kills one stand.
BR016

The Blood Angel right flank seems to be holding its own very well, so I send my Baal Predators over to the collapsing IW left flank to push forward and eventually encircle the Chaos Space Marines.
BR017

The Iron Warriors are out of activations, so the Blood Angels call a second Thunderhawk Assault on the already broken CSM Retinue, not only to finish it off, but also to establish position in the IW rear / flank. The Blood Angels win the assault and rout the Chaos Space Marines.
BR018

At the end of Turn 1, the Blood Angels have nearly managed to encircle the Iron Warriors. The Blood Angels hold two objectives, the Iron Warriors one.
BR019

TURN 2

The Blood Angels win the roll to go first and take full advantage of it.  First, the Predator Annihilators fire on and break the Defiler formation.
BR020

Then they retain the initiative and the Death Company makes a ballsy assault against the Predator formation in the center of the battlefield.
BR021

The Death Company wins the assault without taking any casualties and sends the Predator formation packing.
BR023

An Iron Warrior Decimator unloads on the Blood Angel Devastator formation and breaks it.
BR024

The Iron Warriors retain the initiative, and the Ravager Titan destroys the Predator Annihilators.
BR025

The Blood Angel Assault Marines on the left flank fall back out of range of a Decimator lurking nearby, but remain within marching range of the IW Blitz objective and one Take and Hold objective.  Because one stand is within charge range of the Decimator, they actually need to overcome Frenzy to make this move.  They fail, but then pass on the Supreme Commander re-roll.
BR026

The remaining Iron Warrior CSM Retinue doubles over and opens fire on the Death Company, but does no damage.
BR027

The Iron Warriors retain the initiative and a Decimator advances and kills one stand of Death Company.
BR028

Back on the right flank, Blood Angel Land Speeders advance and open fire on a Decimator, but fail to do damage.  The blast marker would later prove important, however.
BR029

The Iron Warriors are out of activations, so the Blood Angels keep going.  Both Thunderhawks fail their initiative checks to come in for ground attacks and stay in the box of shame.
BR030

The Baal Predators advance and let loose a withering hail of the Emperor’s Justice upon the IW Marine Retinue, destroying quite a few stands and breaking the formation.
BR031

The Tactical Squad advances and puts fire down on the Decimator, doing one point of damage and breaking it.
BR032

The End of Turn 2 is not looking so good for the Iron Warriors.  Only two units are unbroken heading into the rally phase.  Meanwhile, most remaining Blood Angel formations are at or near full strength.
BR033

TURN 3

Before the turn begins, the Iron Warriors teleport the Terminators that they had forgotten about in Turn 2.
BR034

But, the Blood Angels manage to win the initiative roll again, for the third straight turn.  The broken Blood Angel Devastator formation, which managed to rally, fires on the also freshly rallied Defiler formation, instantly breaking it again.
BR035

The Blood Angels retain the initiative and send the Baal Predators to welcome the Chaos Terminators.  They destroy two stands and break the formation.
BR036

The Iron Warriors respond by breaking the Blood Angel Land Speeder formation with a Decimator.  The war is on to break and destroy objective grabbers.
BR037

The Tacticals consolidate their control of an IW take and hold objective, falling back to a position safe from the Ravager titan.
BR038

The CSM Retinue sustain fires on the Death Company, but does no damage.
BR039

A Blood Angel Thunderhawk lays down a blast marker on the IW Ravager, hoping to make his activation more difficult.
BR041

The Ravager lumbers over to protect the Blitz objective.
BR042

But that’s check mate.  The Blood Angel assault formation captures the second take and hold objective, and with no activations left, there are no unbroken Iron Warrior formations on the Blood Angel half of the table.  The Blood Angels win on Take and Hold and They Shall Not Pass victory conditions.
BR043

Game End
BR044

Post Game Breakdown

After getting tabled by Volrath running this exact same list in our last engagement, this solid Blood Angel victory was refreshing and encouraging.  The Predator Annihilators were able to break two Iron Warrior armored formations, and probably caused Volrath to overreact in his efforts to destroy them.  For the first time I was able to destroy armor without having to assault, and it adds a tactical dimension to the army and really makes them feel competitive. I definitely think this was a step in the right direction and I am very happy with the change.

Yes, this was a resounding Blood Angel victory, however, before we start thinking that the list is too powerful now, let’s look at things a little more closely.  First, I think I played a pretty solid game, while Volrath played a real stinker.  Numerous times he retained the initiative when it wasn’t really necessary, and often to attack formations of mine that had already acted – they weren’t going anywhere.  Leaving his retinue exposed and unsupported like that in Turn 1 was a gift to me.  He forgot to bring his Terminators in at the top of Turn 2.  His target selection was not optimal throughout the course of the game.  And in the third turn, had he moved his surviving retinue into my table half or moved to contest a Take and Hold objective, he could have forced a turn 4, and hopefully some of his units could have rallied. Volrath is usually a very good player, but tonight he was off.

I also had pretty good luck this game, particularly in winning the initiative roll all three turns. That was extremely helpful in dictating the pace of the match. As of right now, I am happy with where the Blood Angel list is.  It’s my opinion that the Iron Warriors list is quite powerful (indeed, Volrath has a winning record in our league), and now I think the Blood Angel list may be able to hold its own with the toughest lists out there.  All that seems to be left now is to playtest the Sanguinary Guard, and hopefully we can make the push for final approval.

Epic League Game – Blood Angels vs. Ghazkull’s Horde Battle Report

Epic League Round 6!

As the new Blood Angel Army Champion, I thought I would playtest my new proposal – teleporting assault marines! Will I be able to demonstrate the shock and awe of the Blood Angels assault with this change?

The Blood Angel List

DEATH COMPANY [300]
Chaplain, 4 Assault Death Company Units

ASSAULT DETACHMENT [300]
6 Assault Units, Captain

ASSAULT DETACHMENT [300]
6 Assault Units, Chaplain

SPACECRAFT [200]
Strike Cruiser

TACTICAL DETACHMENT [275]
6 Tacticals

TACTICAL DETACHMENT [275]
6 Tacticals

TERMINATOR DETACHMENT [350]
4 Terminators

DEVASTATOR DETACHMENT [250]
4 Devastators

THUNDERHAWK [200]

THUNDERBOLT FIGHTERS [175]
2 Thunderbolts

THUNDERBOLT FIGHTERS [175]
2 Thunderbolts

LAND SPEEDERS [200]
5 Land Speeder

The Ork List

Big Warband with 12 Boyz, 4 Grotz, 4 Nobz, 1 Flakwagon and Warlord 385

Big Warband with 12 Boyz, 4 Grotz, 4 Nobz, 1Flakwagon  385

Fighta Sqwadron with 6 Fighta Bommerz 300

Fighta Sqwadron with 6 Fighta Bommerz 300

Big Blitz Brigade with Big Mek, 8 Gunwagonz, 1 Flakwagon 335

Big Blitz Brigade with Big Mek, 8 Gunwagonz, 2 Flakwagonz 370

Big Blitz Brigade with 8 Deth Koptas 250

Normal Kult of Speed with 9 Warbuggies 225

Landa 200

Normal Warband with 8 Boyz, 4 Grotz, 2 Nobz, in Landa 250


The start of the game. Units and objectives are marked.

011b

For their first activation, the Marines put the Thunderbolts on CAP
013b

The Ork warband doubles forward
015b

The second Thunderbolt formation goes on CAP
017b

Blitz Brigade doubles forward
018b

Landspeeders double behind cover
019b

Warbuggies double forward and grab a Blood Angel objective
022b

The Blood Angels have no more activations.  The garrisoned Ork warband advances and captures another Blood Angel objective.
024b

The Ork Fightas attempt to strafe the Landspeeders, but they are intercepted and forced to jink.  One Fighta goes down.
025b

The next Fighta Skwadron attacks the Landspeeders and are intercepted, but the Thunderbolts fail to hit.  The Fightas do not damage any Lanspeeders.
027b

A very short turn.  This is the state of things at the end of Turn 1.  The Orks are in control of two Blood Angel objectives.
029b


TURN 2

Teleport time!  Two Blood Angel Assault formations drop from high altitude onto the battlefield.  One takes a blast marker on the way in.  Terminators appear from nowhere to threaten the Blitz Brigade protecting the Ork Blitz objective.
035b

Marines win the roll to go first, and the Blood Angel captain calls a combined assault against the Big Ork Warhorde.
037b

Furious battle ensues.  The Ork Horde is nearly wiped out, but the marines take heavy casualties in return, losing seven out of twelve stands.
040b

The Ork warband breaks, as does one Blood Angel assault formation.  The remaining unbroken assault formation consolidates behind cover and controls an Ork objective.
042b

In a hot-headed move, the marines retain the initiative and assault the Ork Blitz Brigade with their Terminator formation.
044b

The Terminators break the Blitz Brigade, but it is a Pyrrhic victory.  The Terminators are wiped out.  Orks capture the Break Their Spirit Objective.
045b

Ork Fightas fly in and break the marine assault formation.
047b

The Landspeeders double to fire upon the Warbuggies holding onto the Blood Angel objective.  They only manage to kill one.
048b

The second Skwadron of Ork Fightas fails its initiative check.
049b

Thunderbolts fly in and strafe the broken warband unit, destroying it completely.  Blood Angels capture the Ork Break Their Spirit Objective.
050b

Deff Coptas double forward and destroy three Landspeeders, breaking them.
054b

The second Thunderbolt formation fails to activates and stays in the box of shame.
055b

The Ork warbuggies fail their initiative check.
057b

They elect to regroup and clear all blast markers.
059b

DROP POD ASSAULT!  The deathwind finishes off the broken Blitz Brigade.  The Space Marines capture the Ork Blitz objective.
060b

The orbital bombardment preceding the drop pod assault only manages to spook a couple of Orks.
064b

The Tactical formation camping the Ork Blitz go on overwatch.
065b

The remaining Ork Warband doubles forward and destroys the broken Landspeeder formation.
066b

The Ork Landa strafes a broken assault marine formation and destroys it.
067a

The tacticals that arrived via drop pod sustain fire on the Ork warbuggies, but only kill one.
069b

The end of Turn 2.  The Blood Angels control the Ork Blitz, while the Orks control two Blood Angel objectives claiming take and hold.  Both sides have the Break Their Spirit objective. The marines are significantly outnumbered.
072b

The broken assault formation rallies!  The marines control another Ork objective.
074b


TURN 3

But not for long!  A Fighta Skwadron flies in and crushes them.
078b

Thunderbolts go on CAP
079b

Marines retain and the other Thunderbolt formation strafes the warbuggies, breaking them and taking control of the BA objective out of Ork hands.
080b

The Ork warband goes on overwatch.
082b

Blood Angel tacticals go on overwatch and continue to camp the Ork Blitz.
083b

An Ork Blitz Brigade doubles to contest the Ork Blitz.  They eat heavy overwatch fire on the way in.  The marines kill three vehicles, just one blast marker shy of breaking the formation.  The Ork Blitz is now contested.
087b

The situation for the Space Marines is dire.  It is Turn 3, and the Orks now have Take and Hold and Break Their Spirit, while the marines only have Break Their Spirit.  In a single activation, the marines swing the momentum in the other direction.  The Thunderhawk calls a ground attack on the Blitz Brigade and breaks it, bringing control of the Ork Blitz back into Blood Angel hands.  At the same time, it disembarks a Devastator formation onto an Ork Objective.  The Blood Angles now have Blitz, Take and Hold, and Break their Spirit.
089b


An Ork Fighta Skwadron tries to destroy the Devastators, but only kill one stand.
091b

The Ork Landa declares an Air Assault.  Thunderbolts intercept but only put one damage counter on the Landa.  The Big Warband easily destroys the remaining three Devastator stands.  The Blood Angels lose Take and Hold.
093b

The end of Turn 3 and the game is tied.  The Blood Angels have the Blitz and BTS objective, the Orks have Take and Hold and BTS.  The Space Marines are hanging on by a thread, with only two Tactical formations and the Death Company on the ground.
095b

TURN 4

Tacticals march and occupy a building, capturing an Ork objective.  The Blood Angels have Take and Hold again.
097b

An Ork Warband spreads out and manages to come within control range of three objectives!  They contest the Ork objective that the Angels just captured.  Game still tied.
099b

Thunderbolts fly in and try to knock the Warband off of the objectives.  They inflict one casualty.  Not enough.
101b

Ork Fightas strafe the Tacticals camping the Blitz, killing one stand.
103b

The Death Company marches across the battlefield and contests the Blood Angel Objective.  Orks lose Take and Hold.
105b

The second Fighta Skwadron strafes the Marine Tactical formation on the Blitz, but fails to kill a stand!
107b

An Ork Warband doubles and opens fire on the Space Marine Tactical formation contesting the Ork objective, and kills one stand.
112b

The second Thunderbolt squadron strafes the Ork Warband, nearly knocking them off the objective.  One stand of Orks (arguably) remains within 15cm.
113b

The Deff Coptas fly up to contest the Blitz Objective.  They eat overwatch fire on the way in, but none of them go down!  The Ork Blitz is contested.  Both the Marines and the Orks only have BTS at this point.  The game is tied.
118b

The Thunderhawk comes in and strafes the warband, killing many stands.  The Warband is now definitively knocked off of the Objective.
120b

The Ork Landa swoops in to contest the Objective.
121b

The End of Turn 4.  The game is a tie.  The Blood Angels and the Orks only have the Break Their Spirit objective.  Victory Points are added up, and the Orks win with 1400 VP to the Blood Angels 1150 VP.
123b

O rk Victory.

Post Game Wrap Up

What a great game.  Back and forth, back and forth.  Absolutely grueling, however.  By turn 4, neither of us were thinking straight.  The back and forth over that one Ork objective late in Turn 4 was probably moot at that point.  It had been a long battle.

First and foremost, I think the teleporting assault marines made a GREAT addition to the list. It wasn’t so much that they were effective, but they were fun and thematic.  Blood Angels are all about the shock and awe blitzkrieg assault, and nothing says in your face like a bunch of frothing assault marines dropping in on your backline.

From a list balance standpoint, neither I nor my opponent found the capability imbalancing.  In fact, one of my major complaints about the Blood Angel list has been that it is nearly impossible to capture the BTS objective with our lack of tools.  However, as you can see from this battle report, teleporting the assault marines in and calling a combined assault is what enabled me to break the Ork BTS and ultimately destroy it.

I still felt as though I was playing Epic on Hard Mode with the Blood Angel list, but, being able to capture the BTS objective kept me in the fight long enough to have a fighting chance.  I still think the list needs work, but this is a fun, exciting, and balancing step in the right direction.

Thunderbolts are a unit I normally will add as an afterthought, but, I really liked the flexibility that having two formations offered me.  It can be tough to cover the entire table with Blood Angels, however, with the Thunderbolts, you can reach out and hurt someone anywhere on the board.  However, are those 350 points better spent on boots on the ground?  Maybe.  Especially considering I had precious few units capable of grabbing objectives.  Will have to give this some thought.

The Ork player really played a masterpiece of a game.  Feinting, grabbing objectives, attacking the right units.  He had some bad luck on a couple of key rolls in the game, specifically when he sent so many Fightas at my tactical squad camping the Blitz and only killed one stand.  With all of the firepower he sent at that unit, under normal luck conditions, I think it would have been broken.

Great game, lots of fun, and lots of great material for list development!